# Operations - During Class
# Blocksi - Classroom Management Basics
[](https://info.wftigers.org/uploads/images/gallery/2026-10/FhhbupJT7x2HvXSu-5680f1c0f6570a6bcdf5aafcdfe3d4d8276aeb9d.png)
West Fork Schools now uses Blocksi as a classroom management and student internet filtering platform!
Blocksi has TONS of features, so this Tech Tip will be the intro and the “getting started” of it all. Expect more information in the coming weeks!
# Logging In
Click for login instructions
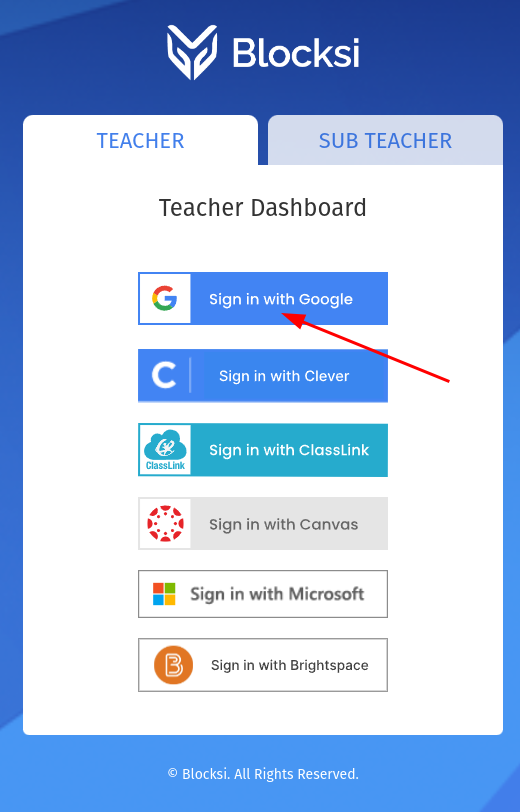
1. To begin, visit [https://teacher.blocksi.net](https://teacher.blocksi.net). This will give you several buttons to choose from.
We want to use the “Sign in with Google” button. *Reach out if you have any issues with the Google button.*
[](https://info.wftigers.org/uploads/images/gallery/2026-10/H1SfNxjnZe9EK4YB-c86935717227ea8184640694ffcee1c950cdfcba.png)
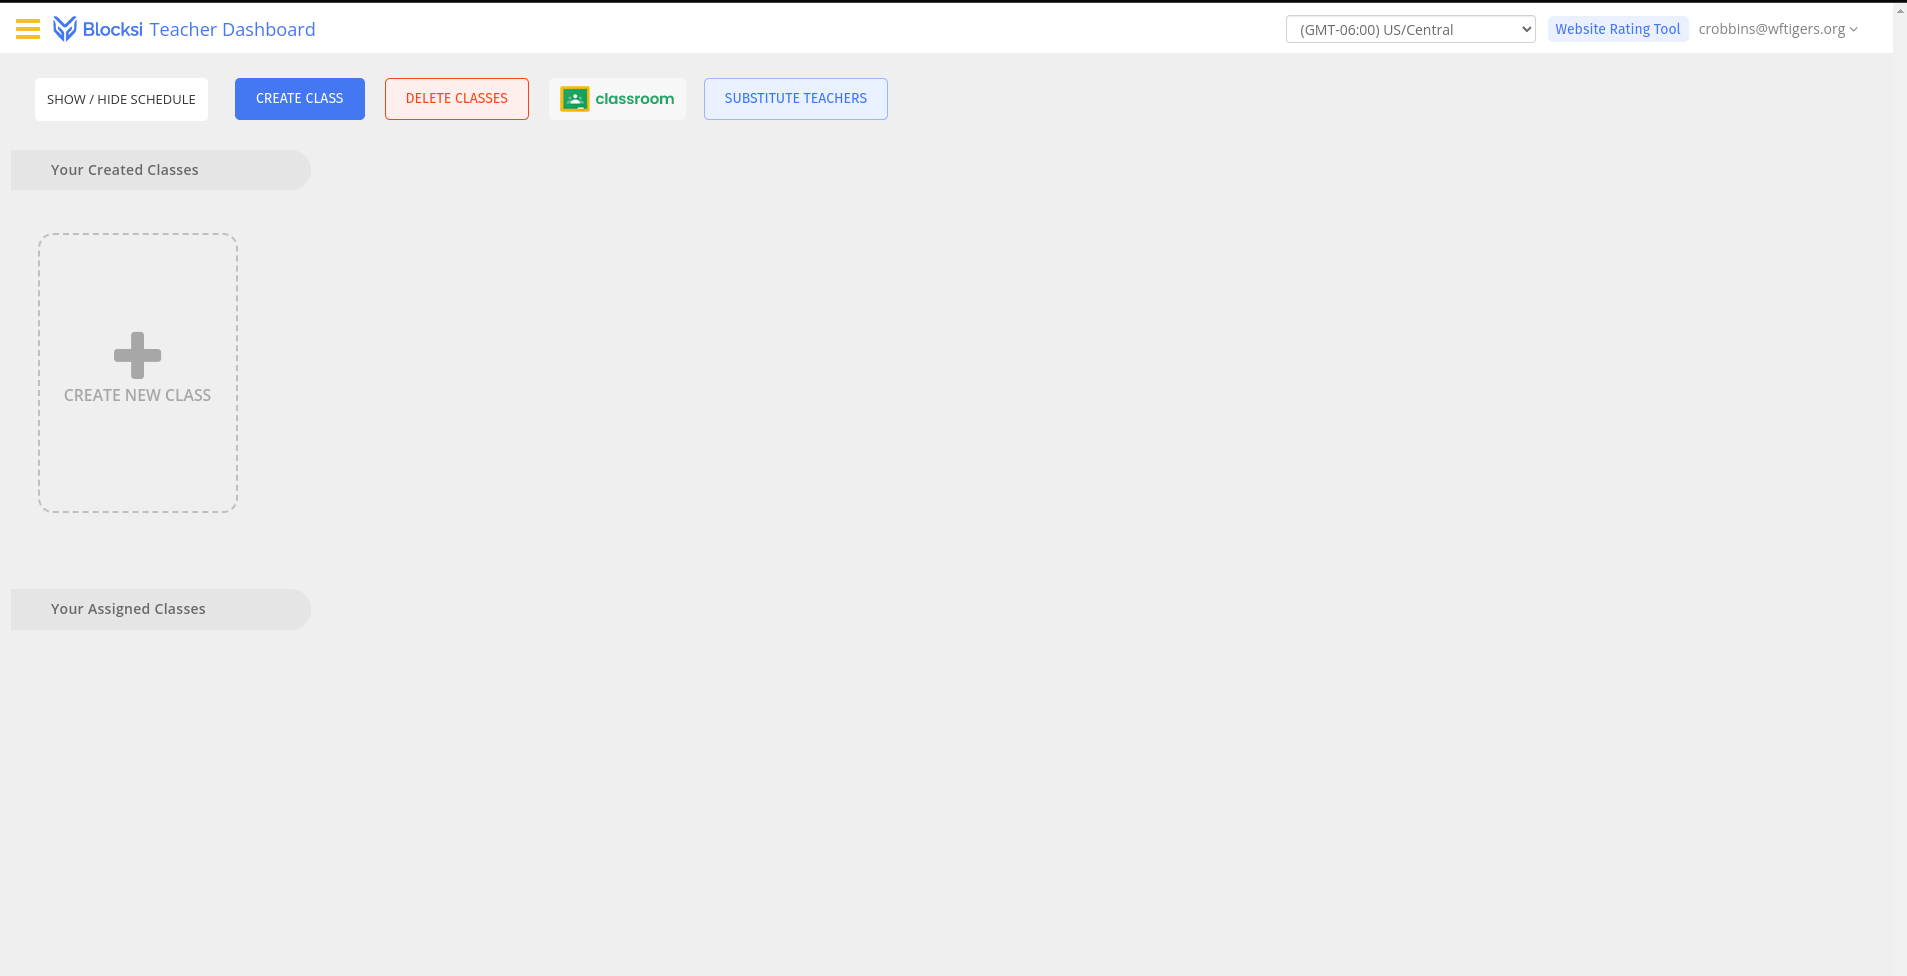
2. This should take you to the Blocksi Teacher Dashboard
[](https://info.wftigers.org/uploads/images/gallery/2026-10/bhsOxnmT913GqhiY-f1e63d393194c66cdb5d0d036d1907b14dfb0c7f.png)
Click for the overview
[](https://info.wftigers.org/uploads/images/gallery/2026-10/S6OWRqMX8t2I6U2F-d942c1ecb67aa70bae05dfec518be5a0c056191e.png)
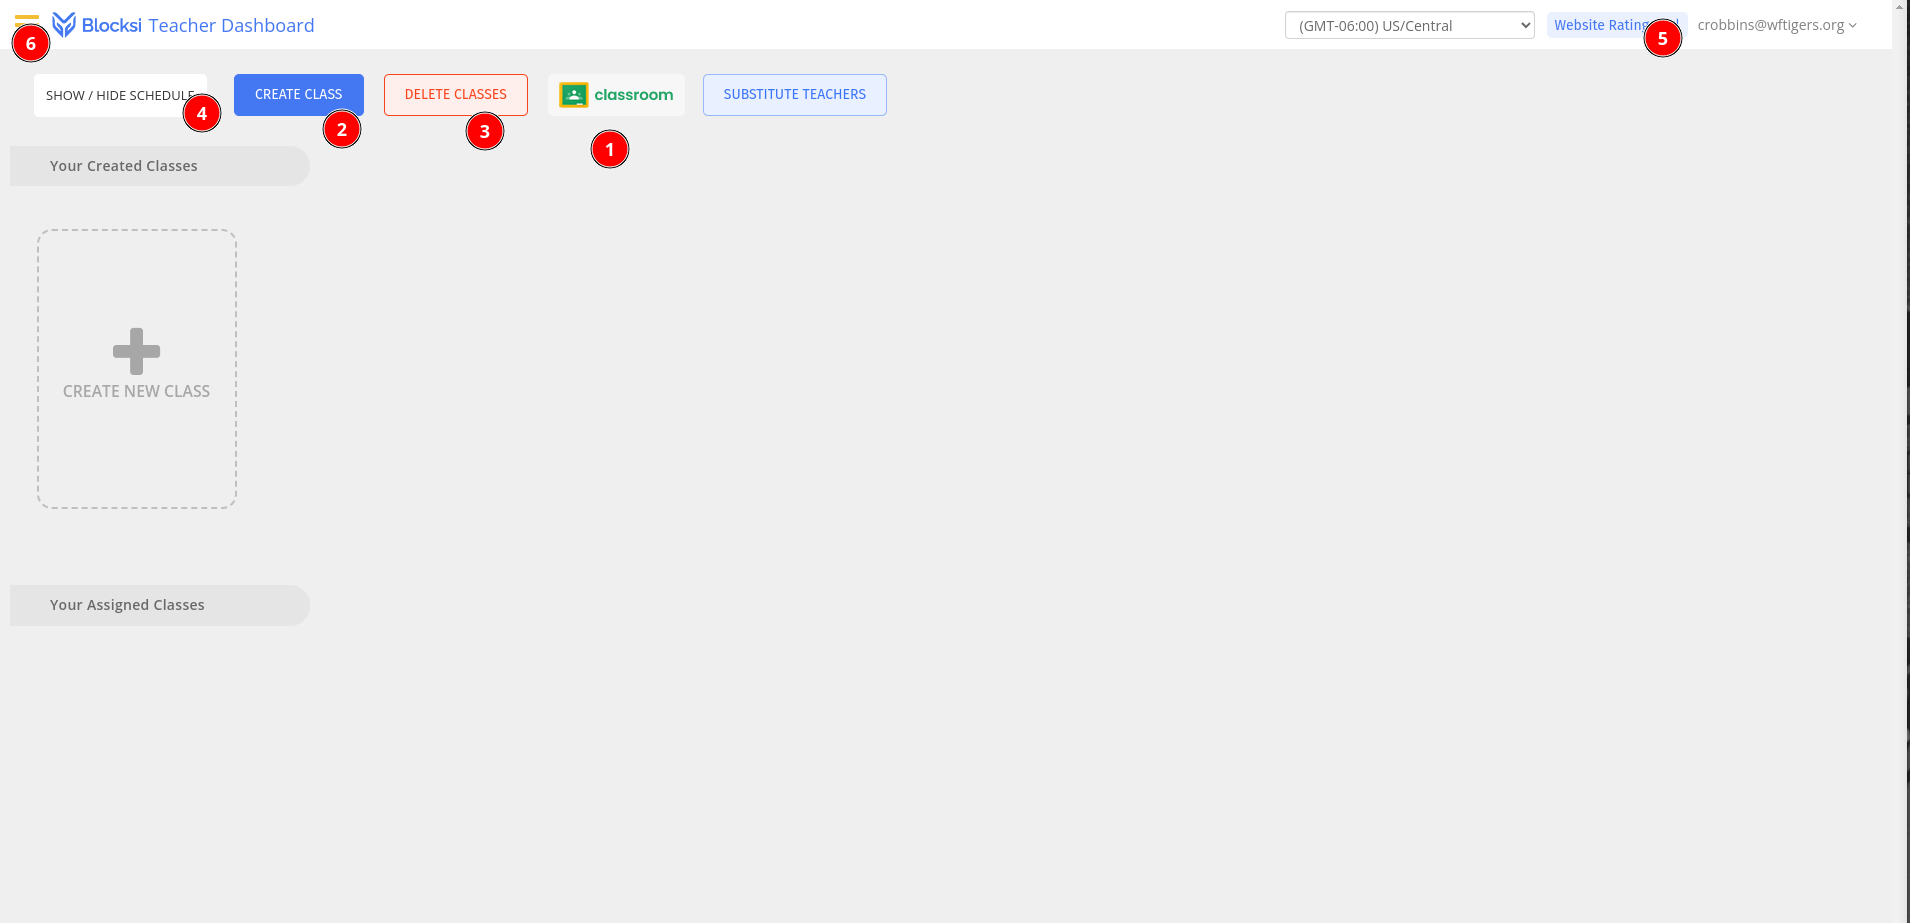
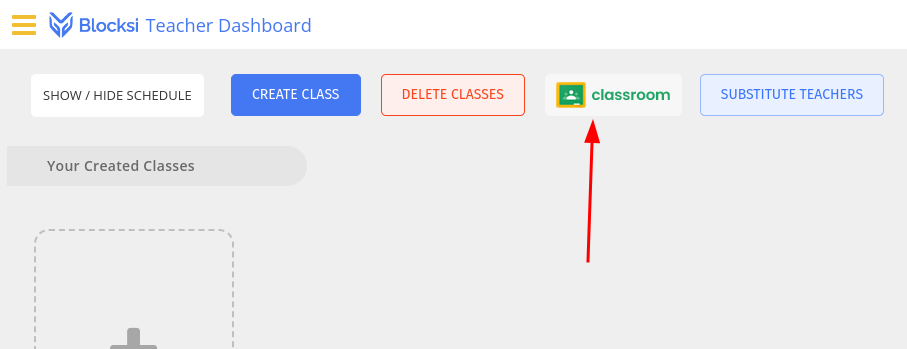
1. This button allows you to import your Google Classroom classes and rosters. Even if you don’t use Google Classroom, you will want to accept your class, and use it just for the purpose of rostering.
2. The “Create Class” button lets you manually create a class. We will use this later on to have a dedicated class for grading.
3. The “Delete Class” button will allow you to delete classes you imported from Google Classroom or manually created.
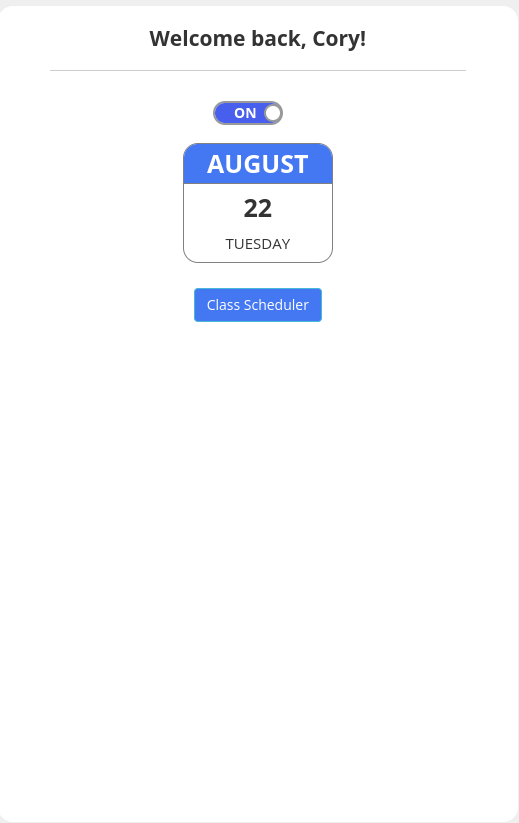
4. The “Show/Hide Schedule” button will show this nifty screen, which we will discuss a bit later.
[](https://info.wftigers.org/uploads/images/gallery/2026-10/WPe6a6ZrRs7ccACW-fa3b0f4bf4cd8a8d2dfe6b2b9b3308818ddc1af7.png)
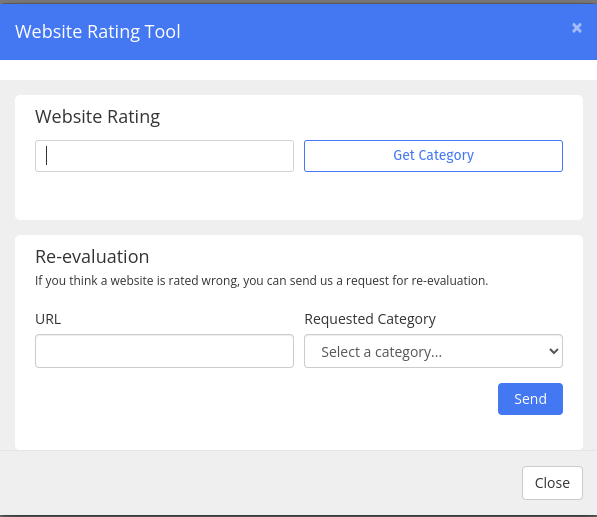
5. The “Website Rating Tool” is for testing to see if a website is categorized in a blocked area.
[](https://info.wftigers.org/uploads/images/gallery/2026-10/ZDW0CDYEKkKikDDn-ea61821064ede420a9d0d23c10589e123735d1df.png)
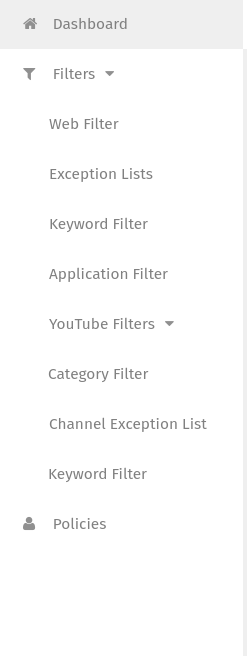
6. The hamburger menu opens up options for viewing and modifying filters for your class. Again, more info later on!
[](https://info.wftigers.org/uploads/images/gallery/2026-10/D6g0d8RZHKb0AOsp-9edc9da369d8618da5d56334e5ef5ac9b39dc274.png)
Click to view the instructions
1. Click on the Google Classroom button
[](https://info.wftigers.org/uploads/images/gallery/2026-10/52IOoy4phSIUQ8A4-aea31ac5c666990d9c23ace3908650ed7644e088.png)
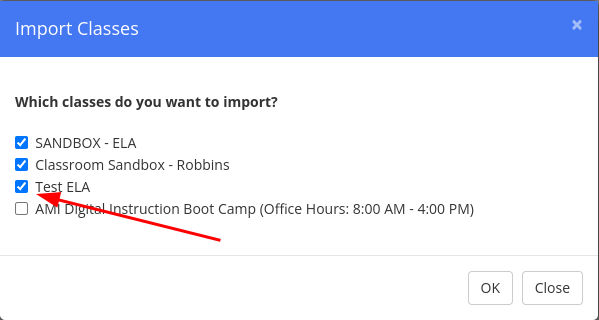
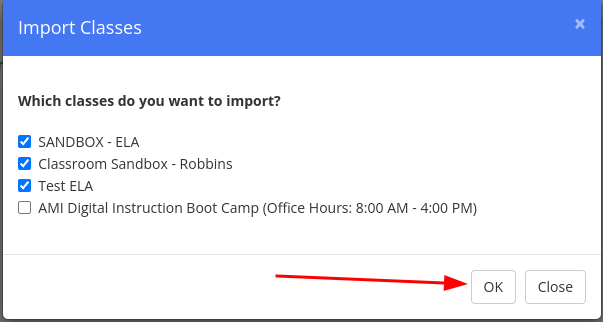
2. Check the boxes next to the Google Classrooms you wish to add. You can ONLY select courses you accepted.
[](https://info.wftigers.org/uploads/images/gallery/2026-10/fhltPL0g3gWKXOIl-5feba4ea7075d8835b8d44a8d6d3468cdf1308a5.png)
3. Click on OK to submit your selections.
[](https://info.wftigers.org/uploads/images/gallery/2026-10/K9AnmSLanC41kXoZ-31013b33f1b24839b1dcf883a7b2cc3260795e88.png)
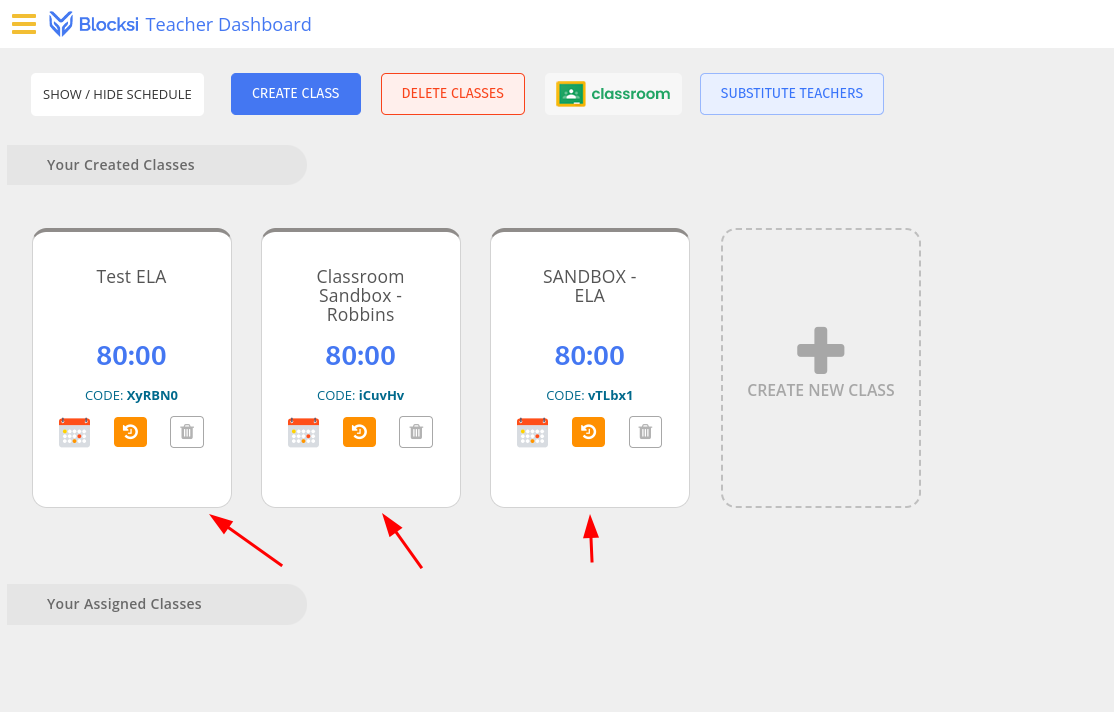
4. You should now see those courses listed under “Your Created Classes.”
[](https://info.wftigers.org/uploads/images/gallery/2026-10/PKZiVdDCvTlCugEJ-a2ef8f9d8fbe4a555b8dd9f12f212dc9c6d47772.png)
Click to learn about class tiles
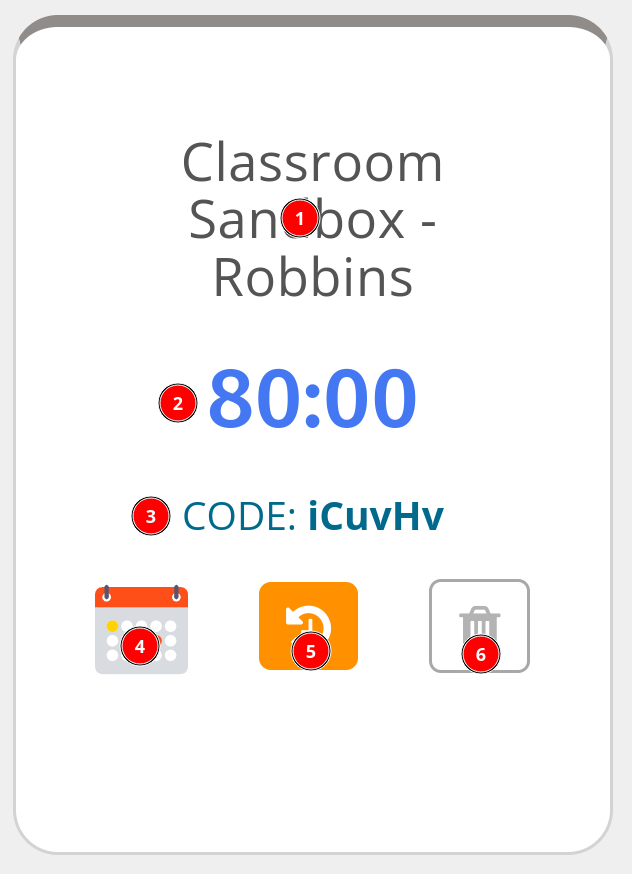
Class tiles are the quickest way to get to several settings and the fastest way to view some pieces of information.
[](https://info.wftigers.org/uploads/images/gallery/2026-10/g85m3hPWVgqGc02l-6da6a98224b3b3cb70a074fa4646cd82a67f29b2.png)
1. The name of the class, and the part of the tile to click to open your class.
2. The amount of time that the class is supposed to last. This defaults to 80 minutes, but we will provide instructions on how to change it.
3. This is the class invitation code, which you will probably never need.
4. This will let you set and view the class schedule.
5. This will let you see the history of class sessions.
6. This will let you delete your class. If you accidentally delete it, you can always just re-import it from Google Classroom.
How to Open the Class
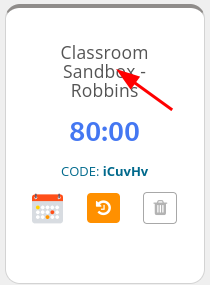
Start by opening a class. To do so, click on the class name.
[](https://info.wftigers.org/uploads/images/gallery/2026-10/oV9EIDukF4R900YO-8292b391f369f95e7550e0a19e0f1195dbbc7f5e.png)
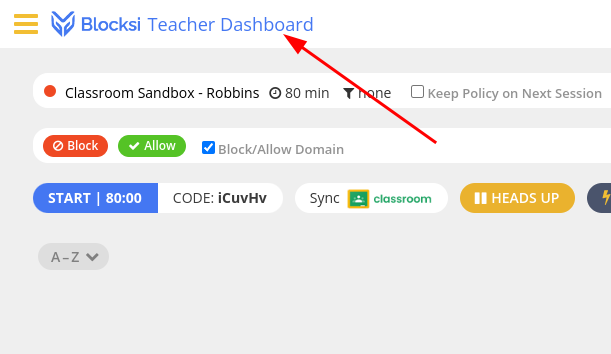
Return to the Dashboard (list of classes)
To return to the dashboard (list of classes), click “Blocksi Teacher Dashboard.”
[](https://info.wftigers.org/uploads/images/gallery/2026-10/PUCuSGkgrYb8FWte-37447fdb6924b0df9e2f7533c719629bb682e4c2.png)
Edit the Class Length
We need to be sure the class length is set correctly. That way we don’t accidentally block students in other classes.
[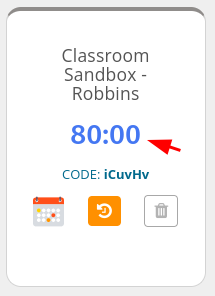](https://info.wftigers.org/uploads/images/gallery/2026-10/FkQczA3TIpt6YgFj-654b4260fef19bc8a22f86f4cfaa5924dbed735b.png)
If the time listed in the area where the arrow is pointing is NOT correct, we need to adjust it.
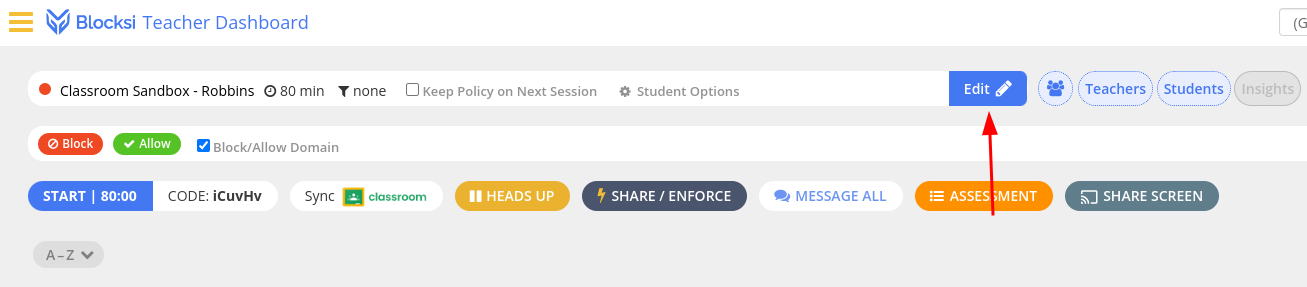
1. Open the class.
2. Click the “Edit” button.
[](https://info.wftigers.org/uploads/images/gallery/2026-10/j2c9bph0gx0qtNe5-bbecc810dadf3c9afa56fd8d69da5407a76d585d.png)
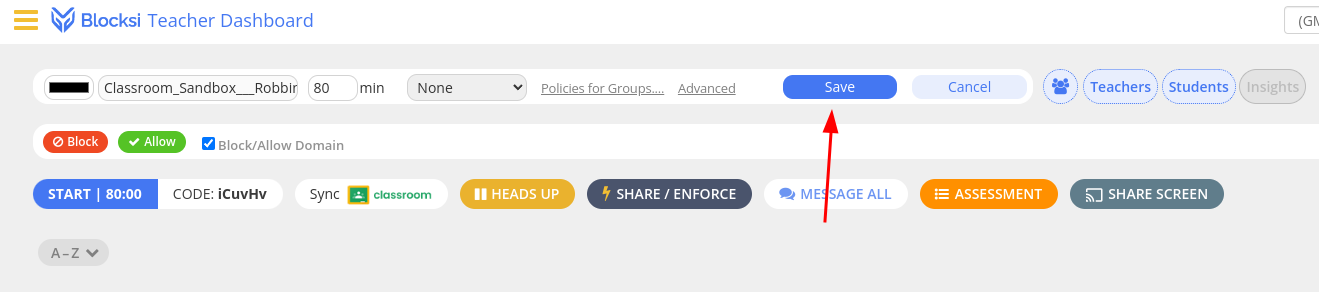
3. Edit the number of minutes to reflect the correct class length.
[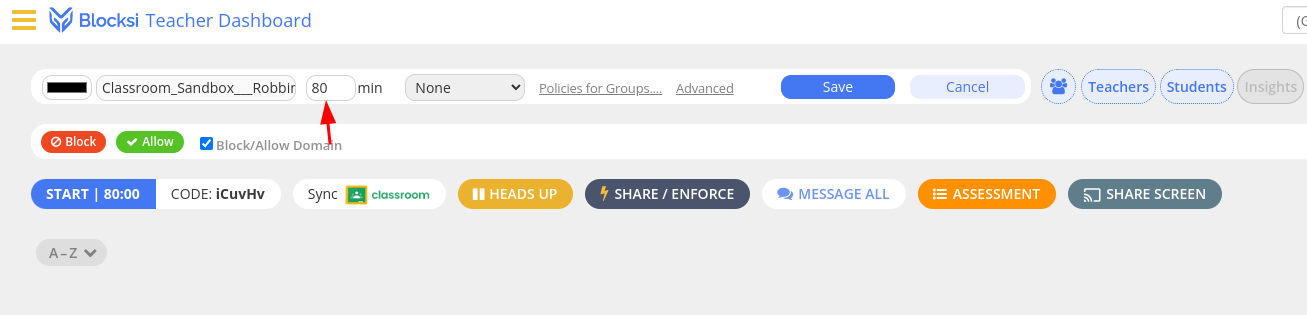](https://info.wftigers.org/uploads/images/gallery/2026-10/a45zhCZ3LqEQBjuo-e02d2d36a9909c3e809470a3a0bc1ea70ef8056f.png)
4. Click the “Save” Button.
[](https://info.wftigers.org/uploads/images/gallery/2026-10/sI9sOAziVSmo3KHo-6ef1d648c967e0f2c42d38f6099133d8821437a5.png)
Choose the Default Filter
The filter determines what websites students can and cannot access. You will have the choice of which of our filters you wish to apply to your class.
1. Open the class.
2. Click the “Edit” button.
[](https://info.wftigers.org/uploads/images/gallery/2026-10/f8JPX6QMMjlkcfLT-bbecc810dadf3c9afa56fd8d69da5407a76d585d.png)
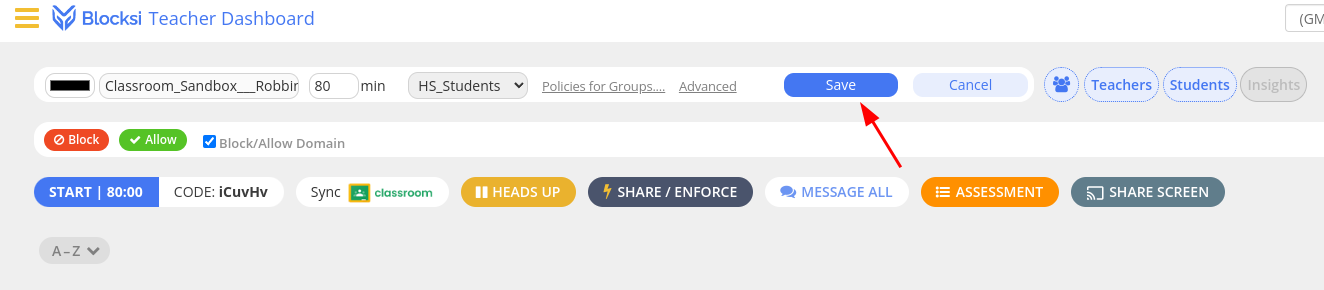
3. Click the dropdown to the right of the class time, and choose which filter to apply.
[](https://info.wftigers.org/uploads/images/gallery/2026-10/F1f35fp1138xnNsa-23e12f2a16c75de6e815f99c8c0549d5d57e4835.png)
4. Click the “Save” button.
[](https://info.wftigers.org/uploads/images/gallery/2026-10/cXBx7vdFGGhIV72U-e0e2c8a350a1bccd33dc08e46f7a7fb05d66c6be.png)
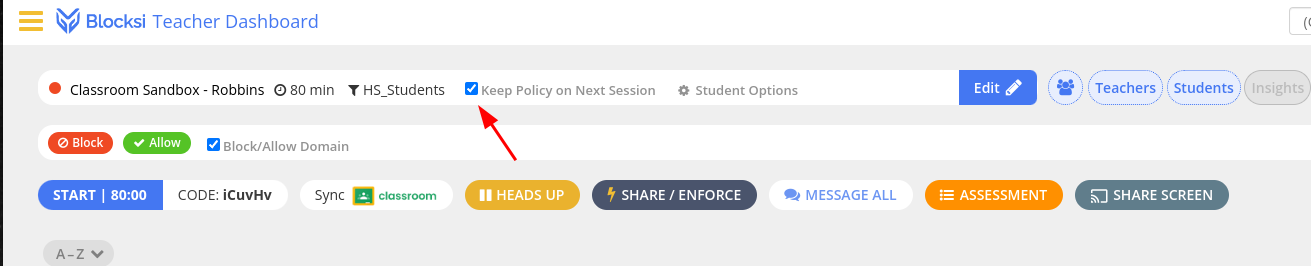
5. Check the “Keep Policy on Next Session” box to make sure this setting will continue to be applied each day.
[](https://info.wftigers.org/uploads/images/gallery/2026-10/G2MhxwU4OgVGrtOJ-76112d85a755dcb208b60723bea86a06d858a6f8.png)
Starting a Class
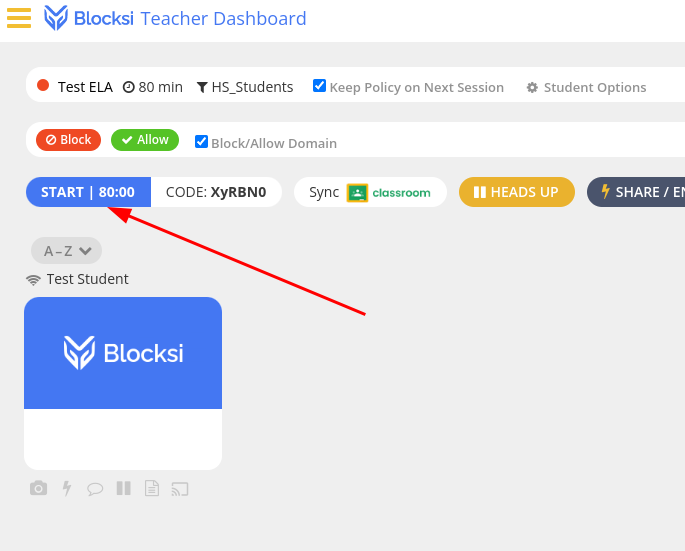
Before you can actually view a student’s screen or manage any of their internet options, you must first start the class.
1. From inside the class, press the “START” button.
[](https://info.wftigers.org/uploads/images/gallery/2026-10/ICmqeLm5HNqugqwi-65db6704e61a4471a927977c7767192d7be23e02.png)
This will begin counting down the number of minutes until the class automatically ends and students are automatically released.
Stopping a Class
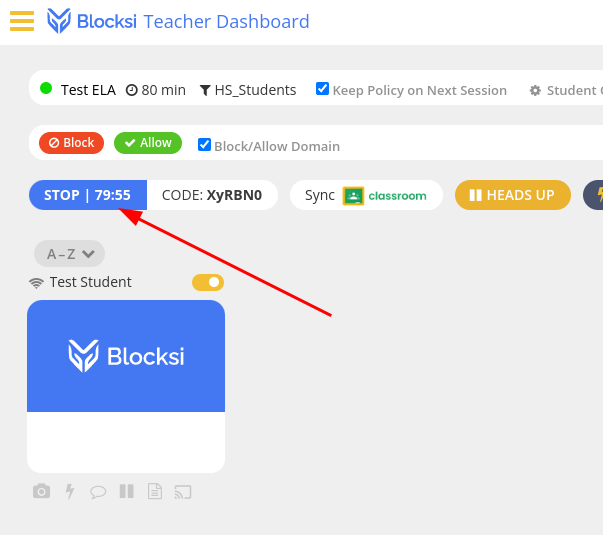
It is important to stop your classes if they end before the timer runs out.
1. From within the class, click the “STOP” button.
[](https://info.wftigers.org/uploads/images/gallery/2026-10/xthLJrJ8evp1cca2-957e81de459700243c0218bbc34f1afb188e316c.png)
Sync with Google Classroom
If you notice your Blocksi student list is not matching the students on your roster. You can pull those students in from your Google Classroom. Please understand that this ONLY works if schedules have been correct in eSchool/TAC for a day before you try to sync.
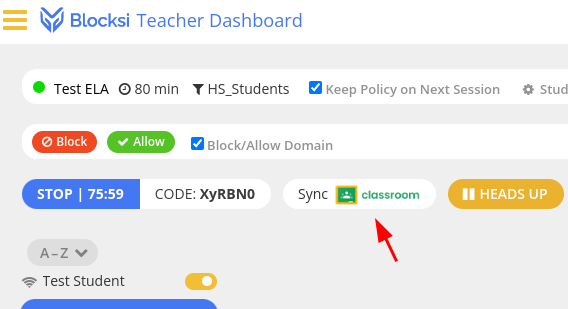
1. Click on the “Sync classroom” button.
[](https://info.wftigers.org/uploads/images/gallery/2026-10/rsBu3hHKzXCk6QTa-a5b0c4360f0d046df7a3f259e8638cfe232bd476.png)
It is also important to note that you will NOT see this button if you clicked the log in with Clever button.
Heads Up - Lock Screens
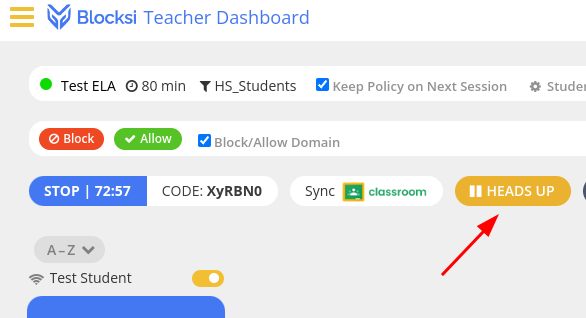
You can lock the screens of students with a “heads up” screen. This will prevent the students from using their device in any way during the duration of time that you set.
1 . Click on the “HEADS UP” button
[](https://info.wftigers.org/uploads/images/gallery/2026-10/T66yCNBuccl8e5WZ-7a6738a502e713714891d18a6c72fb1481473e8b.png)
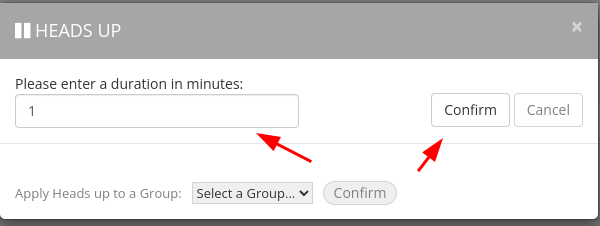
2. Type in the number of minutes you wish to lock the machines, and then click “Confirm.”
[](https://info.wftigers.org/uploads/images/gallery/2026-10/RFGXJBNe6vIH8nLH-d4be18e48a63b4086c201bf08b4e5b09bb32ce2a.png)
Share/Enforce a specific website or set of sites to be opened
When sharing or enforcing, you will push a website or set of websites to student devices. They will not be able to close these pages, but they will be able to open others and to have these pages in the background.
1. Click on the “SHARE/ENFORCE” button.
[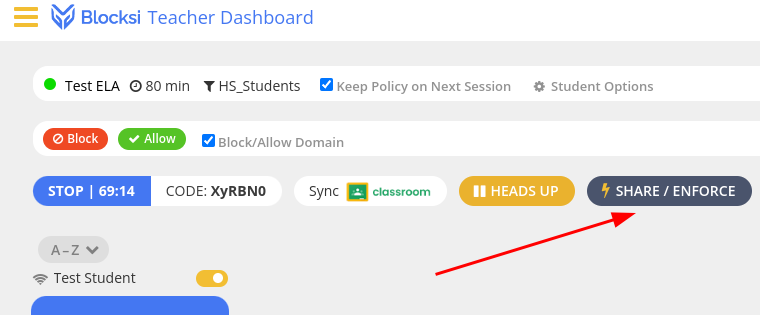](https://info.wftigers.org/uploads/images/gallery/2026-10/efrAy05kIMIHG1OC-1db6d75099d4b1a7229a4bbe967ba41c6e795c0f.png)
2. Type in (or paste in) the address you want kids to go to.
[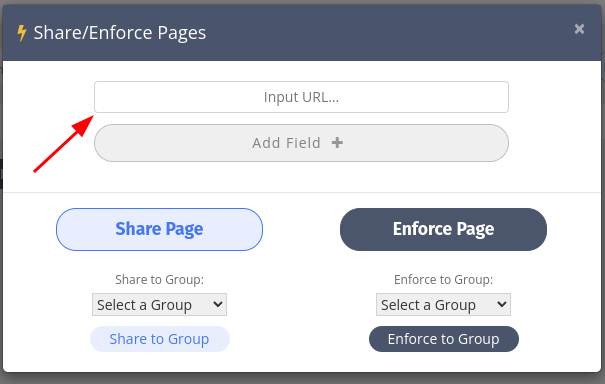](https://info.wftigers.org/uploads/images/gallery/2026-10/CnPVyMWqXF64qDRX-3e4445ae18e7205e10d55e47df43fc7b954d4d3d.png)
3. Click on the “Add Field +” button IF you want to add another website. You may add as many as you like.
[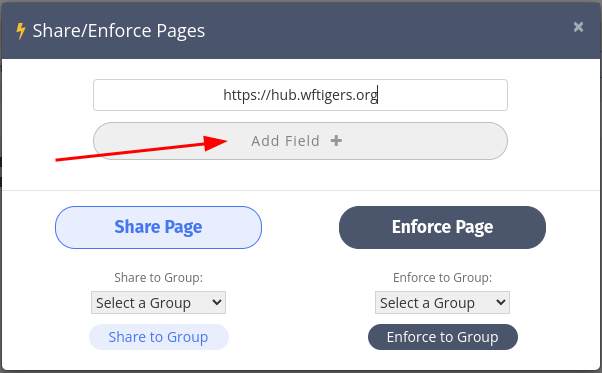](https://info.wftigers.org/uploads/images/gallery/2026-10/6CRy2O0JolZ6hRzm-9d7a2cb63ec5129b0590a466dd1e206323c17210.png)
[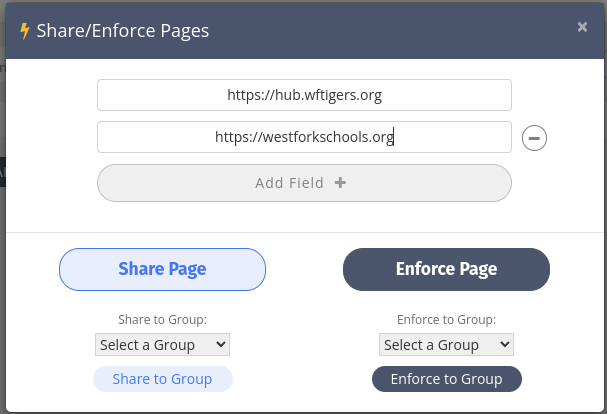](https://info.wftigers.org/uploads/images/gallery/2026-10/8hcdTDFCEwsKP4Q2-ec5ca2ed81da30771cc7276cb984bd10af3d8d74.png)
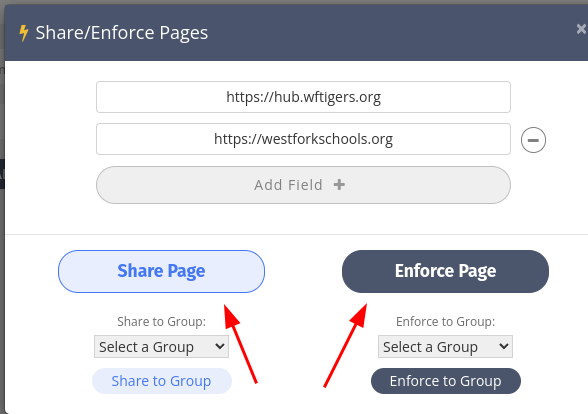
4. Click either “Share Page” or “Enforce Page.” If you choose share, students will be able to close the pages. If you click “Enforce,” the pages will keep opening when students try to close them.
[](https://info.wftigers.org/uploads/images/gallery/2026-10/otlPceUrzGVZLZ1o-e6008fe9d22a2a26e9bd4b8a8546982046b572ac.png)
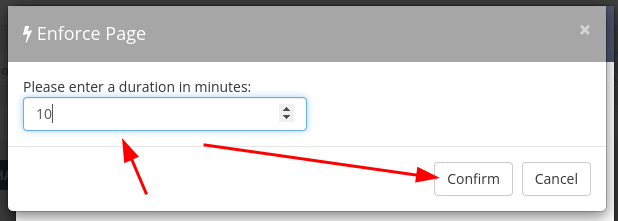
5. If you choose “Enforce,” you will be asked for how long you want these pages to remain open. Enter the number of minutes, and then click on confirm.
[](https://info.wftigers.org/uploads/images/gallery/2026-10/baoO5tMJfDWx8T5R-8d5726f109c9967d1810aeb013864a470d9eda08.png)
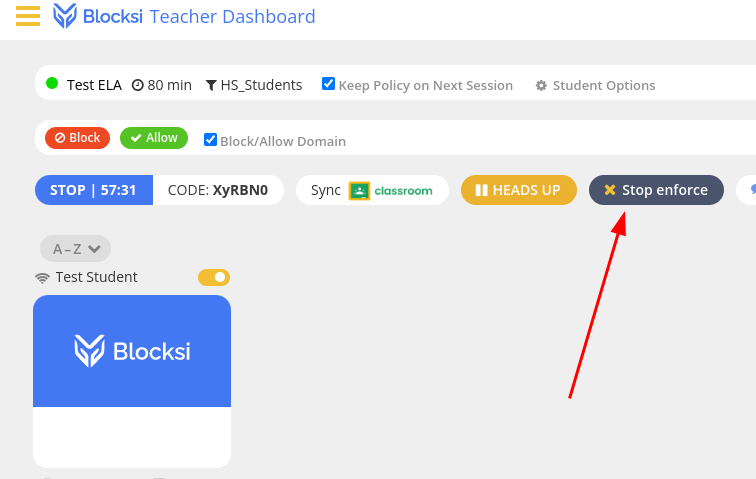
6. If you overestimate the amount of time you wanted the enforce to be in place, you can cancel it by clicking the “Stop enforce” button that replaced the “SHARE/ENFORCE” button.
[](https://info.wftigers.org/uploads/images/gallery/2026-10/f98nuWkW5qOwIXg0-799f9aa50a3535b63eae86165b156e1fa1497237.png)
Message All Students
Sometimes it might be helpful to send reminders for students to get back on task without verbally stepping in. Maybe this would be helpful if there is a guest speaker of some sort.
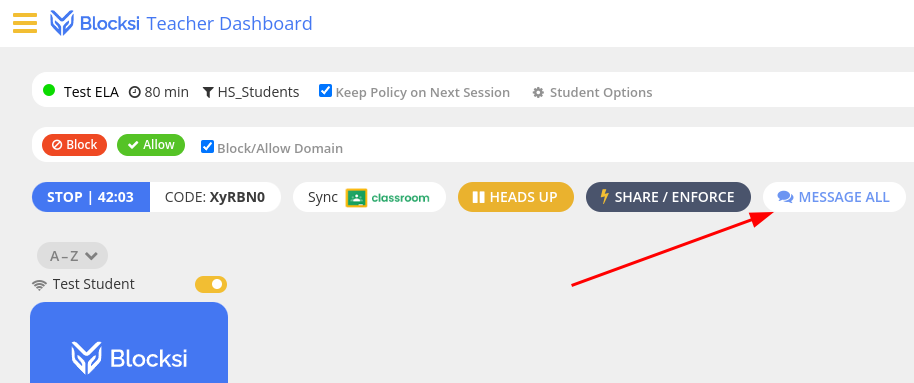
1. Click on the “MESSAGE ALL” button.
[](https://info.wftigers.org/uploads/images/gallery/2026-10/whiNfVoAIFV1EekY-04f6c29ac1f002f03a745957736f11b6693917fb.png)
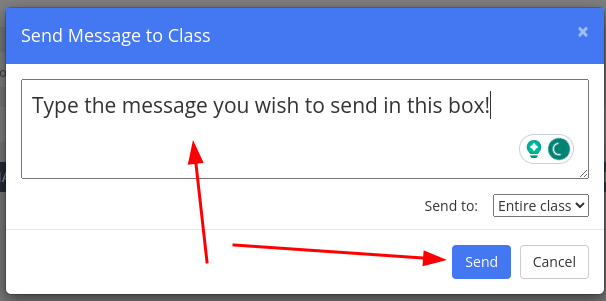
2. Enter the message you want to send, and then click the “Send” button. Students will receive this message at the top center of their computers.
[](https://info.wftigers.org/uploads/images/gallery/2026-10/L5IRfzP39IlDzSgk-bdb5377c11f62c4976608501c1410f4ad42d96fb.png)
Assessments
The assessment feature is very similar to the enforce feature, but students aren’t able to access recourses you don’t specifically allow.
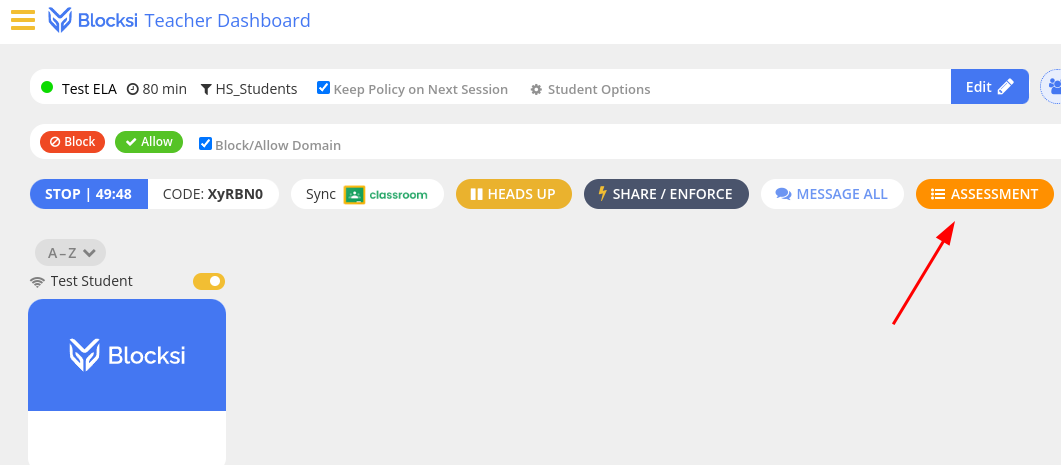
1. Click the “ASSESSMENT” button.
[](https://info.wftigers.org/uploads/images/gallery/2026-10/2PI439yVMoTNNoGC-edd17278e5dc635333583890e1ab633143f53436.png)
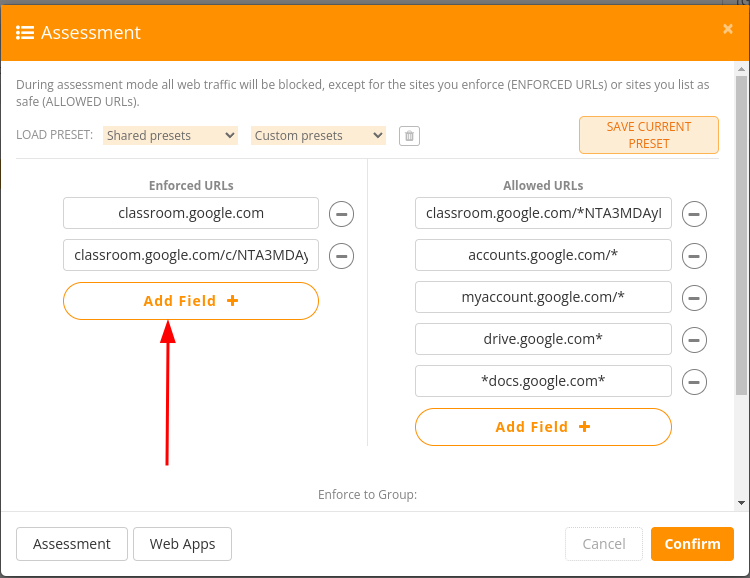
2. In the “Enforced URLs” enter the websites that you want to require to remain open for the duration of the assessment period.
[](https://info.wftigers.org/uploads/images/gallery/2026-10/CSUWciNoHieZr4AI-bc25fe0f6c91d673a759ed28938863eac5a9d062.png)
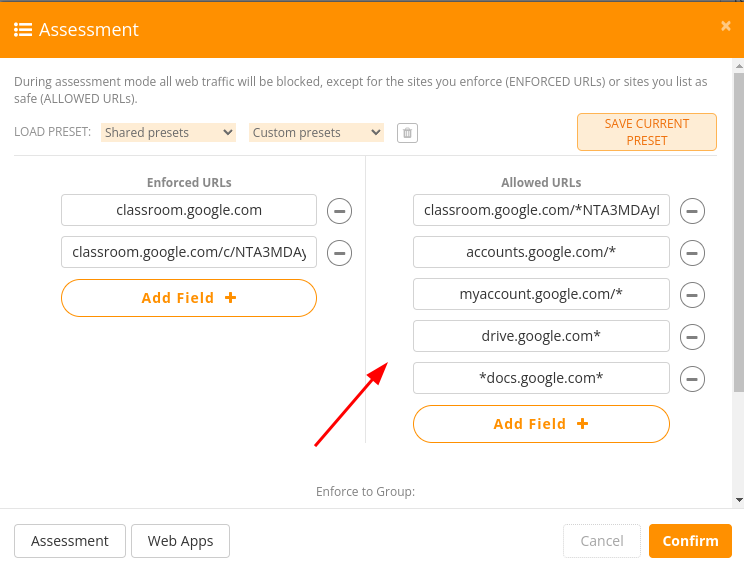
3. In the “Allwed URLs” boxes, enter the websites that you want to ALLOW students to access.
[](https://info.wftigers.org/uploads/images/gallery/2026-10/4yPJS3wKIMzCEERd-60a4e92ea5a2887b95214205531ac738a9625495.png)
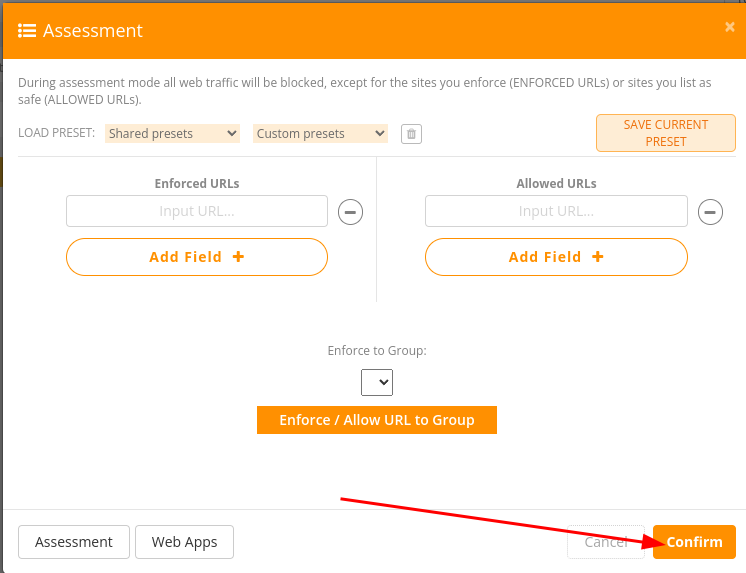
4. Press the “Confirm” button.
[](https://info.wftigers.org/uploads/images/gallery/2026-10/vPL6sTMat37RJoRe-12853296c18a60e0e4d54ebb27bd499a349a41e3.png)
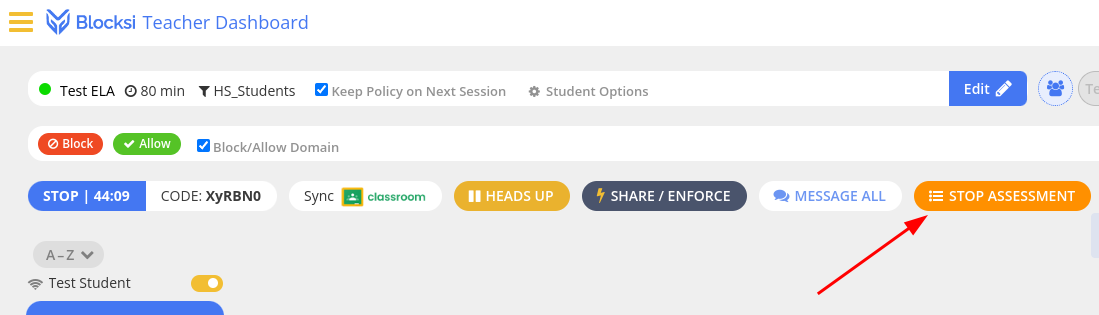
5. When you are finished with the assessment period, click the new “STOP ASSESSMENT” button.
[](https://info.wftigers.org/uploads/images/gallery/2026-10/UNAiQKm9QBWKJQVu-1da8e57b198d8a82daa6473da08c680734032190.png)
Share Your Screen
Projectors are awesome, but sometimes it is more beneficial for each student to see a copy of your screen directly on their own!
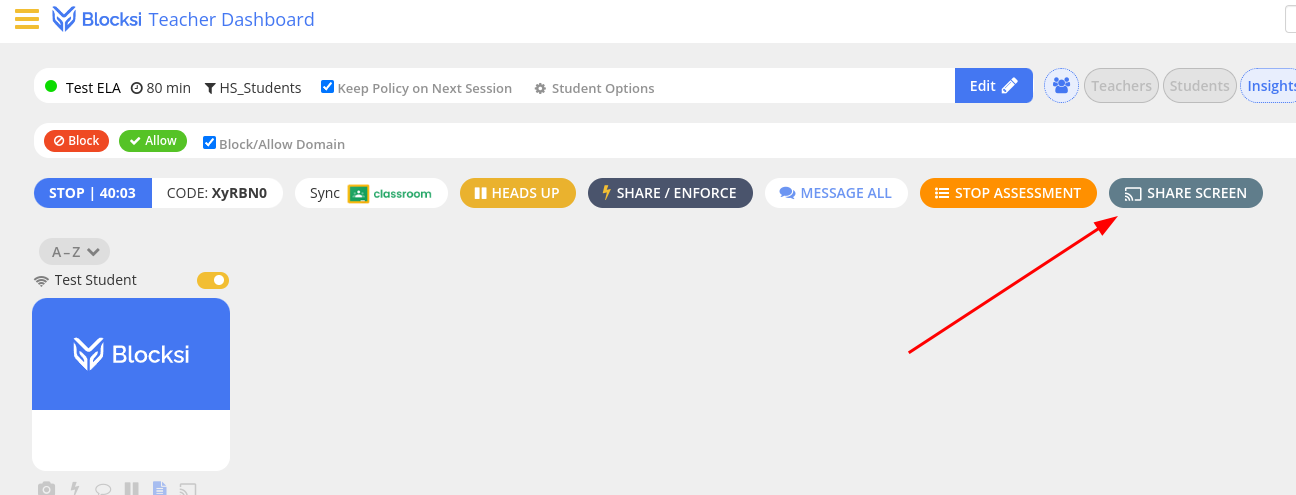
1. Click on the “SHARE SCREEN” button.
[](https://info.wftigers.org/uploads/images/gallery/2026-10/z49rgigz1c5lSF1o-e562f17513d09a1d0dc53fcde9fd00e1b3d6c409.png)
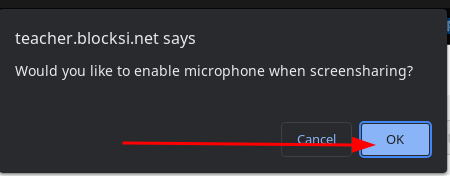
2. Click on “OK” to allow your microphone.
[](https://info.wftigers.org/uploads/images/gallery/2026-10/uIroPFXpEyFtbIzl-75fc015a807940f5bdf8358276e906b2fa6e7d8d.png)
3. This screen works like sharing your screen in a Google Meet. Choose the Chrome Tab, Window, or screen you wish to share, then click the “Share button.”
[](https://info.wftigers.org/uploads/images/gallery/2026-10/940YRvcM5yYRlKv9-d77b28b0fb19250d5d71914cde8d28c77c81f658.png)
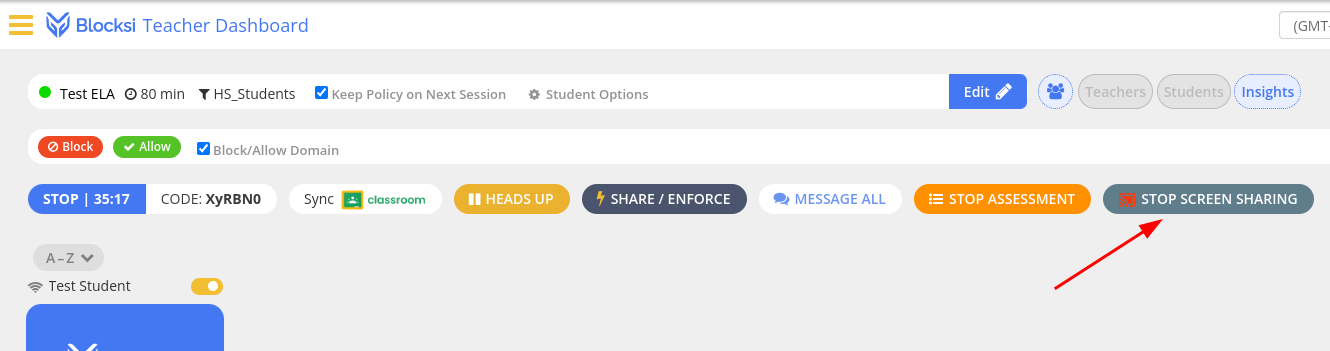
4. Once finished, click on the “STOP SCREEN SHARING” button.
[](https://info.wftigers.org/uploads/images/gallery/2026-10/MfMgJafxBQ9mtIWy-2fefbeca3e2bb4c219b7e576f1ab9f3a8b8a55db.png)
View a Student Screen
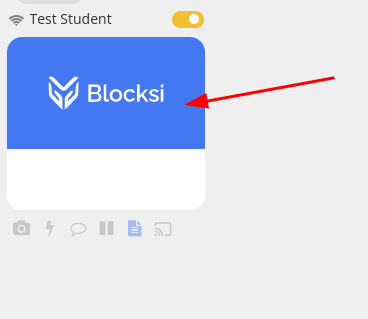
The classroom view will automatically show a preview of the Google Chrome page the student is viewing. If the student isn’t in Google Chrome, you will need to open the individual student’s tile to view what they are working on. Please note that students will be prompted to share their screens with you when you do this. If they say no, you will be denied access, and you will have to do it again.
1. Click on the student tile you want to view.
[](https://info.wftigers.org/uploads/images/gallery/2026-10/JXdLgJtaINzf4r6P-3dd47bdb3166b11afaa0326148125239abdd8323.png)
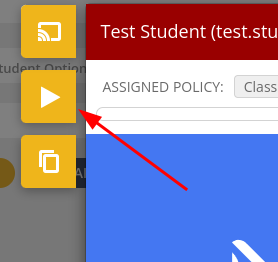
2. Click the play button on the left.
[](https://info.wftigers.org/uploads/images/gallery/2026-10/sZs54ICoOpbn7S5j-87c35ef24dcabf9bc90dacd36576ad7f5147a031.png)
3. Wait for the student to confirm.
Checking for both AI and Traditional Plagiarism
While this isn’t 100% accurate, it has worked for me more times than not.
1. Click the “Plagiarism Checker” button.
[](https://info.wftigers.org/uploads/images/gallery/2026-10/62bWnKmSMtCj9AT8-3ecfddb7a7fc8dcf37c8e2a2d9e8c1cb5482db66.png)
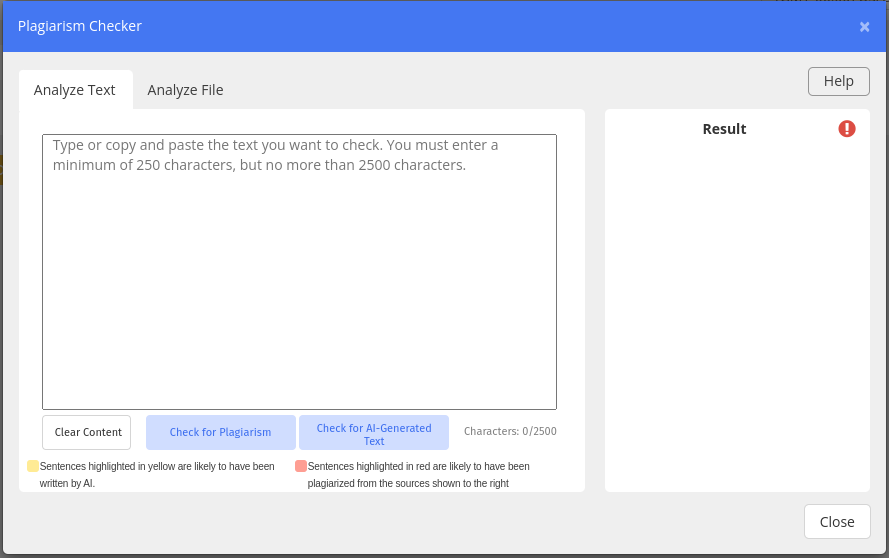
2. Choose whether you want to copy and paste text or if you want to upload a file.
[](https://info.wftigers.org/uploads/images/gallery/2026-10/BAa3ypxmCIR0C8iu-142ed0f18f20ef07e769774e9adff90b24a44a61.png)
3. Choose whether you wish to check for traditional plagiarism or if you wich to check for AI-Generated Text.
Your results will be on the right.
Originally posted by Cory Robbins on the West Fork Technology Hub (2023-08-22).
# Blocksi - Assessment Mode
The assessment piece in Blocksi is pretty powerful. It allows you to put your student computers into miniature lockdown browser modes. You get to pick which websites are open, which are closed, and you can even force some websites to stay open, even if the student tries to close the tab.
While a lot of the instructions for Blocksi have had specific parts, you really should go all the way through this one for it to make the most sense.
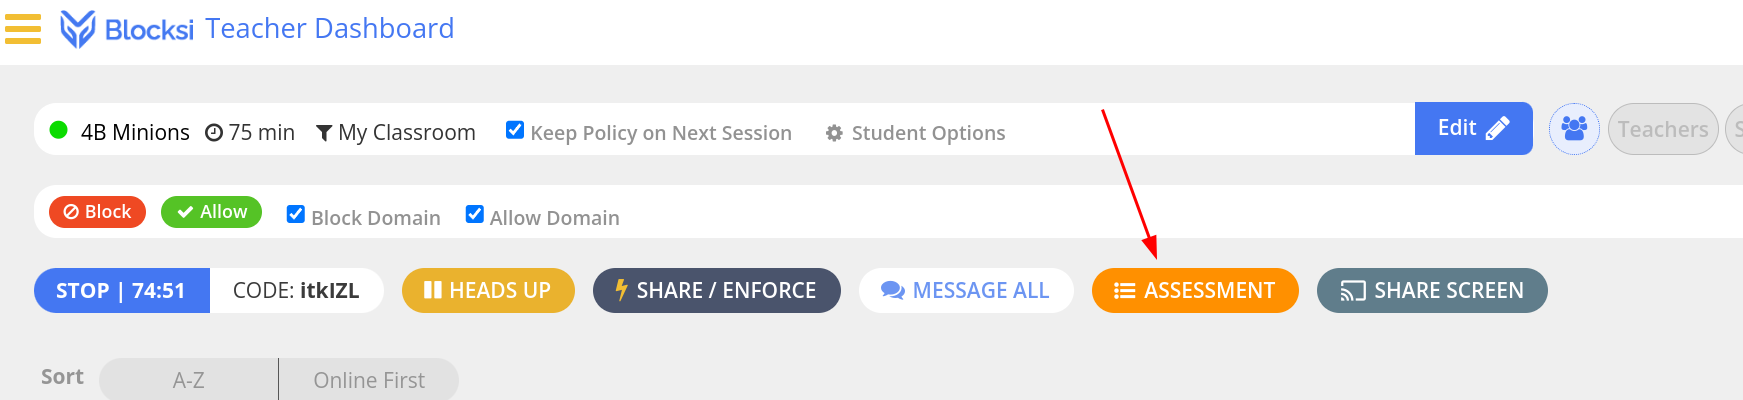
1. From within a class, click on the “ASSESSMENT” button.
[](https://info.wftigers.org/uploads/images/gallery/2026-10/OW6dMysACbNavfDf-8bc01297c1d2accd375f8c8f4cd1e8d0b52ae737.png)
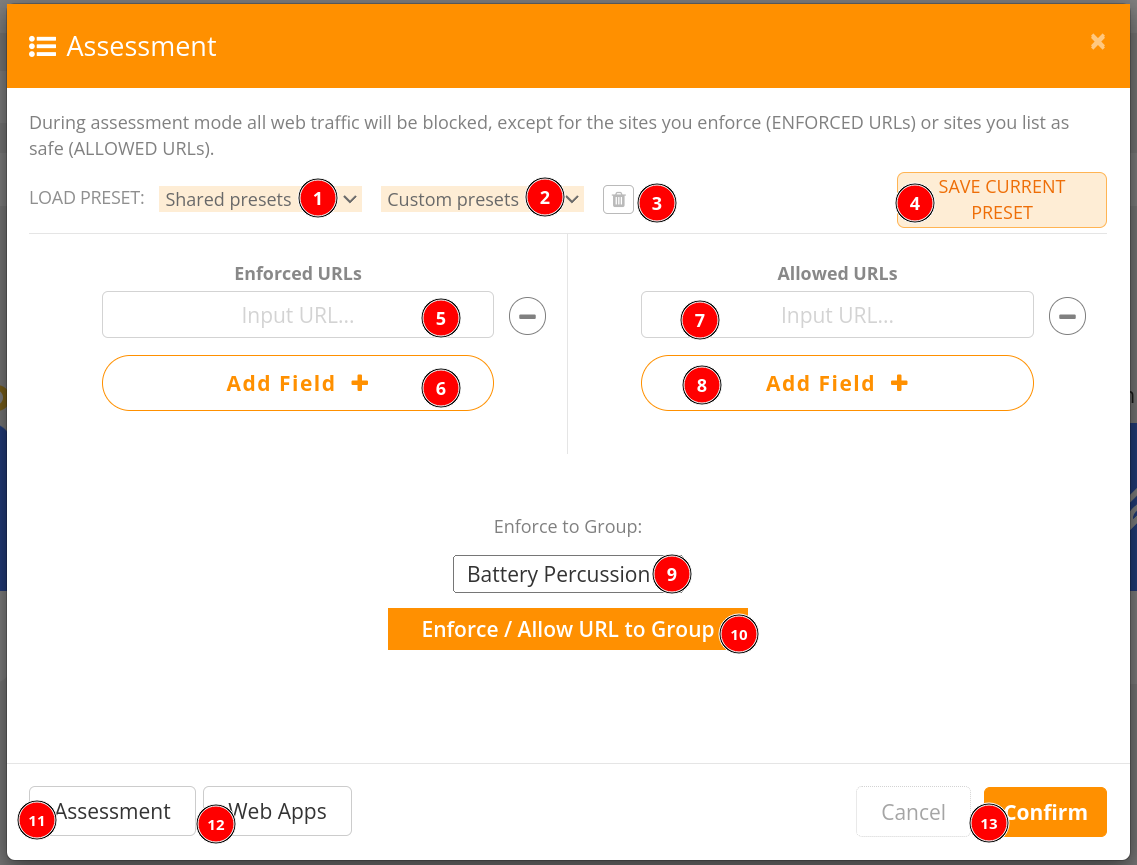
2. This is an overview of the items
[](https://info.wftigers.org/uploads/images/gallery/2026-10/TOh2OXXcUJQ0WfcU-a55e0e3e34bf7e664732ce77fc2a090f55151974.png)
2.1: Allows selecting a preset pushed by Technology (probably empty)
2.2: Allows selecting a preset you have created
2.3: Allows deleting a present you have created
2.4: Allows saving the current settings as a new custom preset
2.5: The box to enter a site you want to always be open
2.6: The button to click to add more enforced pages
2.7: The box to enter a site you want to allow access to
2.8: The button to click to add more allowed pages
2.9: The group you wish to push it to (only matters if using the next button)
2.10: The button to start the assessment for the group in the above menu item
2.11: The assessment pre-filled template library
2.12: The Web app pre-filled template library
Click for usage instructions.
## Assessment Library
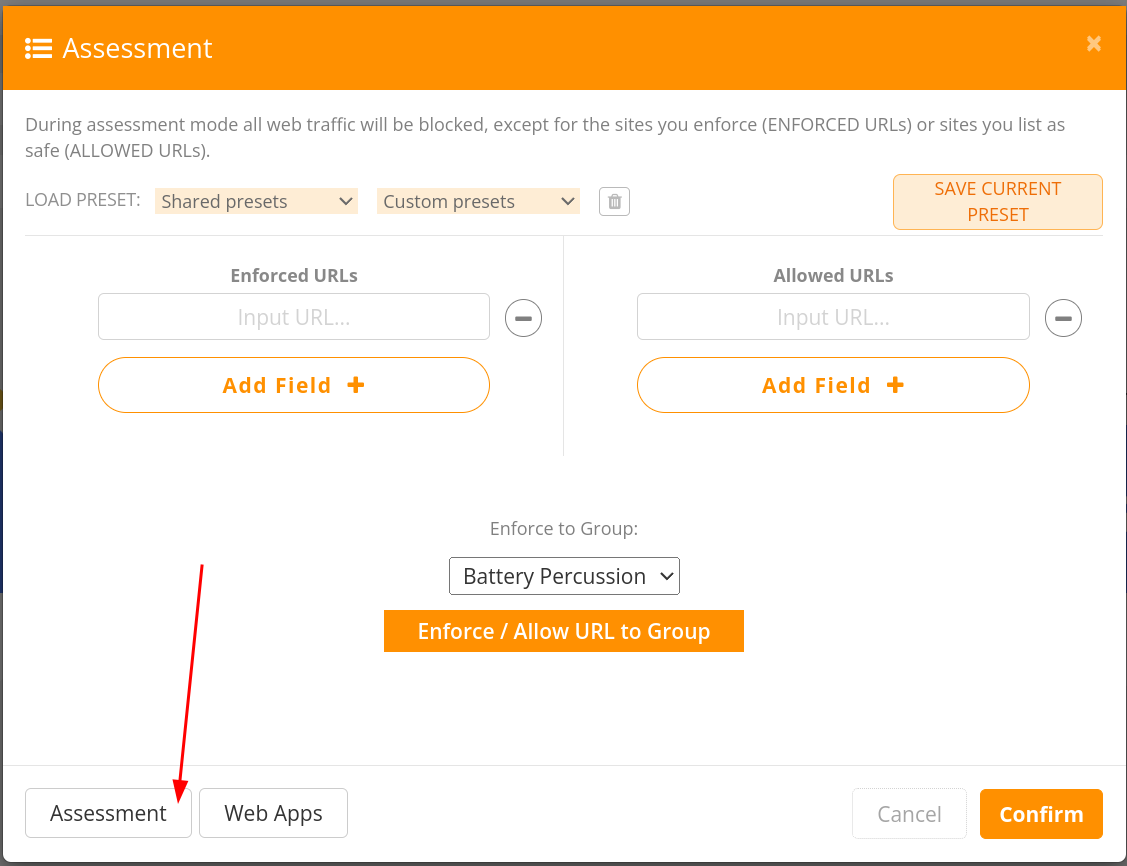
1. Let’s create an assessment using the library. Click on the “Assessment” button at the bottom.
[](https://info.wftigers.org/uploads/images/gallery/2026-10/tfpGkvavGuIhZvi8-ff5419d0e081b0134a47d5da2c0c164d62059bf0.png)
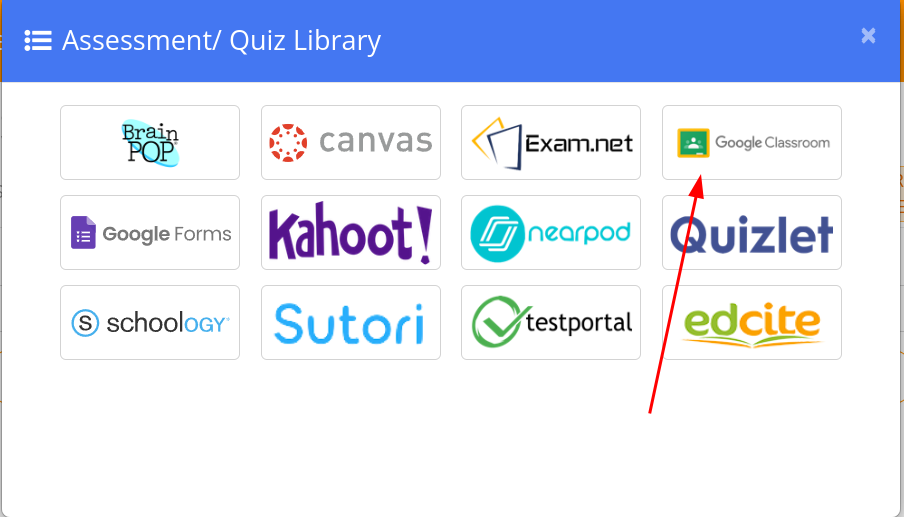
2. Choose one of the library options. This will probably be classroom or forms.
[](https://info.wftigers.org/uploads/images/gallery/2026-10/XF3wiTdzQbhqqv9I-152690bf8e2f89ea6dba6ed4f2dd391eab4f70f3.png)
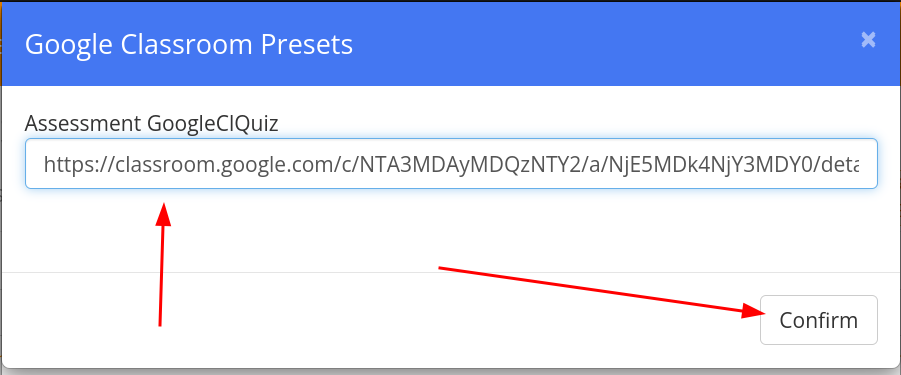
3. On the box that opens, you will need to put the link to the quiz from either classroom or forms, then click on “Confirm.”
[](https://info.wftigers.org/uploads/images/gallery/2026-10/oqA2v15S1wZoDbK7-669f3ff793caa11edb0bc39642cef83a24742847.png)
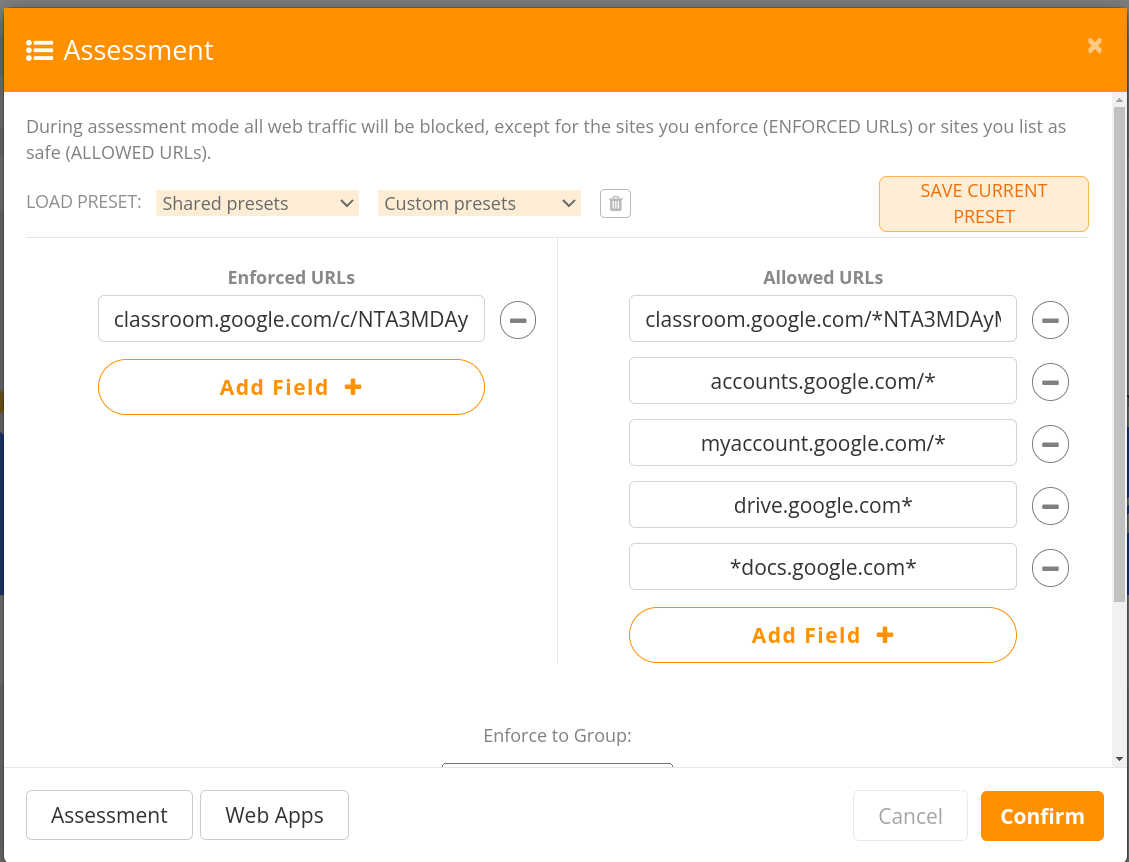
4. The assessment window now shows several links. On the left, you have the page that will open automatically, and on the right, you have the pages that are allowed to be visited.
[](https://info.wftigers.org/uploads/images/gallery/2026-10/wwTc7cLsEWcOTIJn-2abc9432ca011955512c31989103efaf7bff8817.png)
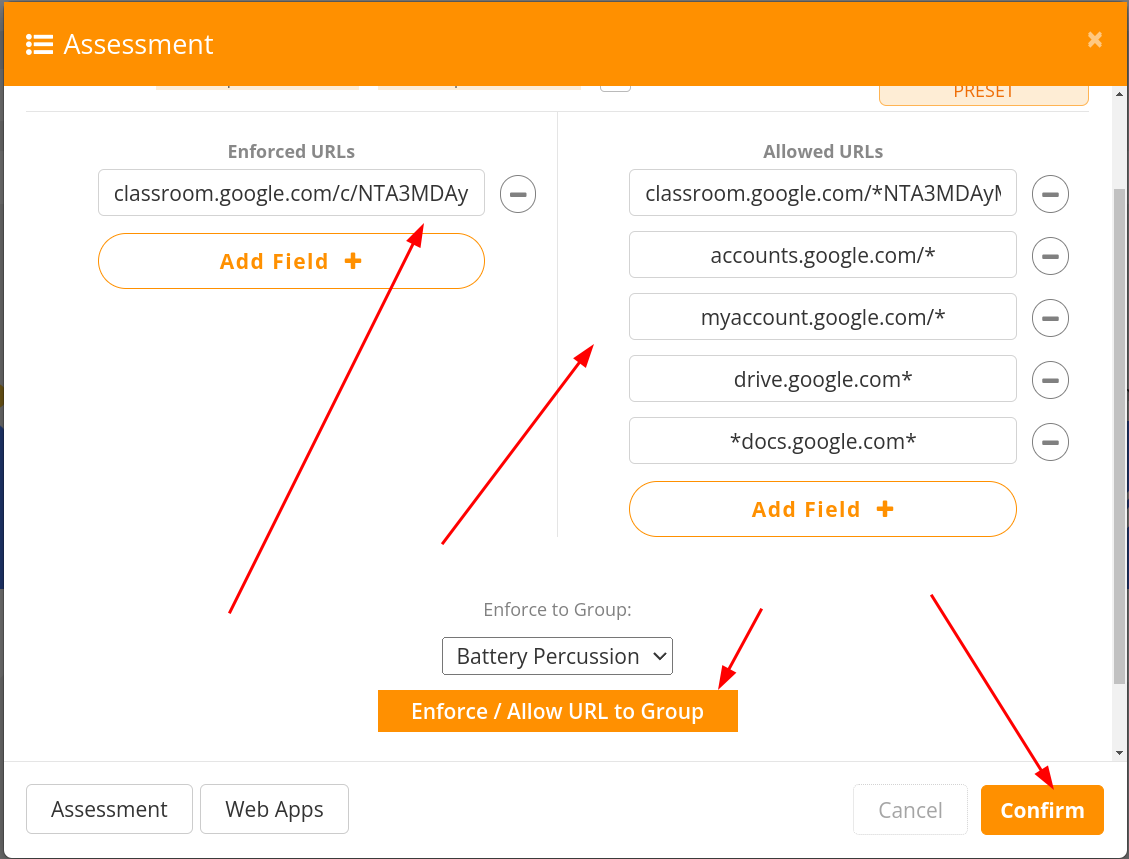
5. You should ALWAYS verifity that the items on the left and the right are correct, then choose to confirm it for the whole class, or to enforce it upon the group you have selected.
[](https://info.wftigers.org/uploads/images/gallery/2026-10/BYZFgePQIV2EcyMP-c3338bba53343d57aa1a06e15ffdee2765114508.png)
## Web App Library
1. Let’s create an assessment using a web app template. Select “Web Apps” from the bottom.
[](https://info.wftigers.org/uploads/images/gallery/2026-10/8HIcpiKs5WbqfBGi-df509bbf543ef64f7f4727a65e9e9490e7eb612b.png)
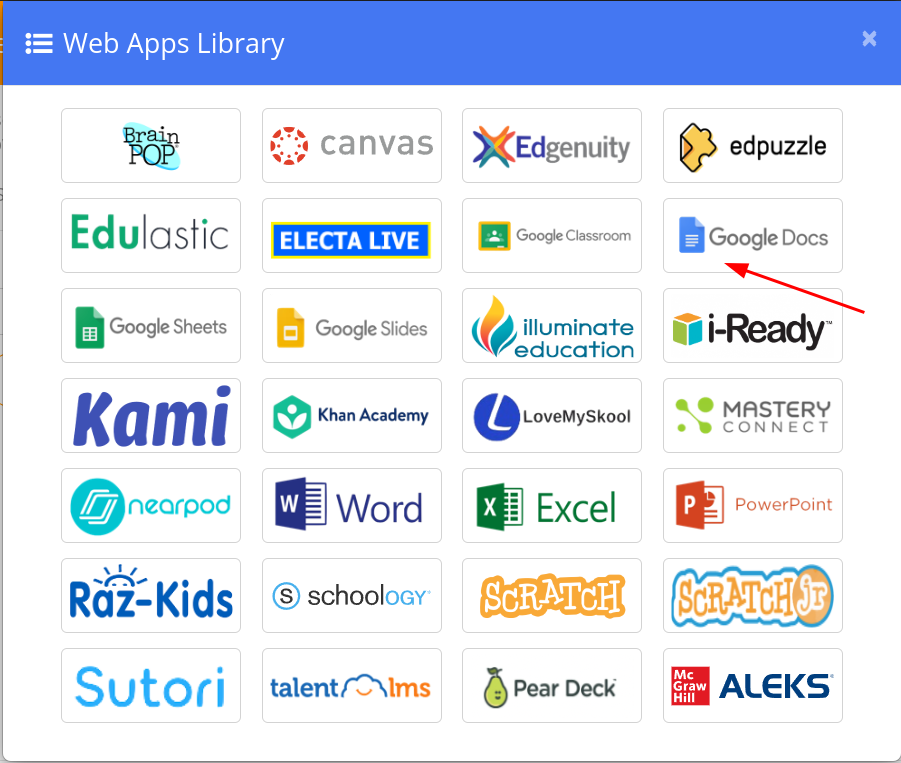
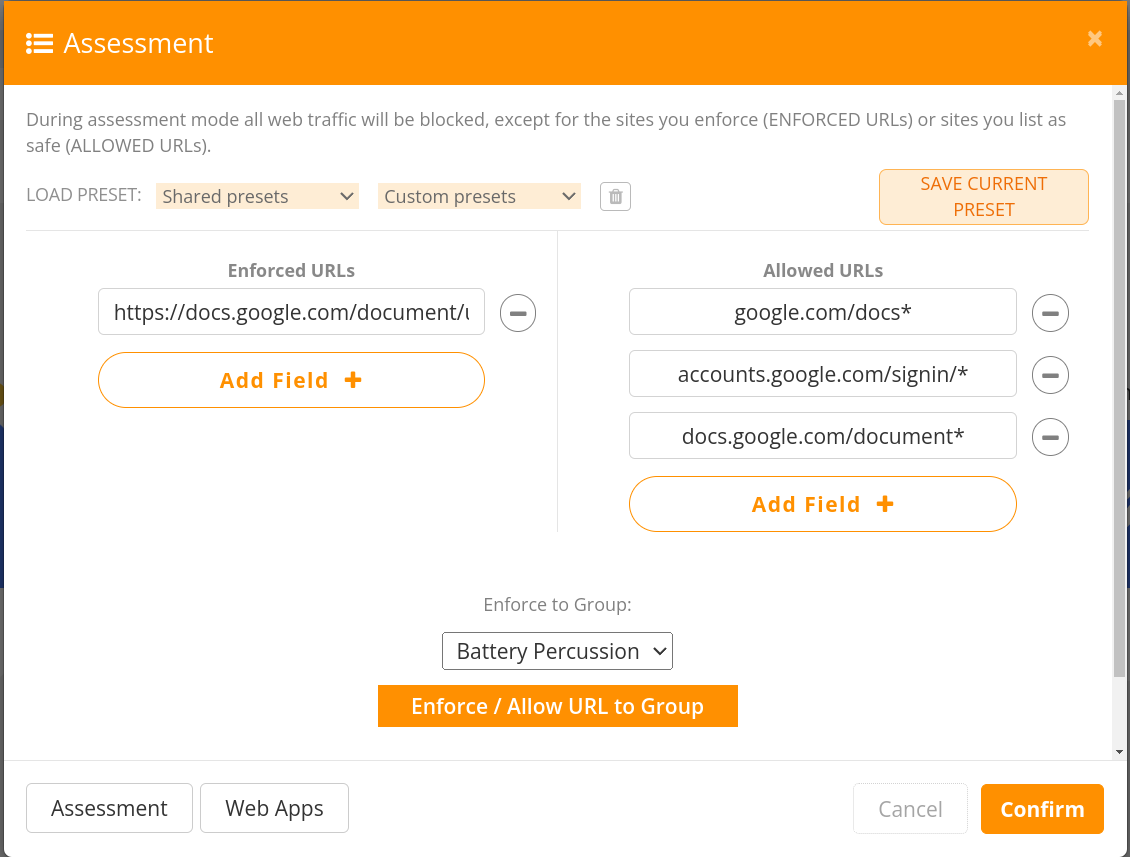
2. Choose the appropriate app icon. I chose Google Docs.
[](https://info.wftigers.org/uploads/images/gallery/2026-10/nsleo9rYmkPVx8R3-4c33caa3b26c9d1d0d8f57adaa0aeb3d0964156b.png)
3. Again, our list is populated with what is needed for this app to function. Our students will be taken to a blank Google doc, and the only other places that can access are the sites specific for Google Docs to function. This would be perfect for a writing prompt day.
[](https://info.wftigers.org/uploads/images/gallery/2026-10/EK7dnrqgQLyJpvgK-1ef8be9a41937a9fc77a80fbcdec62523e129939.png)
## Stacking Web Apps and Assessment Templates
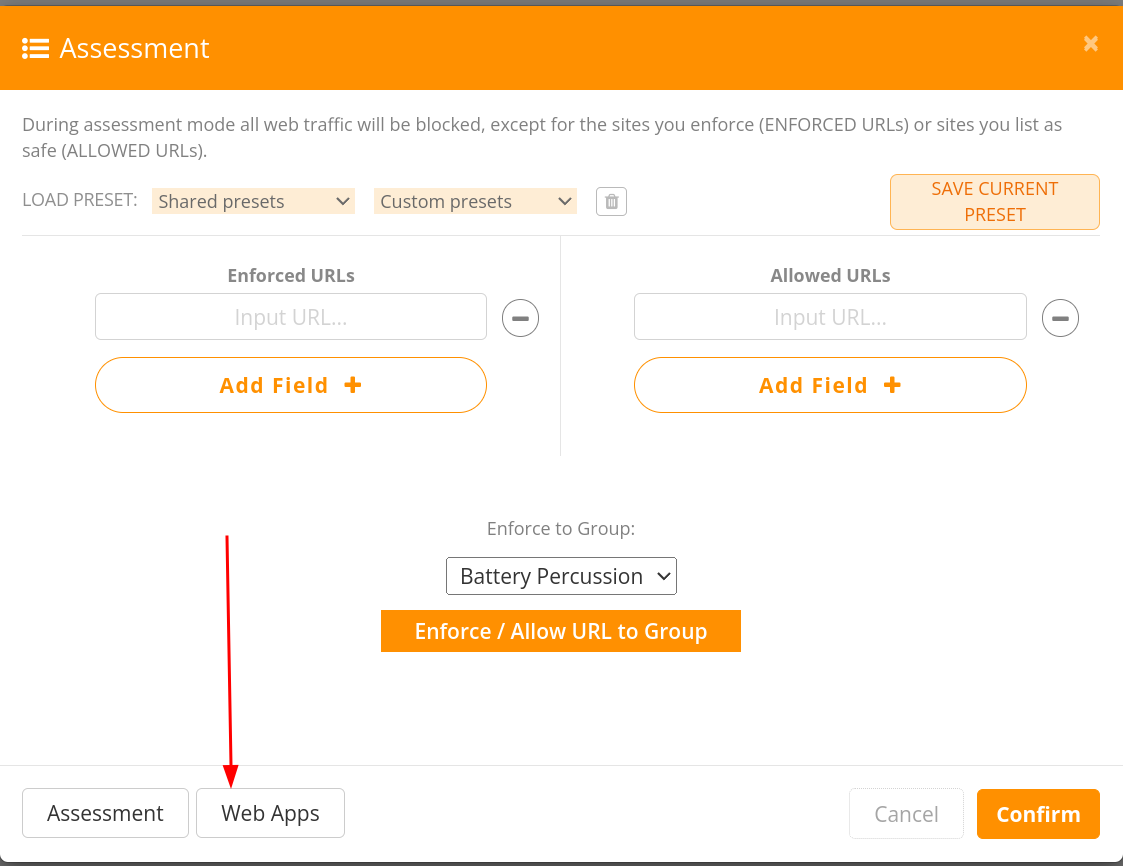
1. Let’s combine two web apps into our list. Choose the “Web Apps” button.
[](https://info.wftigers.org/uploads/images/gallery/2026-10/rxI0S127b60cg5cp-2256482a59f0b2eb49de9932d9bf38abd3b19bb3.png)
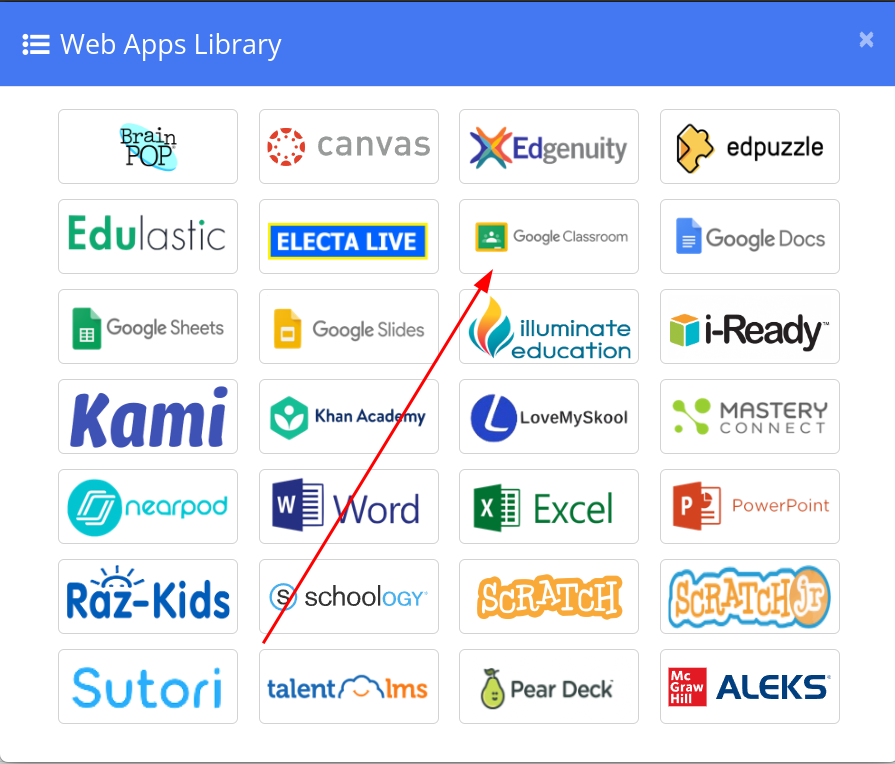
2. Select the first app you would like to use. I chose Google Classroom.
[](https://info.wftigers.org/uploads/images/gallery/2026-10/qZfOOqrUFBRyJ2TU-e1d04493fbda14fb77788b45f8f80fe8e789a146.png)
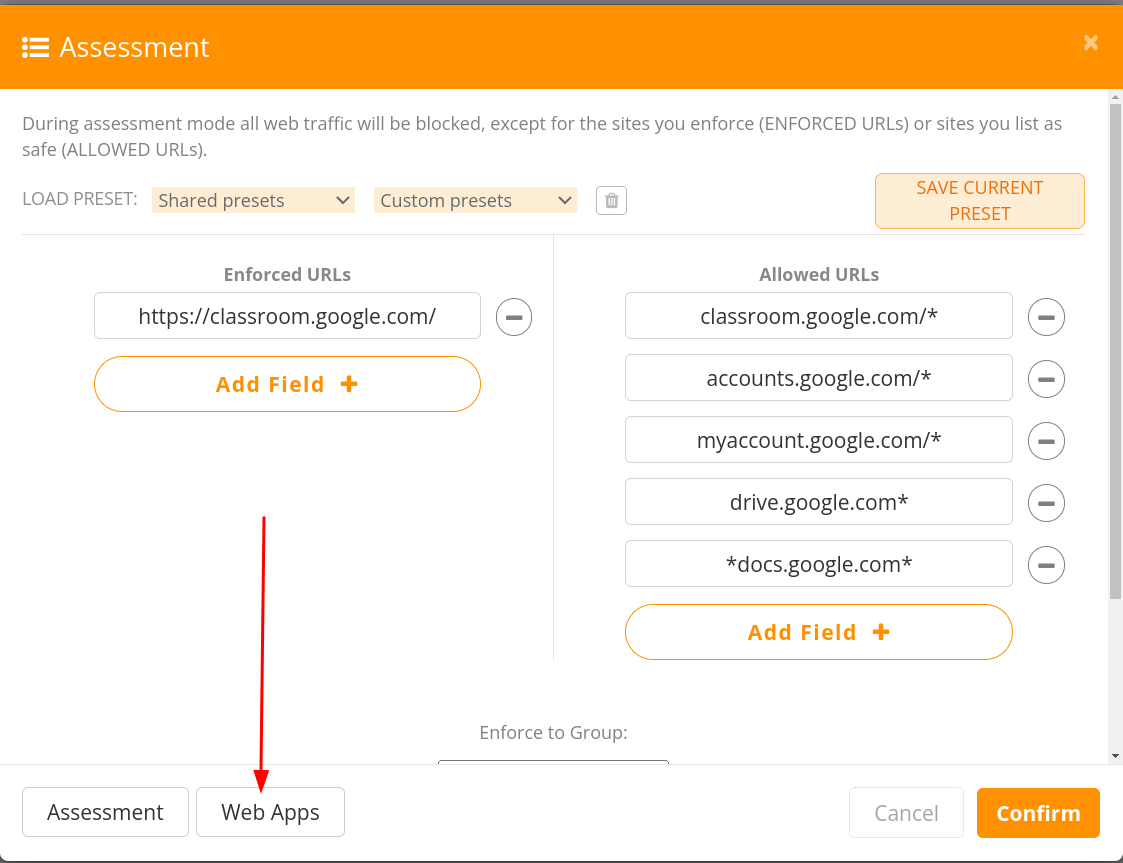
3. Click the “Web Apps” button again.
[](https://info.wftigers.org/uploads/images/gallery/2026-10/fx4HrDyKL6yxa0If-9fc5d3812a8a34b6cd2ae92e98c1c4db398c5c8f.png)
4. Click the second icon. I chose Google Slides.
[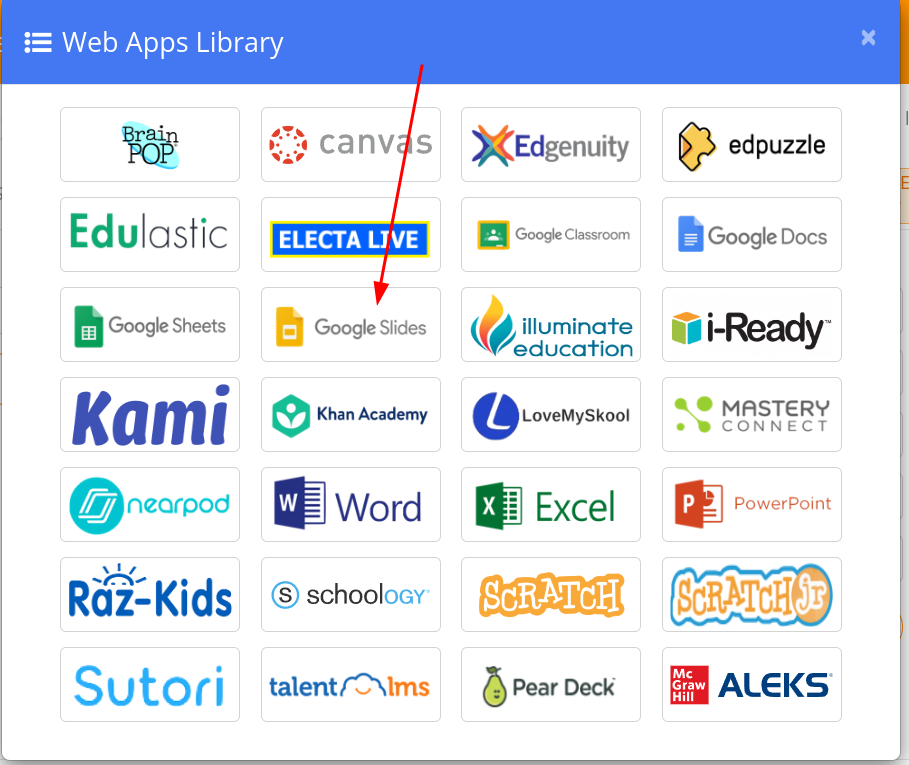](https://info.wftigers.org/uploads/images/gallery/2026-10/s1jZwCr62T8l53sf-669bc049ee60e80c135b59dc828b88567fb232f0.png)
Now, when students are under this rule, they will be able to access anything within classroom and also within Google Slides. They will also automatically be taken to both websites in two unique tabs.
## Custom Presets
What if this is something we want to do regularly, use both classroom and slides? While it isn’t too difficult to do those previous 4 steps, we can make it quicker.
1. I’m going to click on the “-” buttons to remove the enforce URL options.
[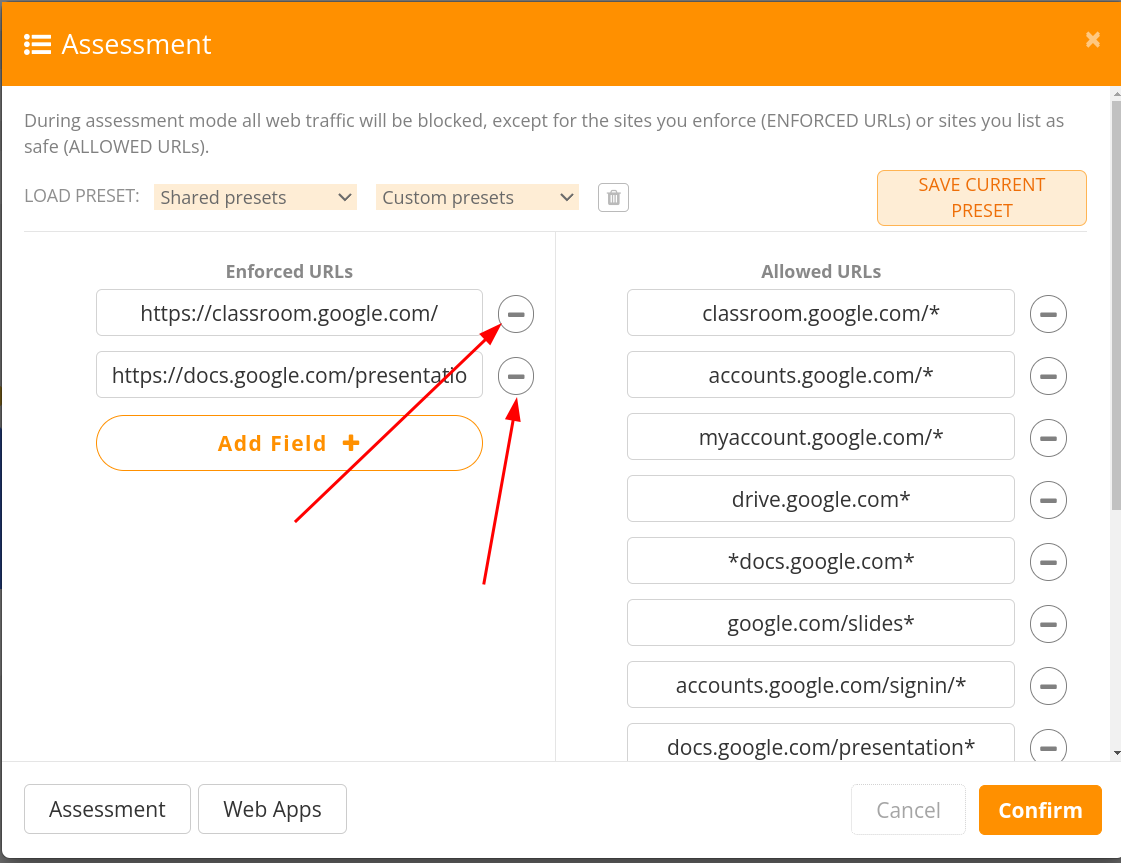](https://info.wftigers.org/uploads/images/gallery/2026-10/dfjoa6tUR4k9i2uy-6e98bc6fd0630edcc2e6b530b288ce093b37aa2c.png)
2. This gives me an empty enforced area and a populated allowed list.
[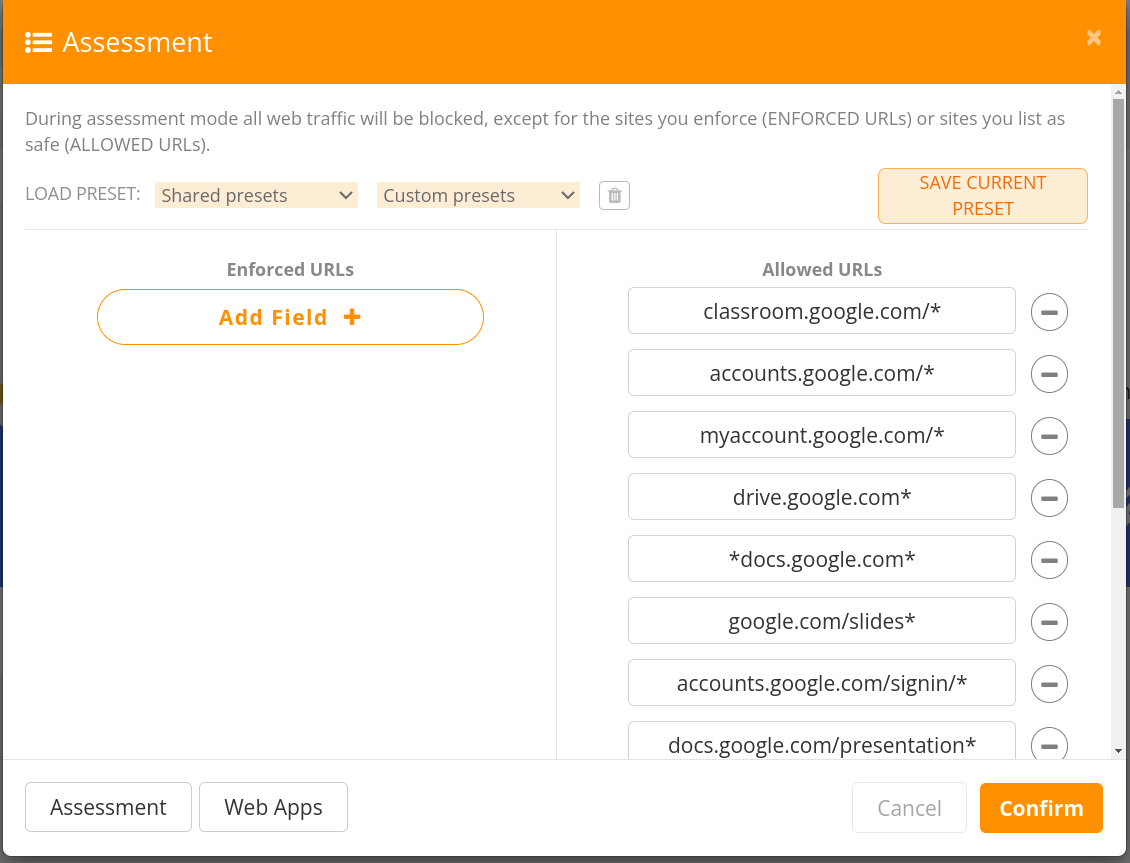](https://info.wftigers.org/uploads/images/gallery/2026-10/VfuNKST4h0MO9qYJ-0c8f1d90fc6aa60bdf58fbceb0d6c7dcc12cc45a.png)
3. Now I’m going to click the “SAVE CURRENT PRESET” button.
[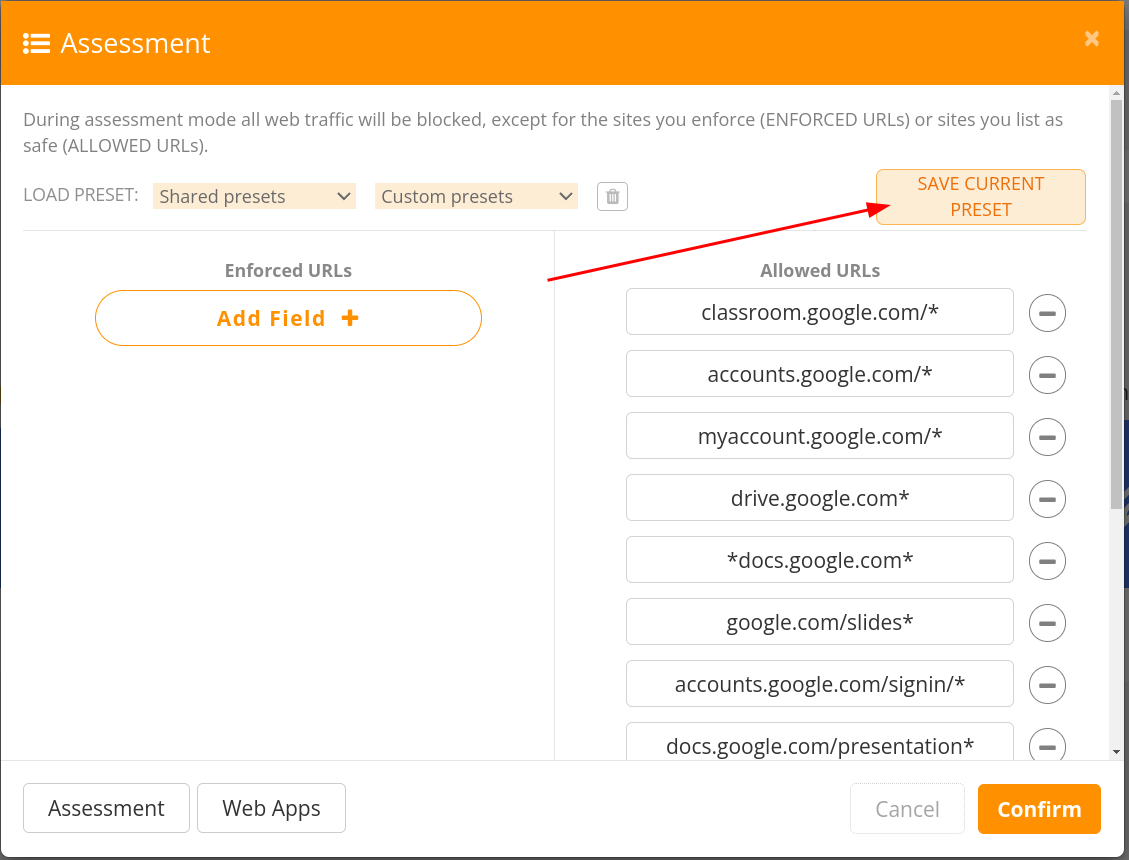](https://info.wftigers.org/uploads/images/gallery/2026-10/dFe2LjCkcEUfqYyI-bafd07b545552534dafed0cdcbc907a225d4cb5f.png)
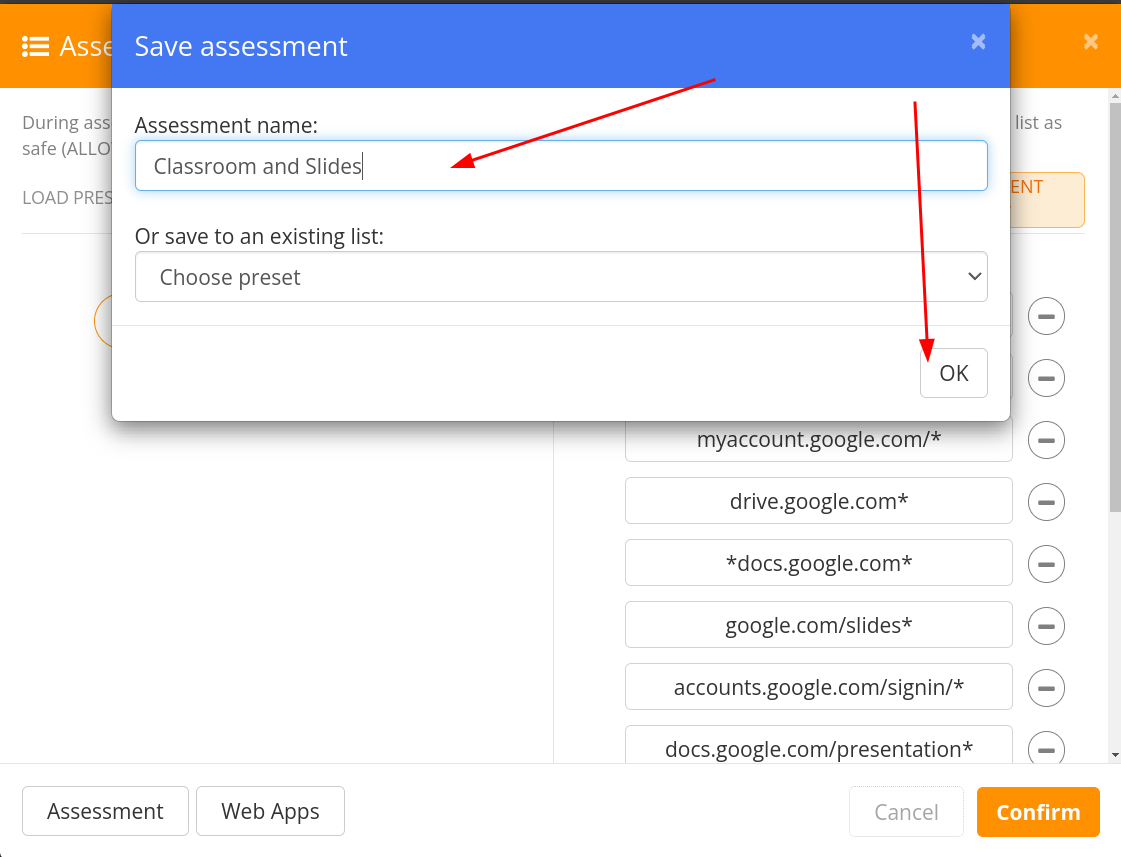
4. On the box that opens, I’ll give it a name (I went with “Classroom and Slides”), and then I will click on “OK.”
[](https://info.wftigers.org/uploads/images/gallery/2026-10/U7jdkrjtY7gpLQXQ-ad67fdbc4a25f0ee15662ece373b85fd99b8cf61.png)
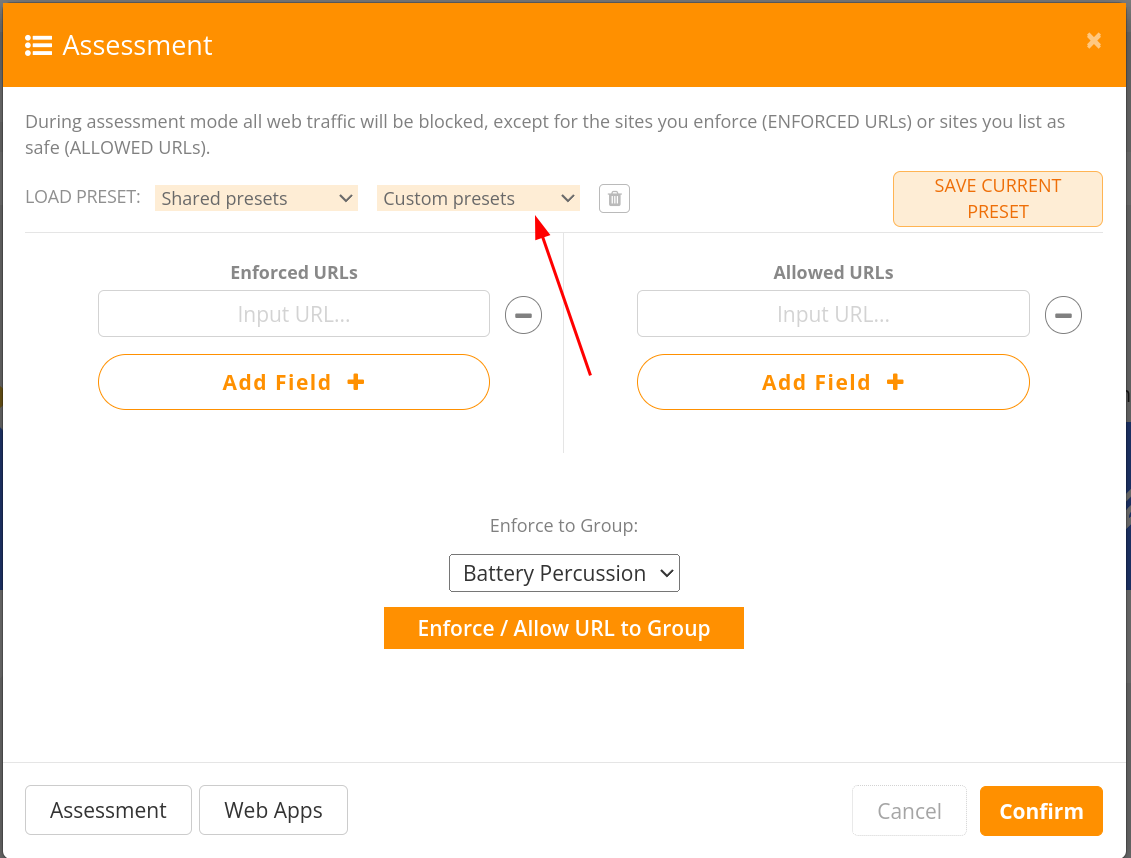
5. Now, the next time I open up the assessment box, I will click on “Custom presets”
[](https://info.wftigers.org/uploads/images/gallery/2026-10/DU3Sr6GZY6cpuC54-d390bacff1a7b914e2b6a8cbb34c9ca472562c87.png)
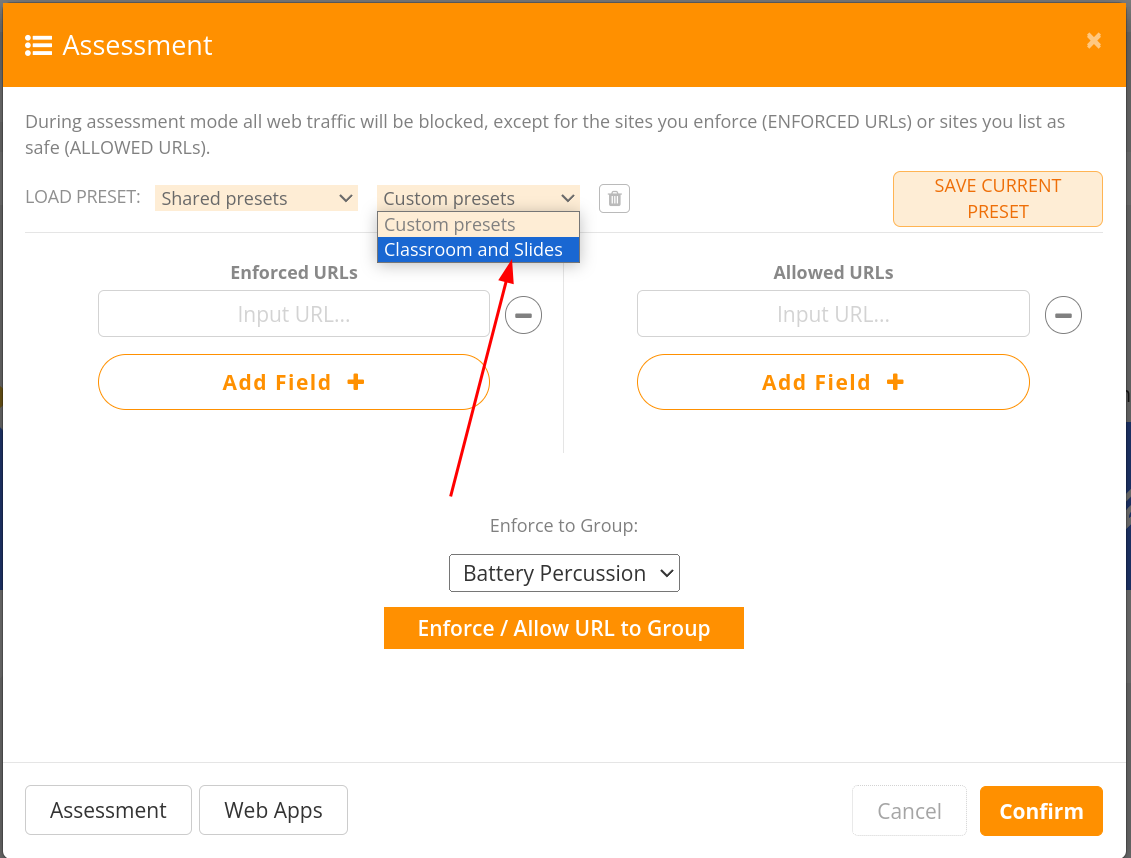
6. I’ll choose “Classroom and Slides” (or whatever preset I created in the past).
[](https://info.wftigers.org/uploads/images/gallery/2026-10/g0pqYLteTOhhDxYF-99d3a712ffb8bc4356cee15c77438ed75bbe48f0.png)
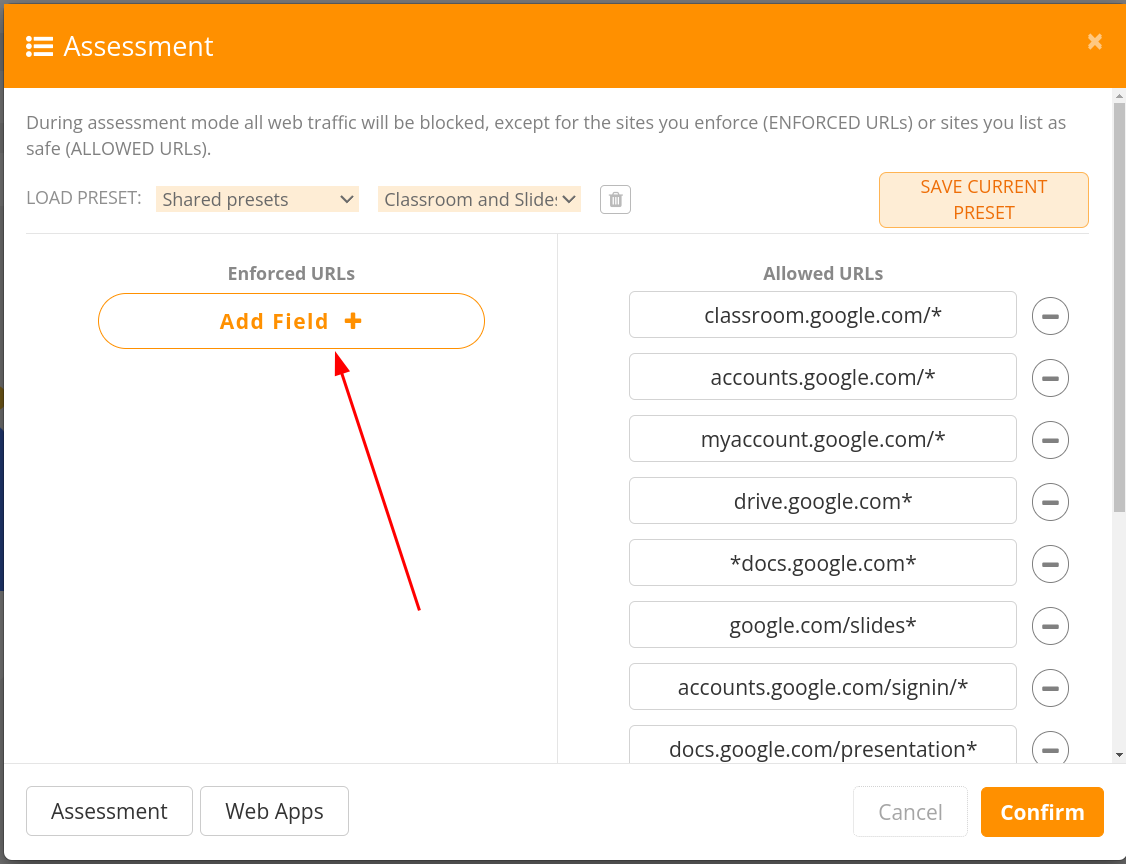
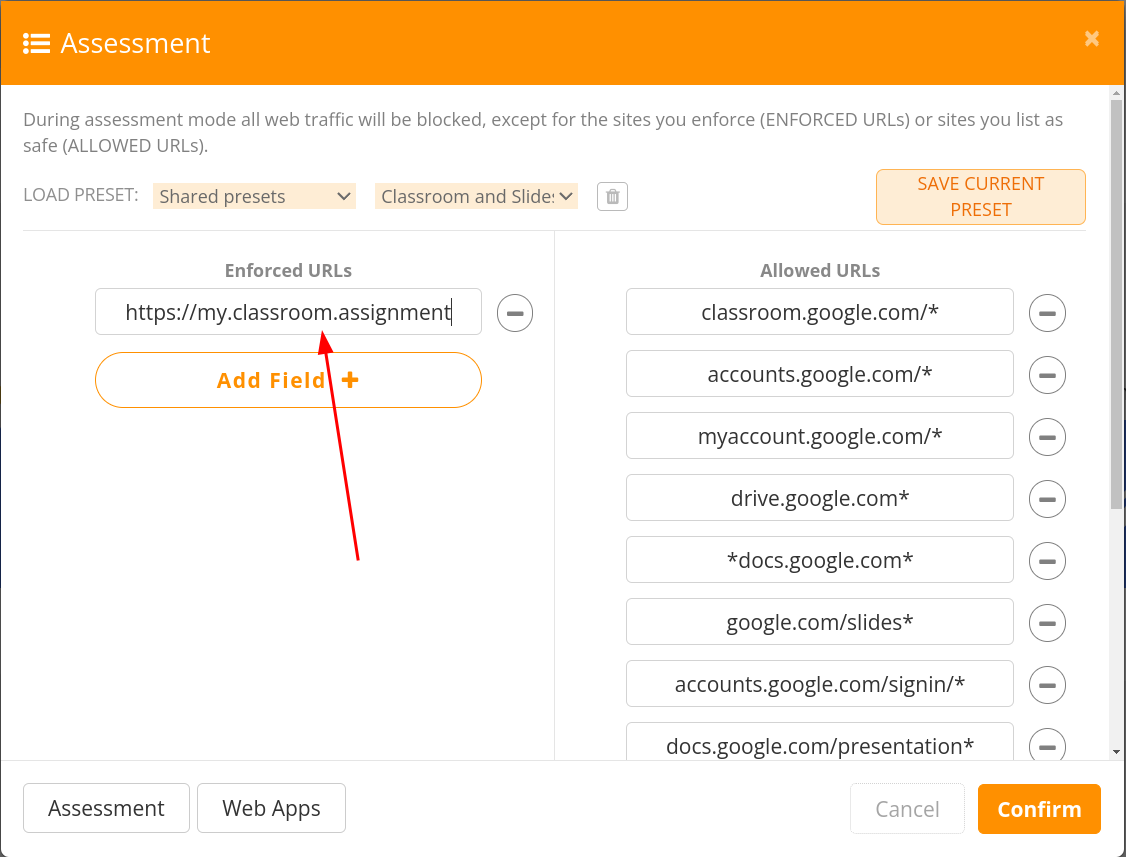
7. Then I’ll have my starting point. I also want to make this open to the assignment in Classroom, so I’ll click on the “Add Field” button.
[](https://info.wftigers.org/uploads/images/gallery/2026-10/b09KrEkpxsb5OUZP-2906236afa16475130d445e7185699aeb8e01f9f.png)
8. In the box, I’ll paste in the address of the Classroom assignment.
[](https://info.wftigers.org/uploads/images/gallery/2026-10/HBB2Ika8lG8vSPwm-9aa69938249b3700c21c049fd07db1bc8acf9412.png)
From now on, all I have to do to make this kind of rule is to choose my custom preset, paste in my assignment, and confirm it for the group or the class!
Originally posted by Cory Robbins on the West Fork Technology Hub (2023-10-04).
# Blocksi - Creating Student Groups
Sometimes you have a classroom that demands a little… separation. Johny can’t be on the same side of the room as Danny, or one of them will get a black eye, Suzie and Jimmy can’t be next to each other without secret attempts at handholding… You know… Kids are kids.
So here is the thing: if kids sometimes need separation in the physical world, sometimes they will need it in the digital world.
Enter Blocksi Groups. Within the Blocksi classroom, you can put students in groups that can be used for the assessment feature, the share/enforce feature, the message feature, and the heads up feature. You can even set different policies for different groups. In short, you can have almost as much control for each group of students as you do for the classroom as a whole. Plus, they are easy to make!
Some examples of why this could be useful:
- Having a group of students that you want to further limit access for
- Project groups to allow you to share different pages with each group
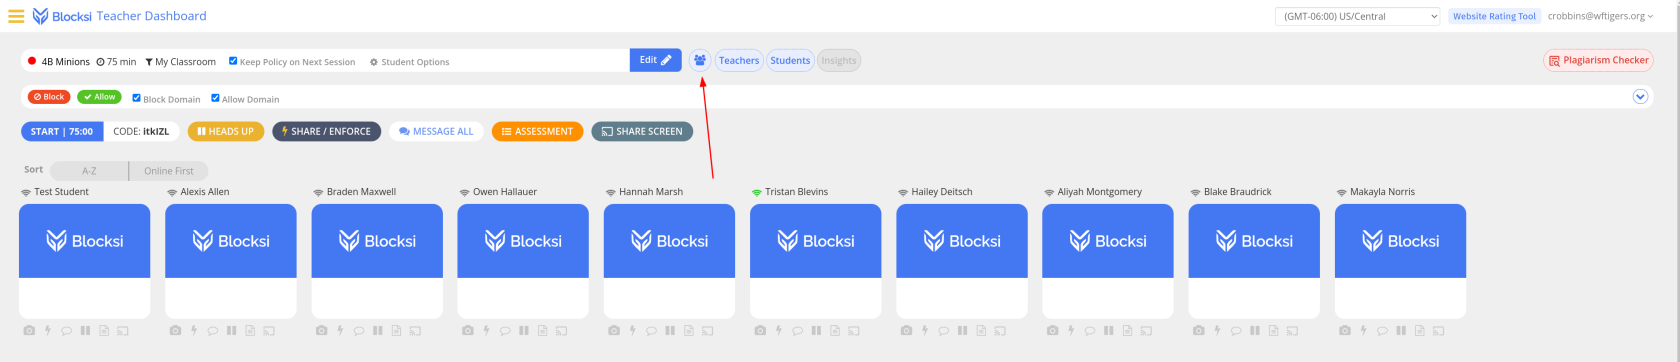
1. From within a class, click on the little group of three people button next to “Teachers” and “Students.”
[](https://info.wftigers.org/uploads/images/gallery/2026-10/tXkCjGEzHHKvYQPz-8207a1be9fcf8e83c4db3734b65525a5bce7196f.png)
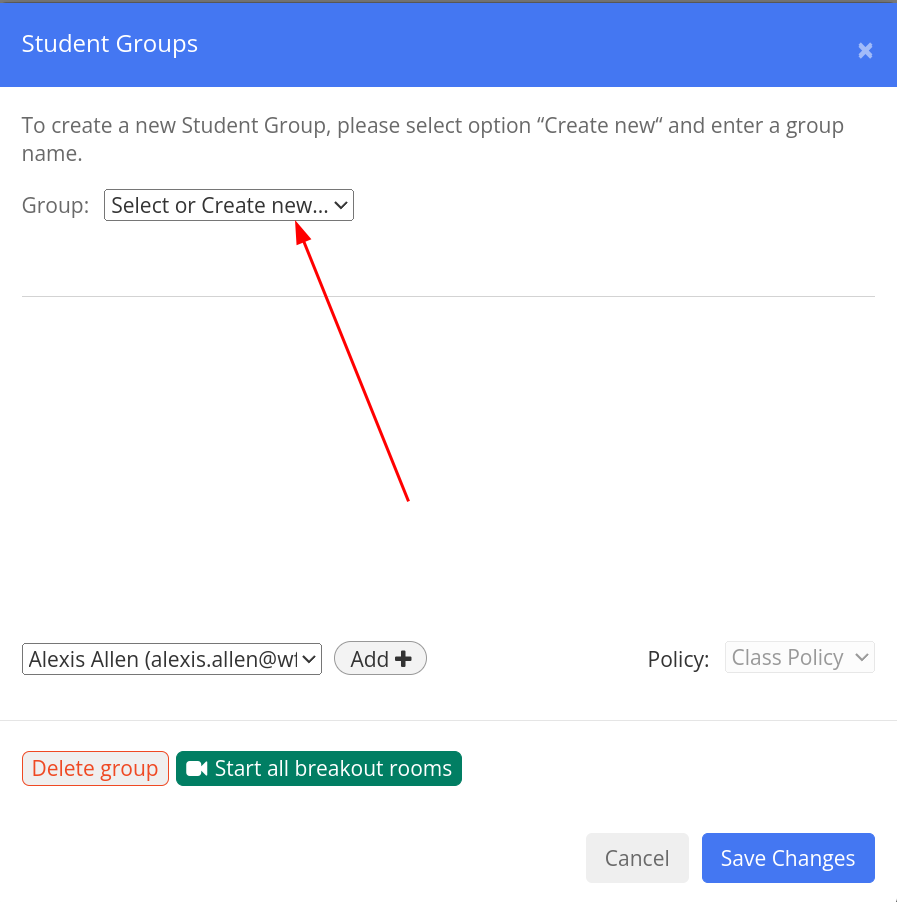
2. Click on the “Group” dropdown menu item, and select “Create New.”
[](https://info.wftigers.org/uploads/images/gallery/2026-10/7wkHYdstFaRr3HRT-566af256f4f34450912c977dfd9a9c114aa746d8.png)
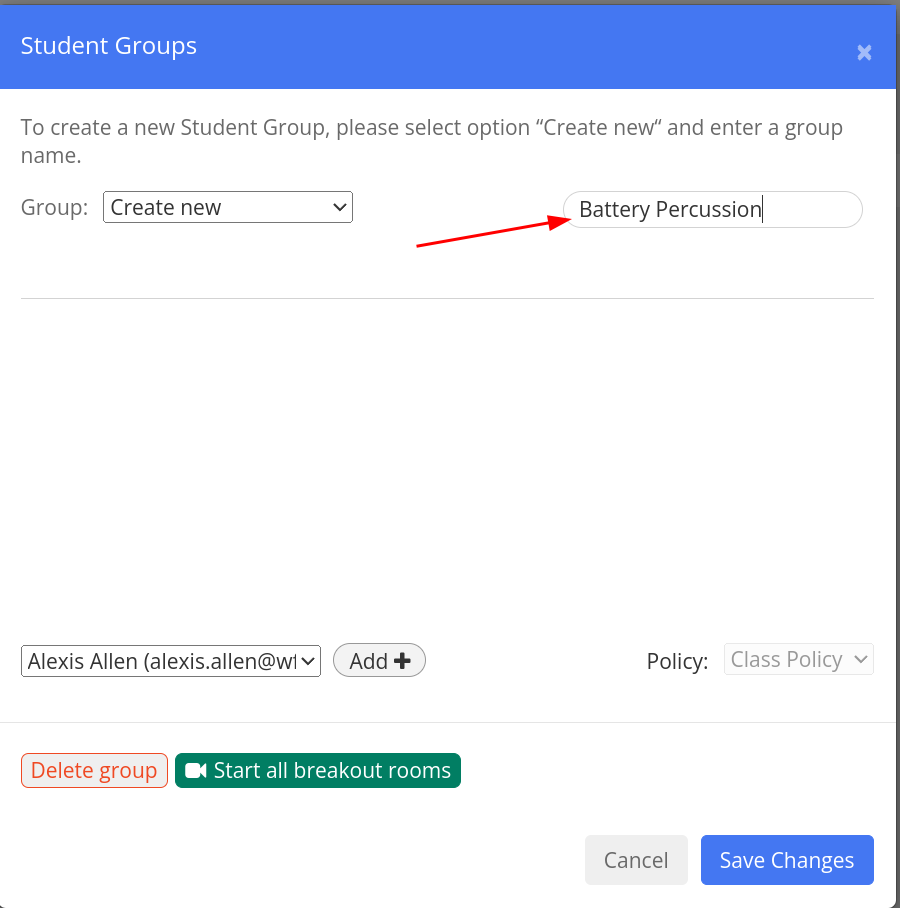
3. Choose “Create New,” then put in the name you want to give the group.
[](https://info.wftigers.org/uploads/images/gallery/2026-10/AemUsOllGJgIqq05-277b47716c367a4d527eacc710038bc37fdbd626.png)
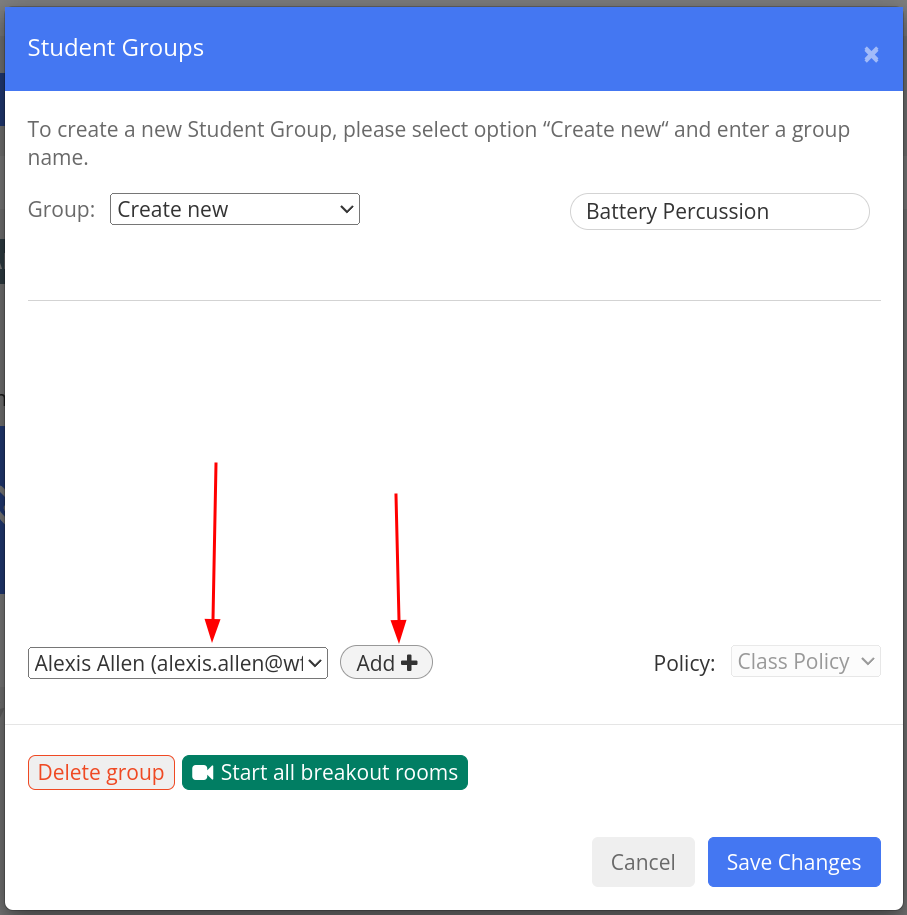
4. In the dropdown box at the bottom, select the first student you wish to add to the group, then click on the “Add” button.
[](https://info.wftigers.org/uploads/images/gallery/2026-10/cCJQ83IRL5gLpDuk-d9cac199f105b37b857b3ec48ed369fd9a0ab276.png)
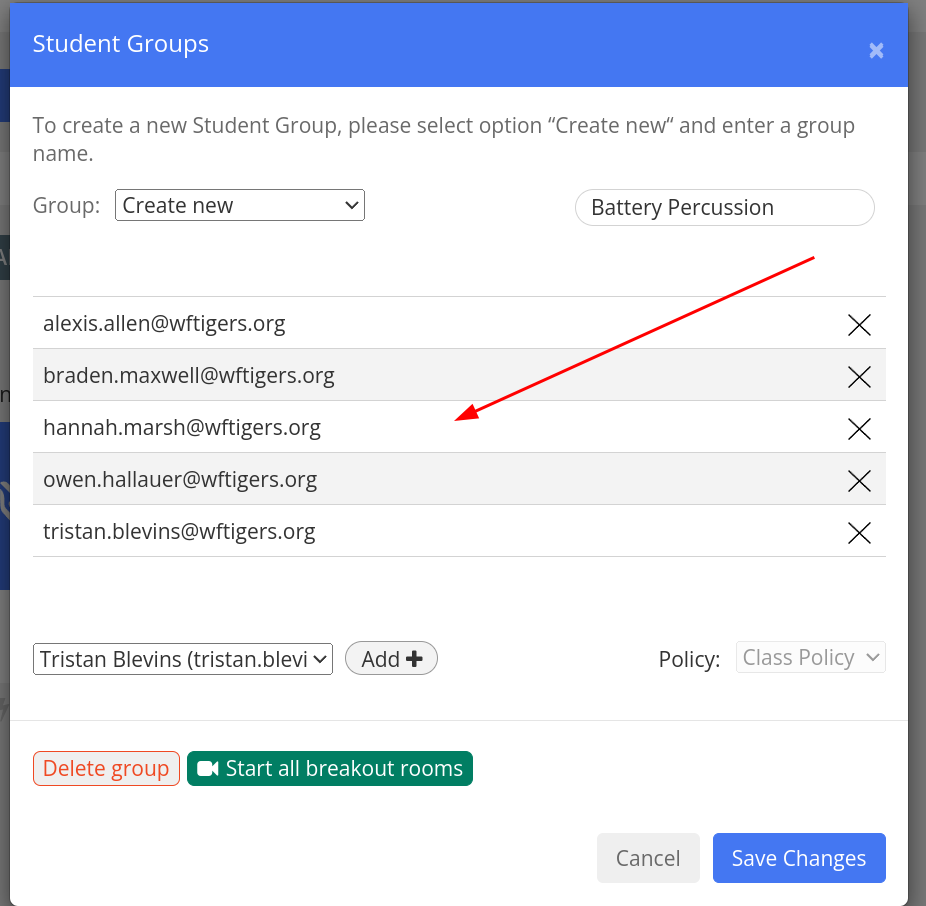
5. Repeat until you see a list of all the students that should be in this group.
[](https://info.wftigers.org/uploads/images/gallery/2026-10/6NeoyoqMGMuRMF1D-6f4bb0330ce2035c6eb730b8c4cb20057bcfb6e8.png)
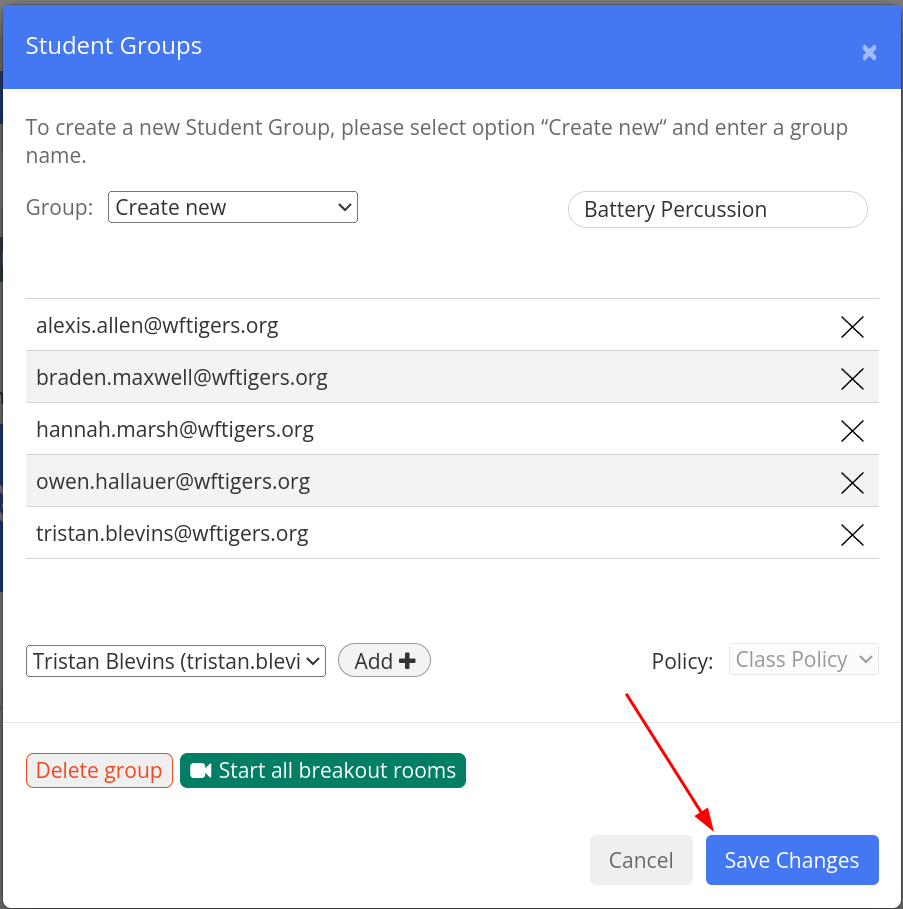
6. Click on the “Save Changes” button.
[](https://info.wftigers.org/uploads/images/gallery/2026-10/jCJhjkkjEK0A8dpU-d3076cb29db985240b230271c11075651186b343.png)
You can repeat these steps to add multiple groups.
Originally posted by Cory Robbins on the West Fork Technology Hub (2023-10-04).