# Operations - Outside of Class
# Blocksi - Scheduling Classes and Manual Rostering
[](https://info.wftigers.org/uploads/images/gallery/2026-10/nQtFVBPxityXsBBA-ad6137c02ac882bbcbffd9b70df9678c93c74a03.png)
In today’s Tech Tip, we are going to continue our exploration of the Blocksi Classroom Management system.
In [last week’s tip](https://info.wftigers.org/link/1842), we covered the basics of using Blocksi, and in today’s tip, we will be going over the process of how to create and roster your own classes (in the event you need to pull in students that aren’t rostered in Google Classroom) and how to schedule them so that each class starts and ends automatically.
# Creating Classes Manually
*Please note that this portion is ONLY intended for people who don’t import from a Google Classroom course such as GT, ISS, Special Pullout Classes, etc. You may also choose to follow this process if you want to have a class for grading that does not include any students.*
Click to see how to create classes manually.
1. Log in to [https://teacher.blocksi.net](https://teacher.blocksi.net) using your Google credentials. Check out [last week’s tip](https://info.wftigers.org/link/1842) for more details.
{{@1842#bkmrk-click-for-login-inst}}
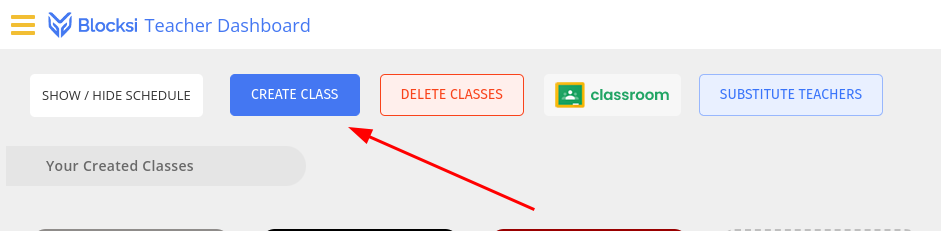
2. From the Teacher Dashboard, click the “CREATE CLASS” button.
[](https://info.wftigers.org/uploads/images/gallery/2026-10/63xDmgur1n5Y6Rto-f89a9a2b17a8e40100a75b565a40943007c367e0.png)
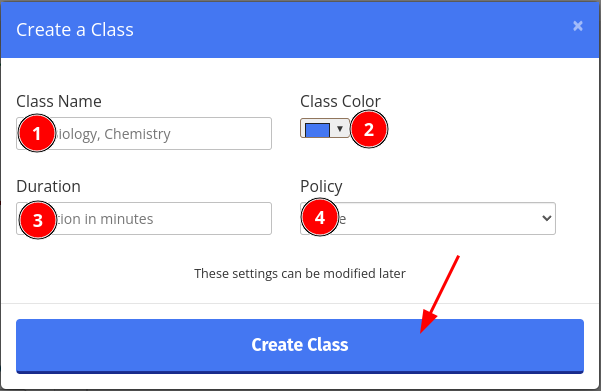
3. At this point, you should get a screen asking for several pieces of information
1: Name of the class: This can be pretty much whatever you want it to be.
2: Class Color: This allows you to set the color of the ribbon at the top of the tile.
3: Duration: This is where you should enter the number of minutes that your class session will last. You may set this to anything between 1 and 480.
4: Policy: This allows you to choose the filtering policy to start from.
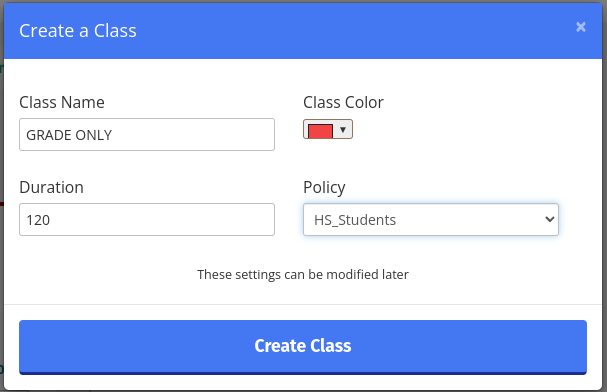
Once you are satisfied with your settings, click on Create Class.
[](https://info.wftigers.org/uploads/images/gallery/2026-10/yHd7c4pNQK0wCnyn-ce9a50cde0adcf9d00ae15b2bc61956ff1ca797d.png)
[](https://info.wftigers.org/uploads/images/gallery/2026-10/6Ali0h3NJ6NFA1lD-94dfce1d8669f24d27cd10c0a1a813efbeaa7e1a.png)
4. That screen should automatically close, and after a couple of seconds, you should see a tile with the name of the class you just added.
[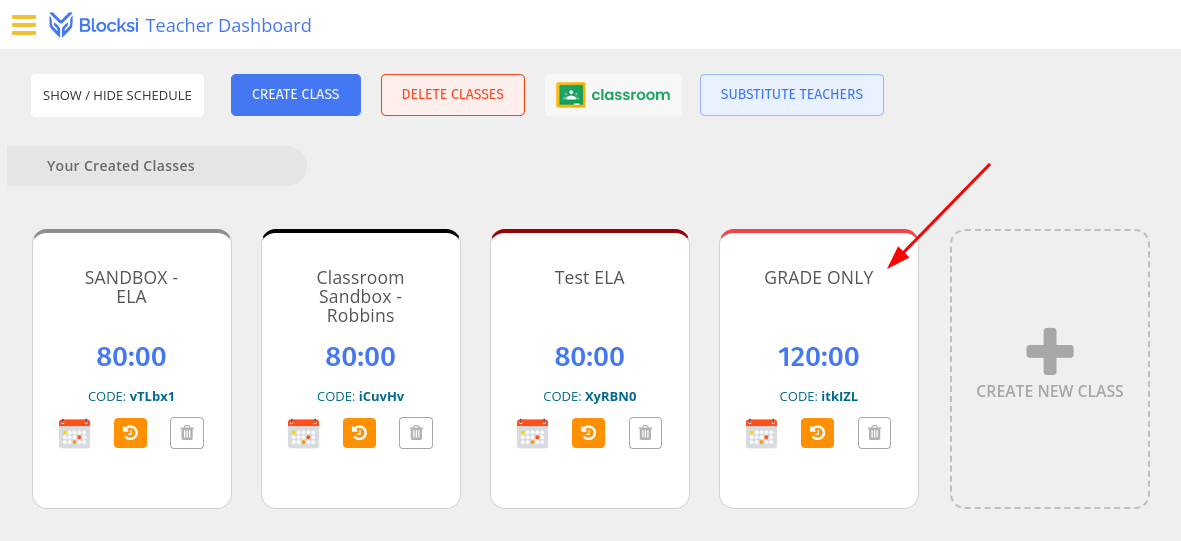](https://info.wftigers.org/uploads/images/gallery/2026-10/HY8HJvUCWRdUDUJW-a06f824e7643c4a90fc7eff595e6bb8bd4cf9fc6.png)
From this point, the class functions exactly the same as one of the classes you imported, except for the fact that you will have to add students manually. Keep reading to find out how!
Click to see how to manually roster students
1. To begin, click on the class tile that you wish to roster.
[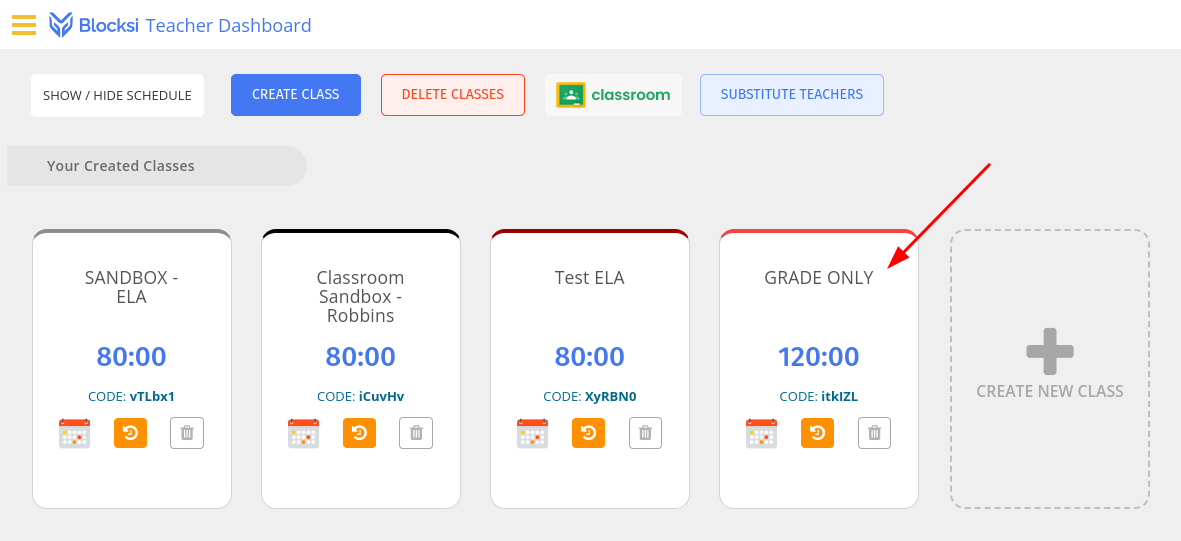](https://info.wftigers.org/uploads/images/gallery/2026-10/YDfLEjGfulTUDF39-a06f824e7643c4a90fc7eff595e6bb8bd4cf9fc6.png)
2. Click on the Students button.
[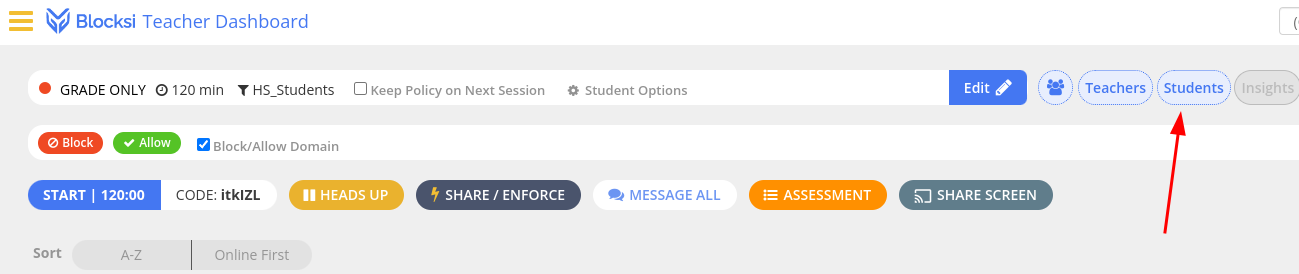](https://info.wftigers.org/uploads/images/gallery/2026-10/6MLvukUkRmPyqQic-c2ce67a7433e665eda0779f39d19207887300b3b.png)
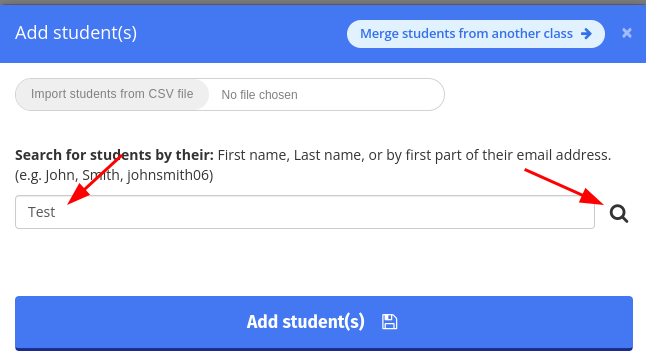
3. On the resulting screen, there is a search box for adding students. Put in part of the students name or email, then click on the magnifying glass
[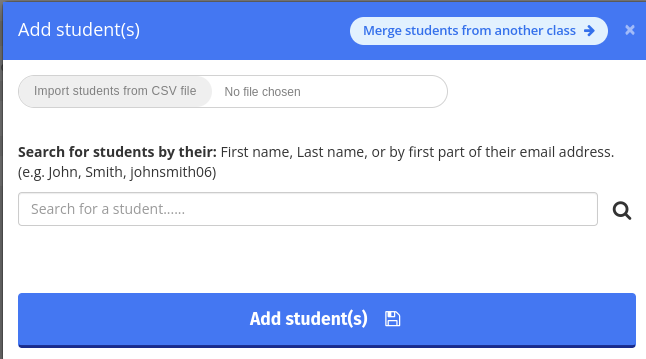](https://info.wftigers.org/uploads/images/gallery/2026-10/S8tXc3NctHwtgclP-120db406ac1e4330d9adb7bc42da91de598be915.png)
[](https://info.wftigers.org/uploads/images/gallery/2026-10/tf7C9dwsl9uAmkqn-1e2c43b3fc4811d2f64d5797f224f655d8de5dab.png)
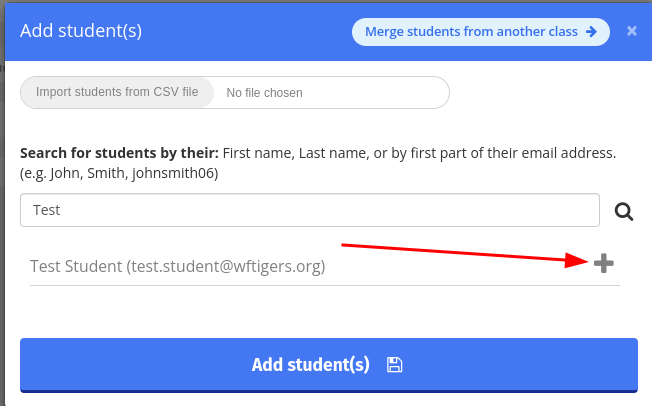
4. Click on the plus sign to the right of the student you wish to add.
[](https://info.wftigers.org/uploads/images/gallery/2026-10/yjsNfErhEoZEC3BI-1bce6741384e0fb82ca36e5978f5316ec8004c7f.png)
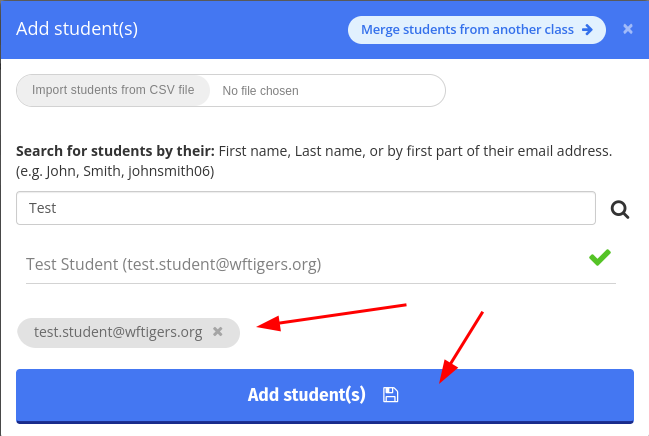
5. You will then get a green checkmark to the right of the student name, the student email will show in a bubble above the “Add Student(s)” button, and you will be ready to either add more students using the same process, or finalize your roster by clicking on “Add student(s).”
[](https://info.wftigers.org/uploads/images/gallery/2026-10/HfON8lwIOODCacaJ-395d92c99cfe43f3c7bff85990924c460ab7e5d4.png)
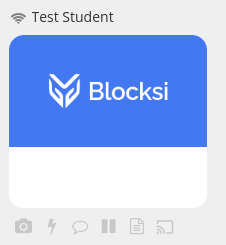
At this point, you should see a tile for the student(s) that you added, and this class will function the same as an automatically rostered class.
[](https://info.wftigers.org/uploads/images/gallery/2026-10/gxK3XzItOaNyrMY0-8305507d07f894d08ca3801ca1396dd919fd148c.png)
See how to add teachers.
1. To begin, click on the class tile that you wish to roster.
[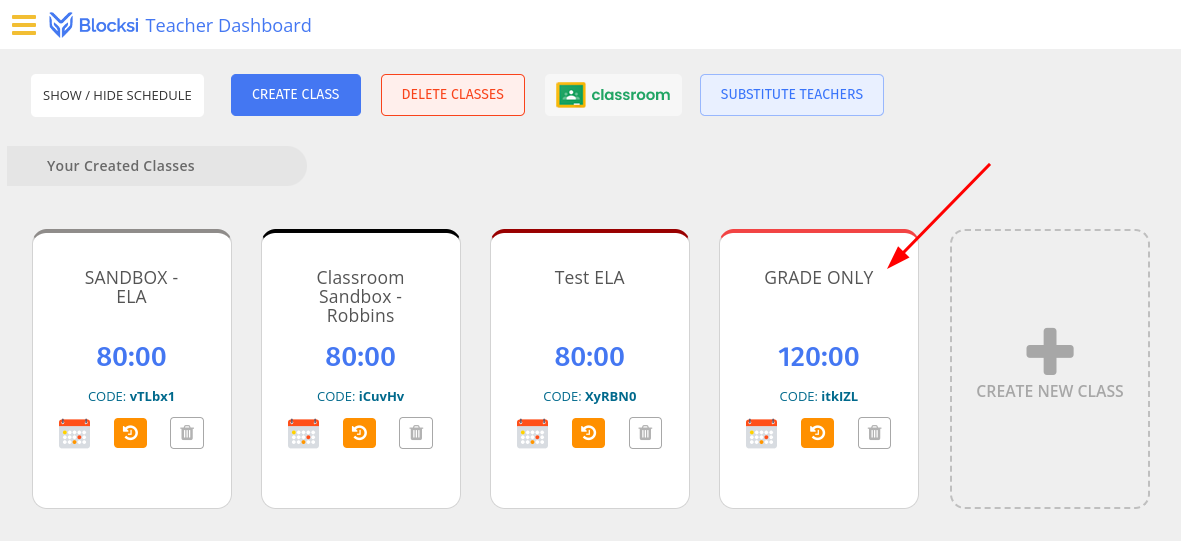](https://info.wftigers.org/uploads/images/gallery/2026-10/EP3HEPrM3vLhK4JS-a06f824e7643c4a90fc7eff595e6bb8bd4cf9fc6.png)
2. Click on the “Teachers” button.
[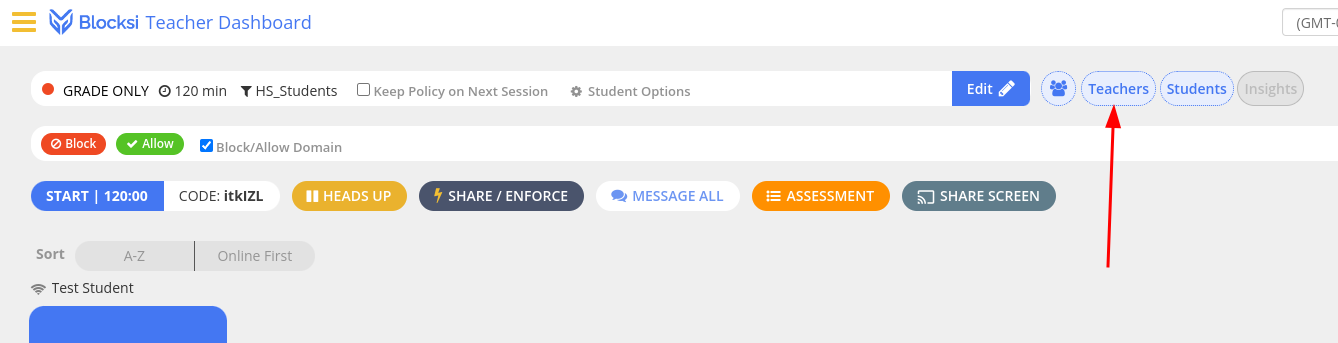](https://info.wftigers.org/uploads/images/gallery/2026-10/pi9Vy8qgM5pbafNu-96fb7188be001e427b099ff333a54c15d2414d0f.png)
3. Search for part of the teacher’s name or email, then click the magnifying glass.
[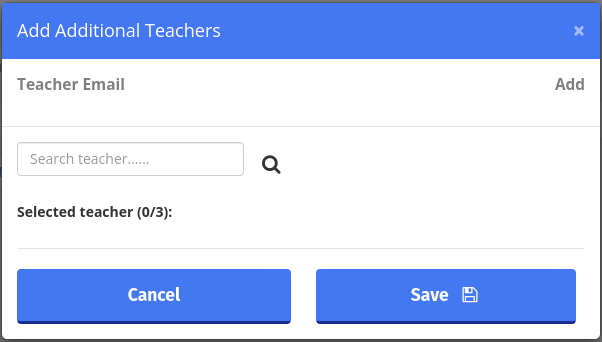](https://info.wftigers.org/uploads/images/gallery/2026-10/agGY4ltj1cuHXQYq-25aa9f918db4e9366889834c1b3dc5e0ee4a6365.png)
[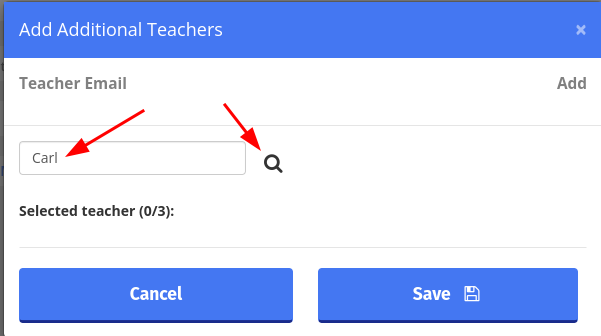](https://info.wftigers.org/uploads/images/gallery/2026-10/Aq31PeT8SDNDfbBu-618e9cc8bdc0dabd30208446f47fe085e6f9fc58.png)
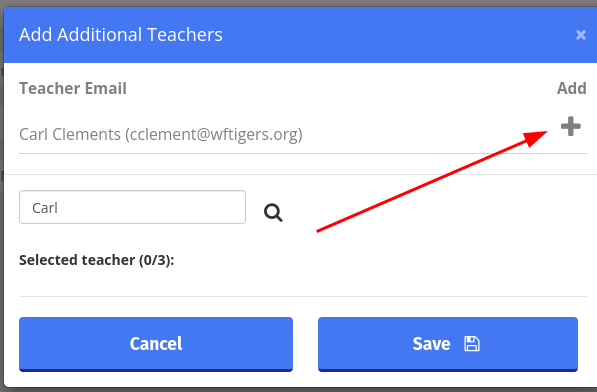
4. That will add your search results to the top of the page. Click on the Plus sign to the right of the teacher you wish to add.
[](https://info.wftigers.org/uploads/images/gallery/2026-10/g8IKCss5XKyZUJxL-8620c5c3f748efce6adb7141a66f242456efbfab.png)
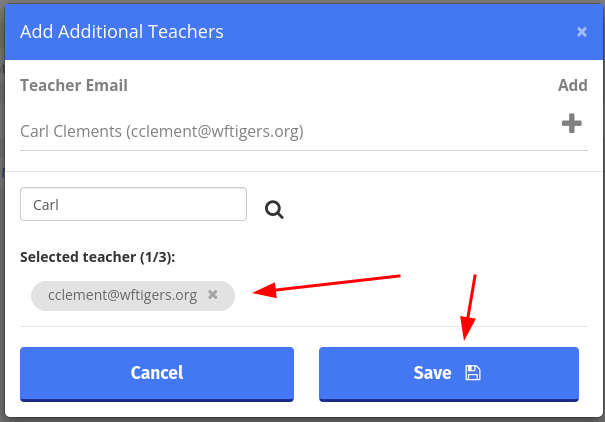
5. Once a bubble with the teacher’s email shows up, you may choose to add another teacher, or to finish rostering your teachers by clicking the “Save” button.
[](https://info.wftigers.org/uploads/images/gallery/2026-10/oKXjOMM7jcTFRxEP-dc81eabdba3c2bf04514a59f82bbd040edfe1ecd.png)
At this point, the teacher you added will also be able to view and manage your class.
Click for instructions on scheduling classes
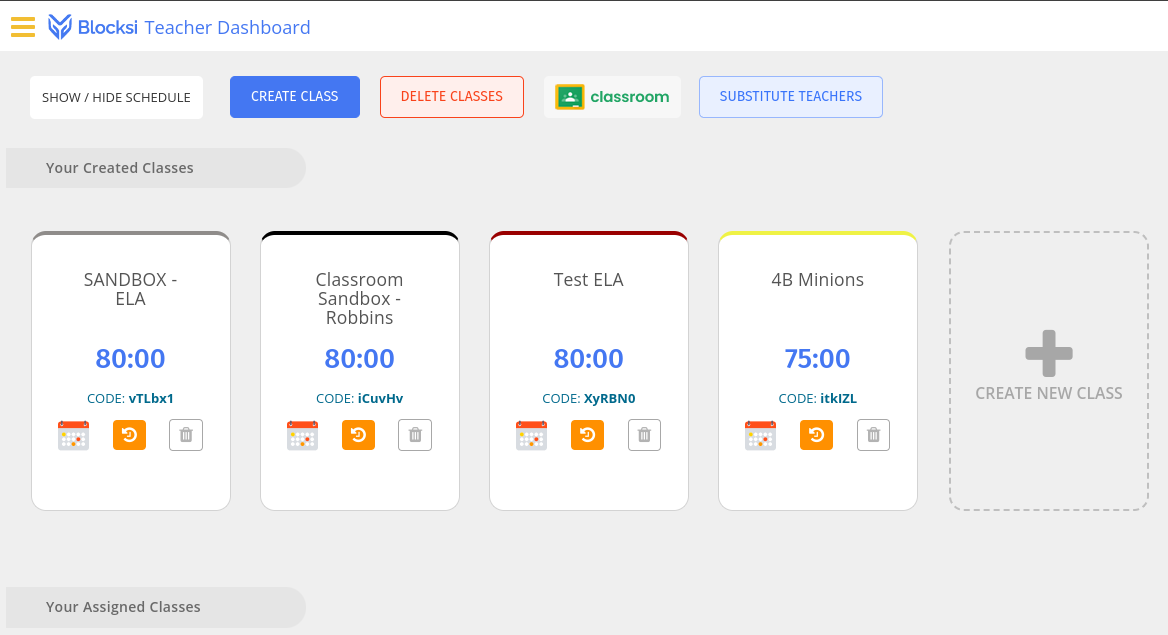
Start from your Blocksi Teacher Dashboard.
[](https://info.wftigers.org/uploads/images/gallery/2026-10/kDTkguIiQxncpAtY-ca936073a6cc39fd009dcf3b610539ca03776e7f.png)
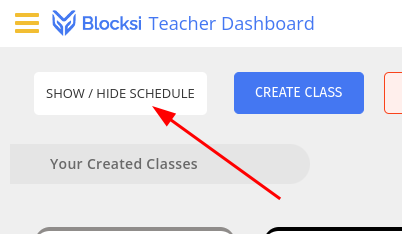
1. Click on the “SHOW / HIDE SCHEDULE” button.
[](https://info.wftigers.org/uploads/images/gallery/2026-10/d0ioaoF01KprwIdo-5586bfa864873c6e45b90183cde55248e31257f0.png)
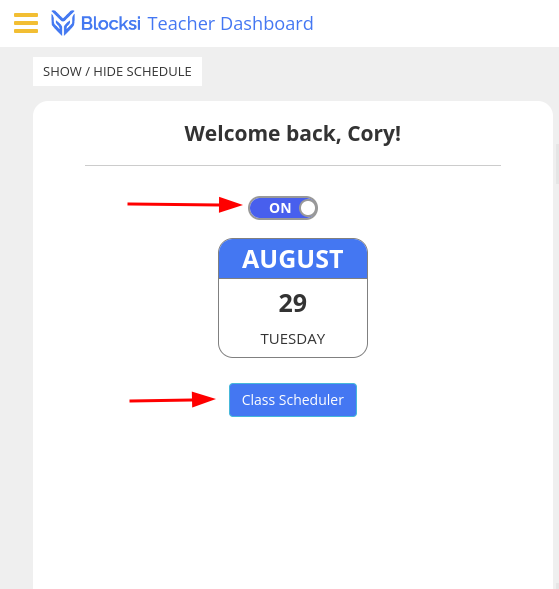
2. This opens the schedule flyout. I’ll make sure that the toggle switch is set to “ON” and then I’ll click “Class Scheduler.”
[](https://info.wftigers.org/uploads/images/gallery/2026-10/Ouh8TaWSdmqb19Vi-9b7da77b75e1de92034d08498b1165cbf2ae8029.png)
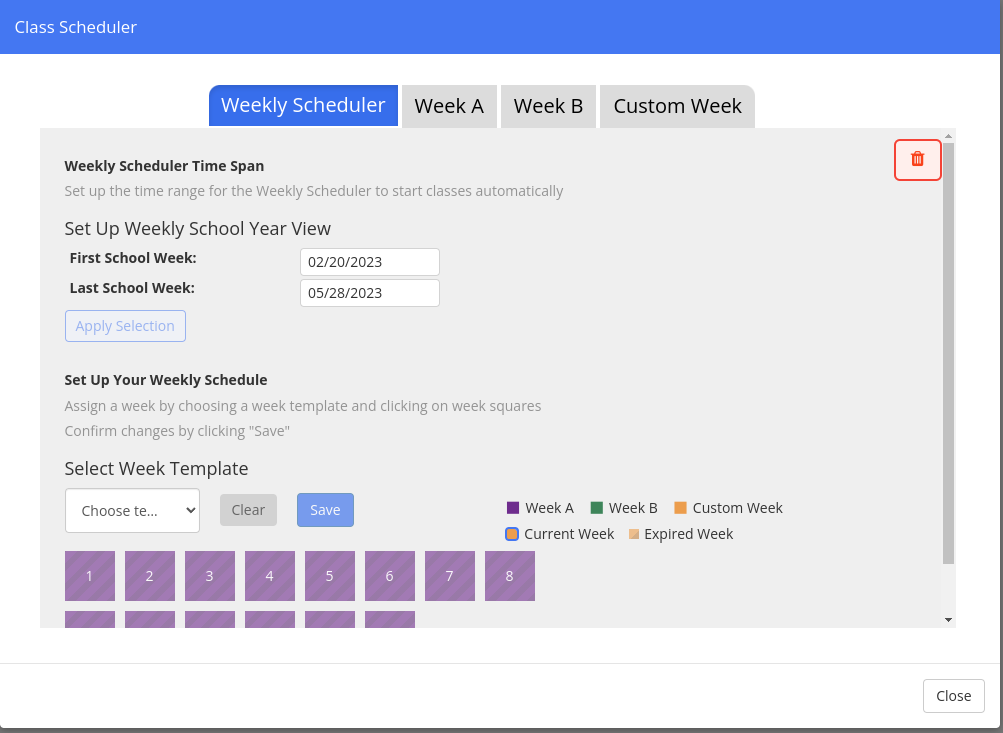
3. This will open a slightly intimidating screen. Have no fear. It really isn’t that bad!
[](https://info.wftigers.org/uploads/images/gallery/2026-10/0Ks4SNbAlngSIsuC-0888f6104fbe16f8d830d674116986aca556d319.png)
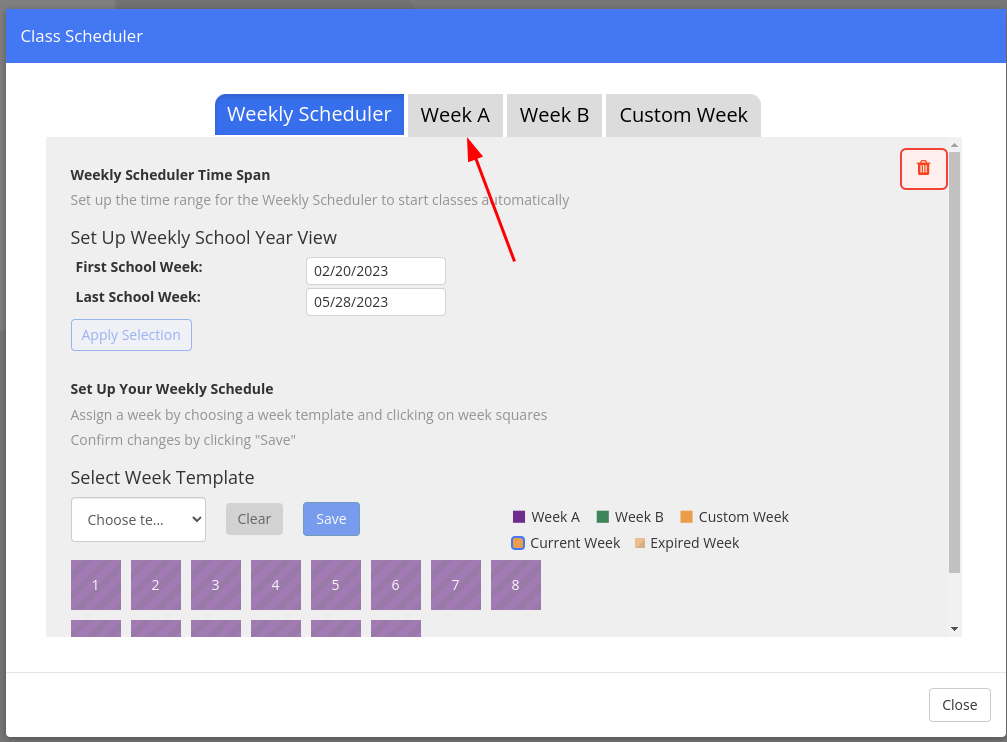
4. I’m going to start by clicking on the “Week A” tab.
[](https://info.wftigers.org/uploads/images/gallery/2026-10/1psnCHcf2MMudTmu-25427f442e3044fd0467a89bd7472a27dcb710db.png)
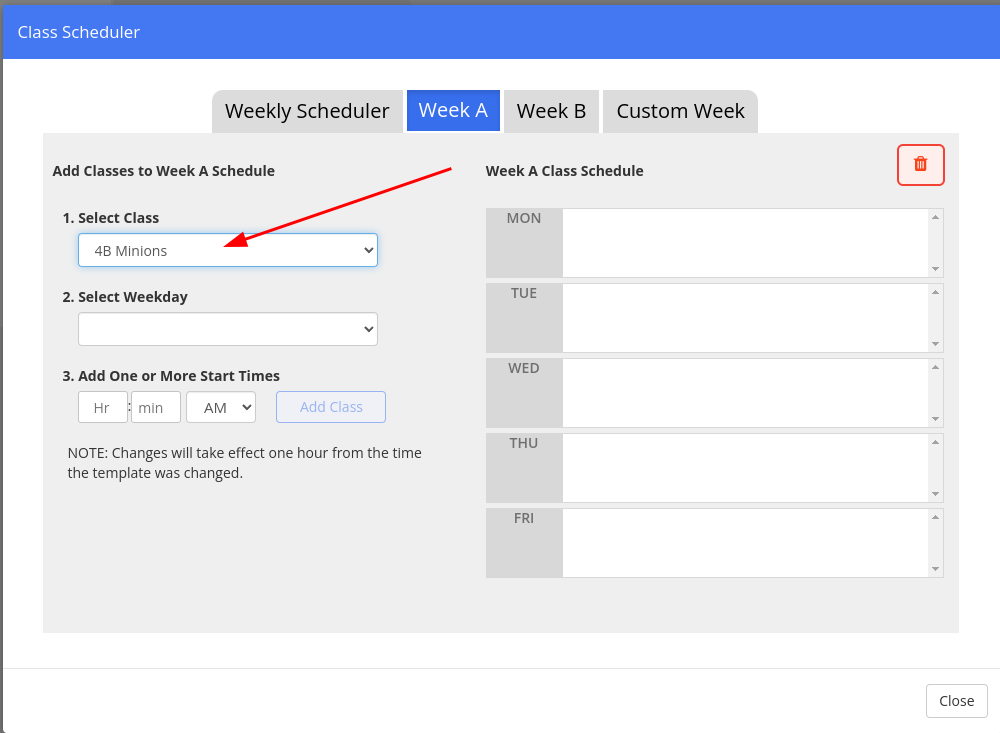
5. Select the class you wish to schedule (you must do this one at a time).
[](https://info.wftigers.org/uploads/images/gallery/2026-10/JAHPthCTMBdXHXb0-2c41738f3f2dc0f5a6ee37dbe9d6a6aa1febf985.png)
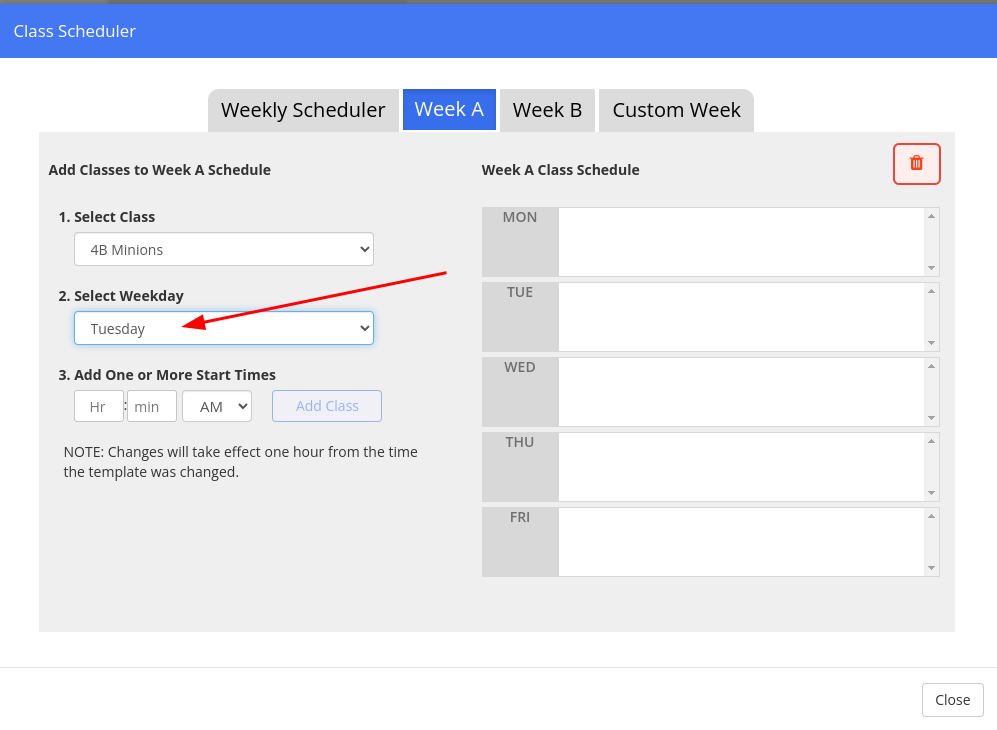
6. Select the first day that the class meets. I chose Tuesday for this example.
[](https://info.wftigers.org/uploads/images/gallery/2026-10/70DFGnSqDujsMB75-b7b953c8168291dec14f687b03104dc1cd856955.png)
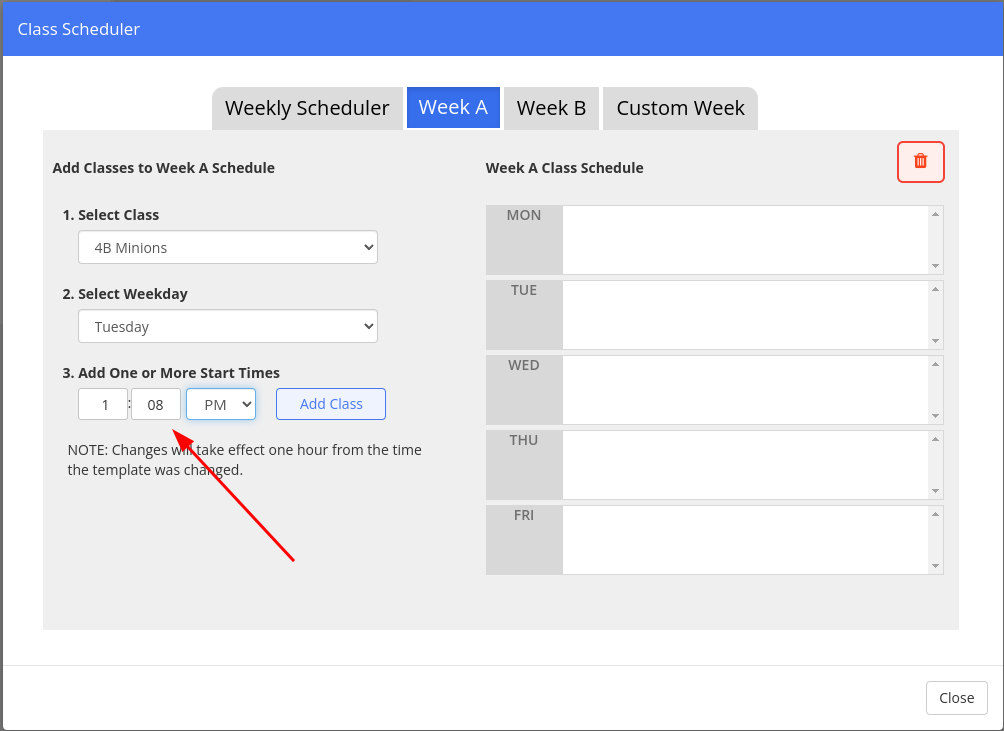
7. Set the start time of the class.
[](https://info.wftigers.org/uploads/images/gallery/2026-10/NDWRC4Zgq5LT9J46-3594752650c85cfc3e381120b408394079299861.png)
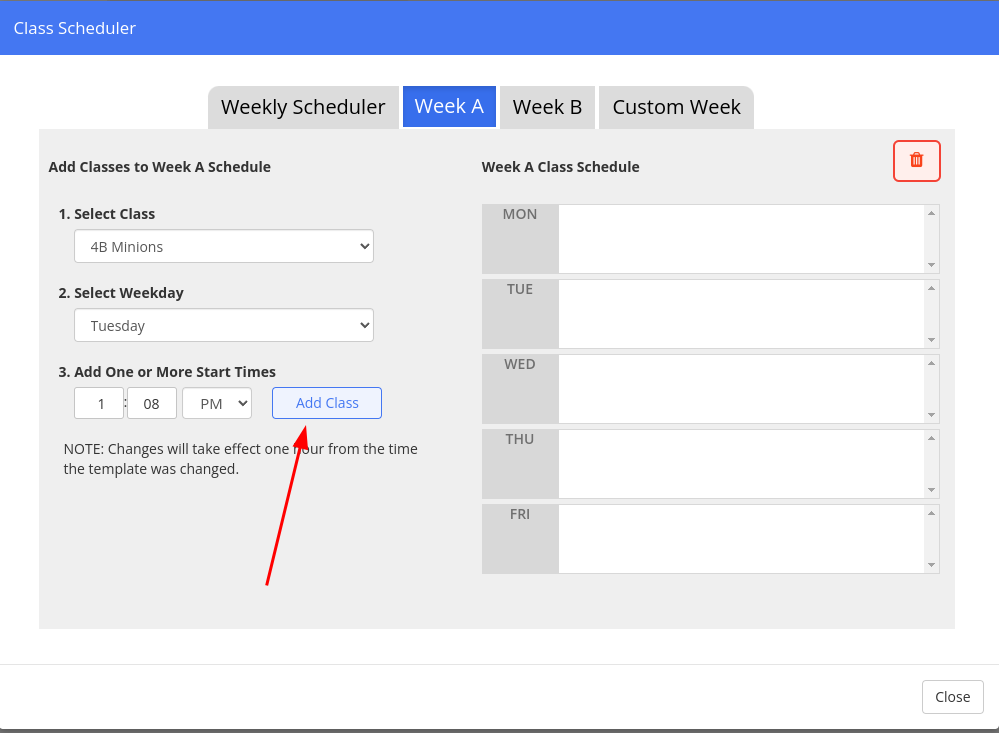
8. Press the “Add Class” button.
[](https://info.wftigers.org/uploads/images/gallery/2026-10/WZGHV6ud95o7O9jX-b1ace77f2c8c5c595a0d2aae76ccd45f5f34462c.png)
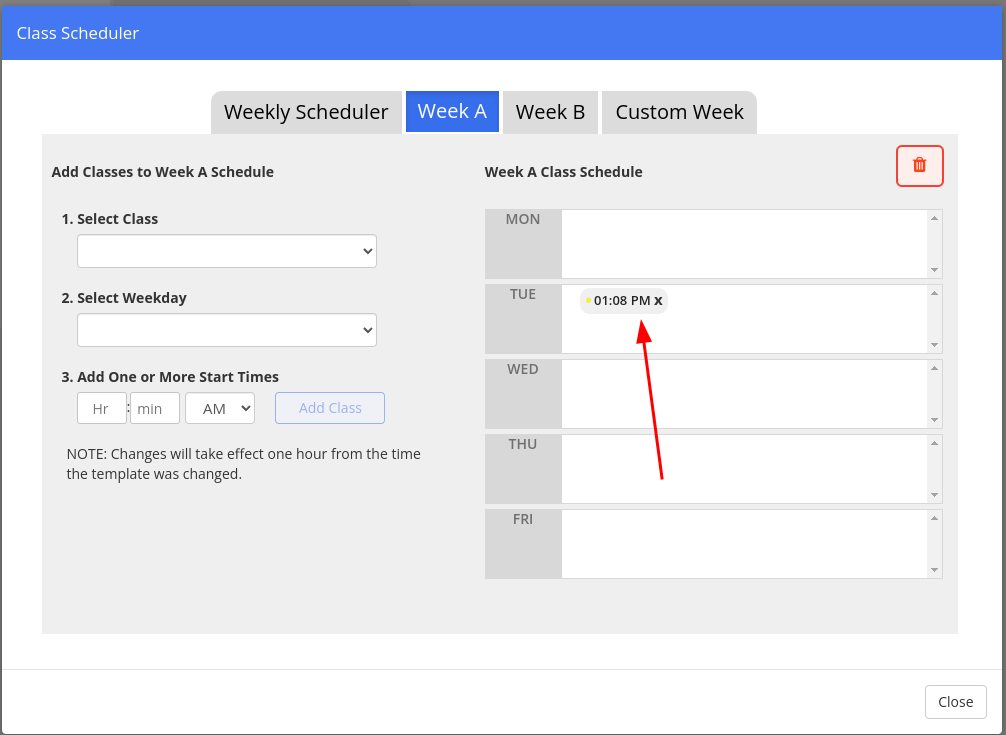
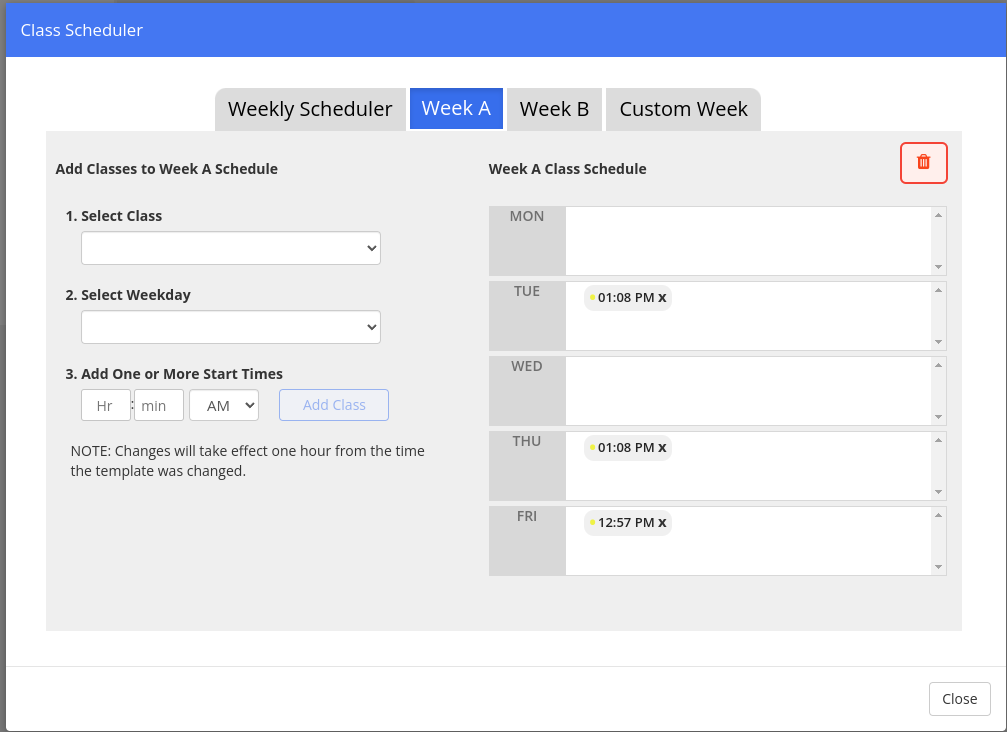
You should now see a bubble with that time and the class color listed in the date boxes on the right.
[](https://info.wftigers.org/uploads/images/gallery/2026-10/Pyth5r85aZCh7Zy9-565c3b8d1e19232adb670338e0497eabfef6e975.png)
9. Repeat this process for each day that the class meets.
[](https://info.wftigers.org/uploads/images/gallery/2026-10/fP5KQ8B9nYj9LMVB-ac333eed234319385440fce2f81600a615816fc3.png)
10. Repeat this process for each class.
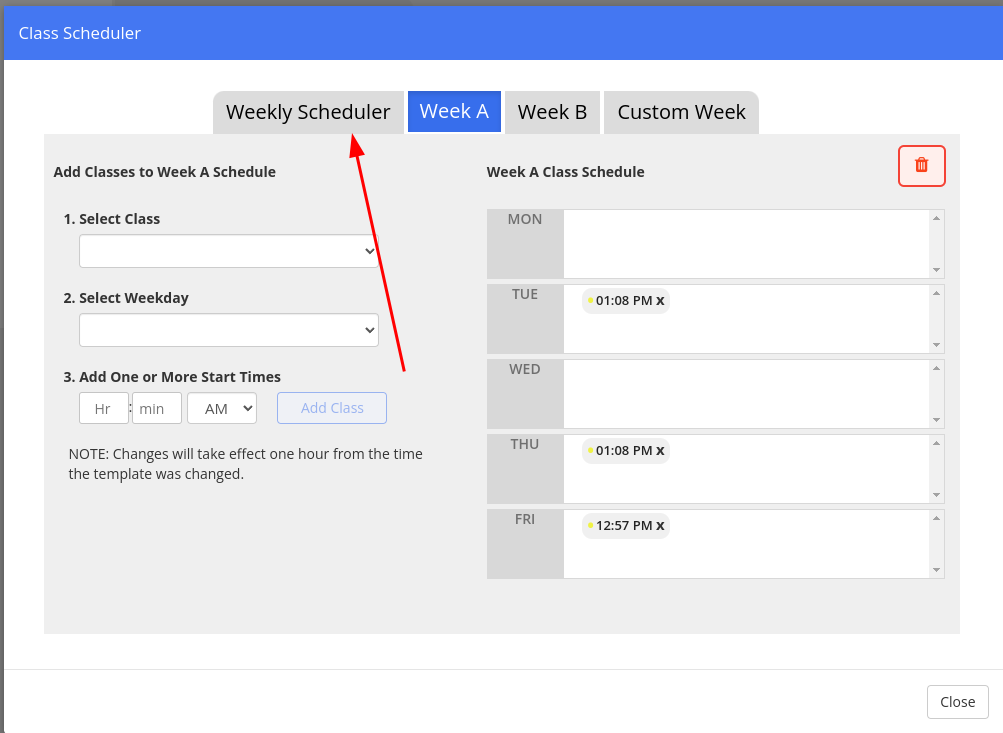
11. Click on the “Weekly Scheduler” tab again.
[](https://info.wftigers.org/uploads/images/gallery/2026-10/y8dc0pythvByoH0N-475e2d715b5f6eba8d1c33fe087139a553e0411a.png)
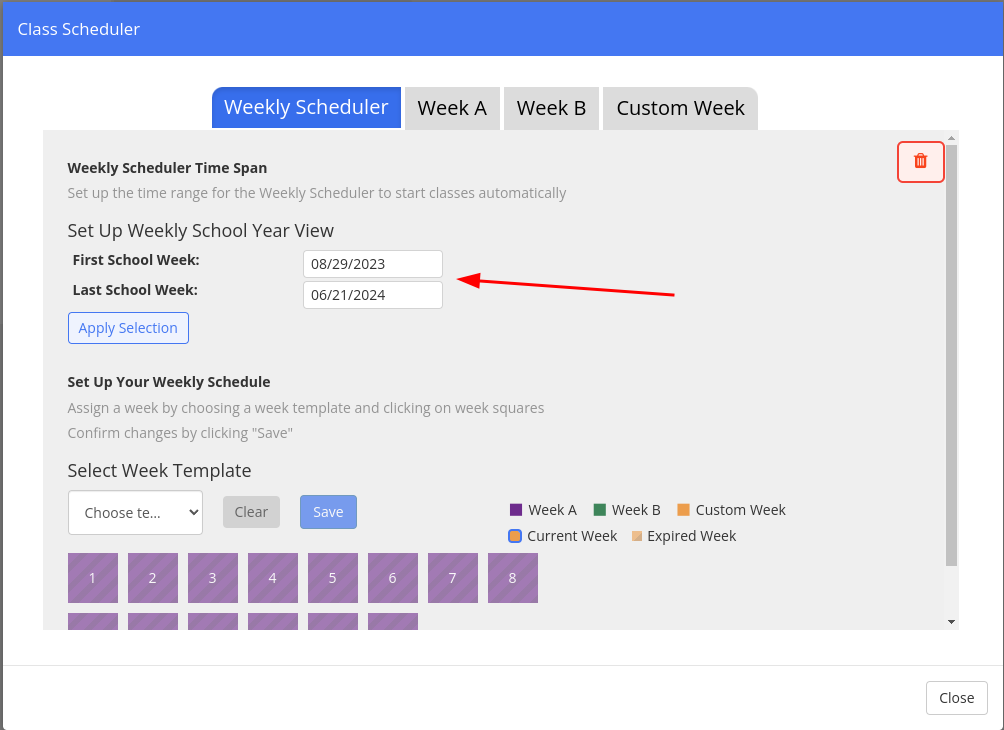
12. Set the First school week and the last school week. You can’t pick before today, and I picked a day past the last scheduled day to account for any extra days.
[](https://info.wftigers.org/uploads/images/gallery/2026-10/0HJeCg2VImu7uSHo-33423ddf33509fb0d6010a6eac950efc142aa31f.png)
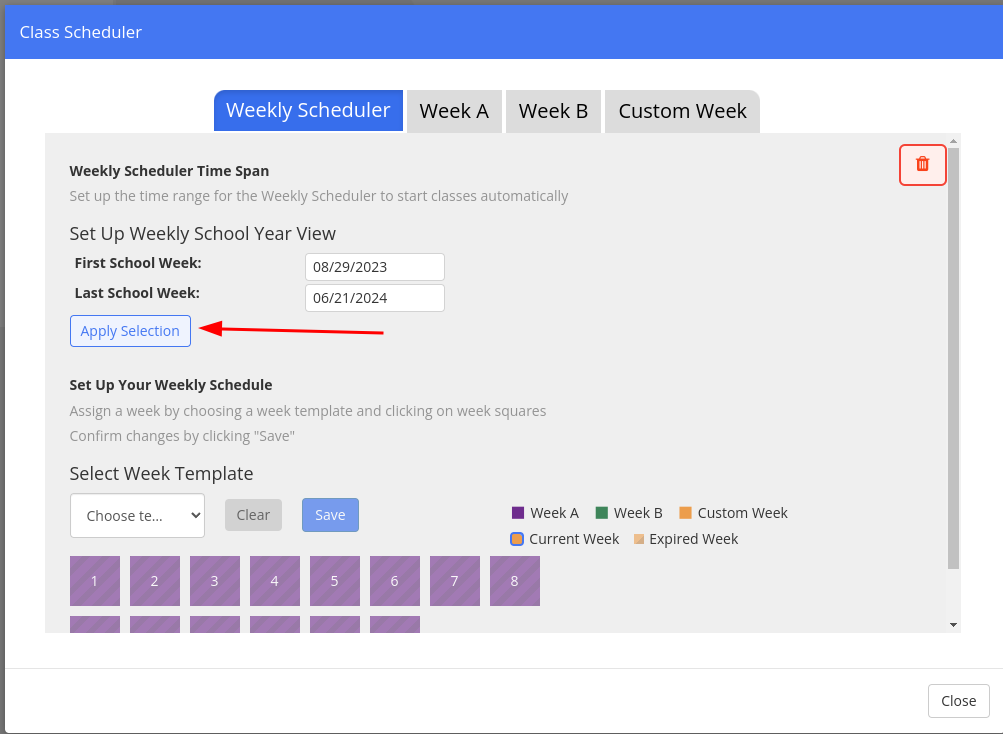
13. Click on “Apply Selection.”
[](https://info.wftigers.org/uploads/images/gallery/2026-10/gWImyxadx5laPUIW-6056735b4af22cfe7c0cb76731c7b4ed963eaaa7.png)
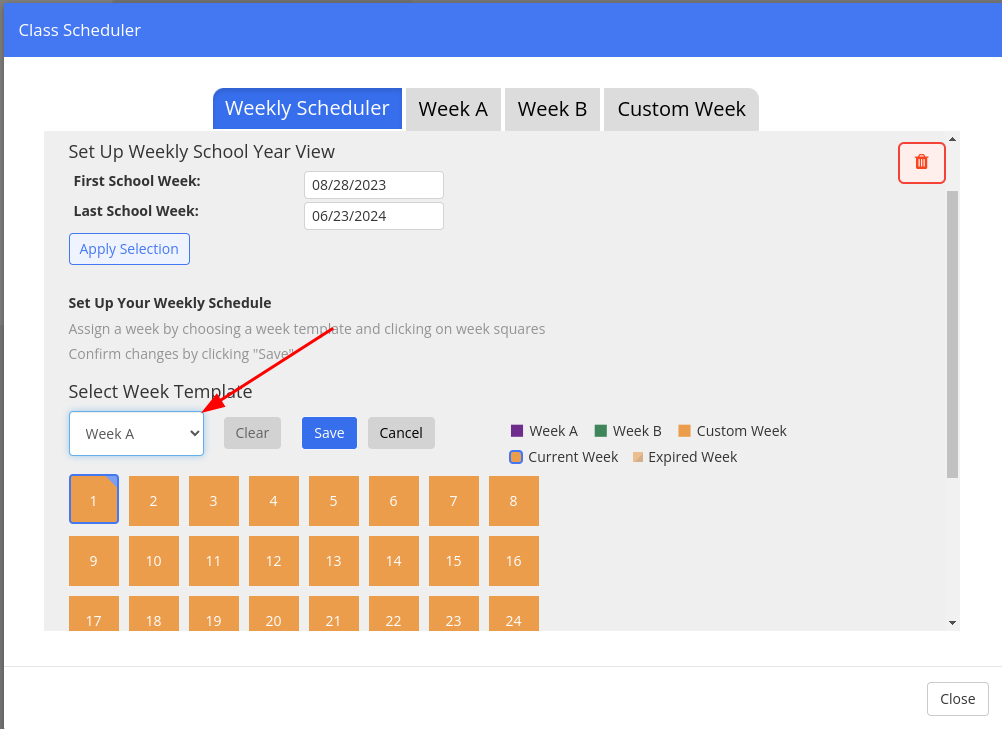
14. Select “Week A” in the week template box.
[](https://info.wftigers.org/uploads/images/gallery/2026-10/8l0JxKldGj8bBCqM-825c662c70cf74a27f0b57464f2a592b7818d372.png)
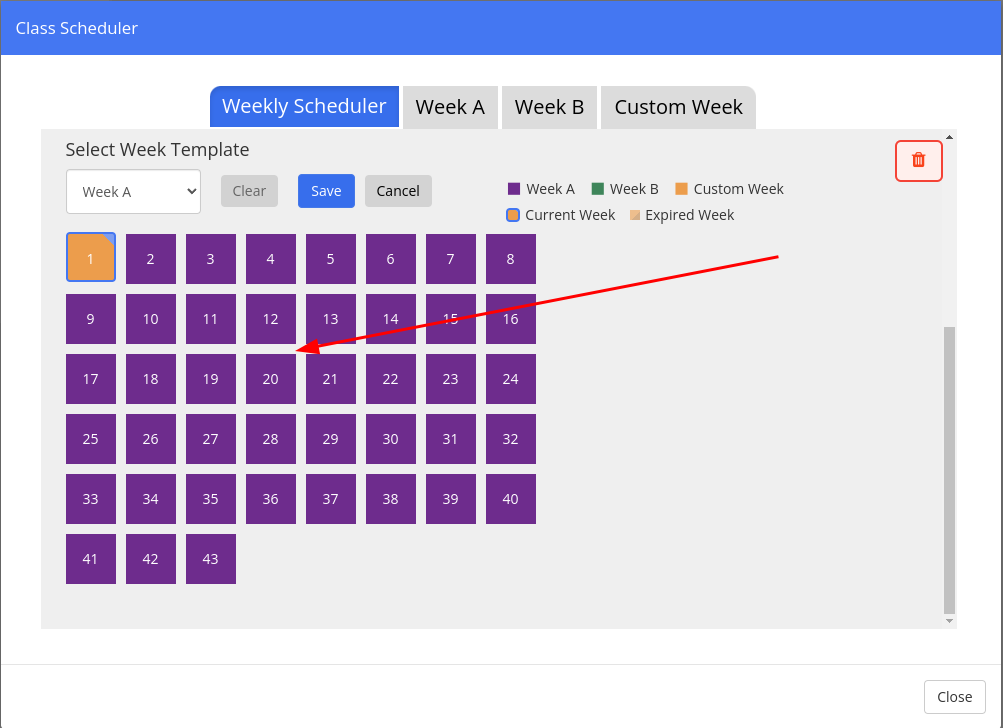
15. Click on the number of each week in the school year. I have 43 of them. They should all turn to a uniform color. You MAY NOT click on week 1.
[](https://info.wftigers.org/uploads/images/gallery/2026-10/1FfBwq3inUez7ky3-9d8afc283a9aa87c5af8b90a656856773935abfe.png)
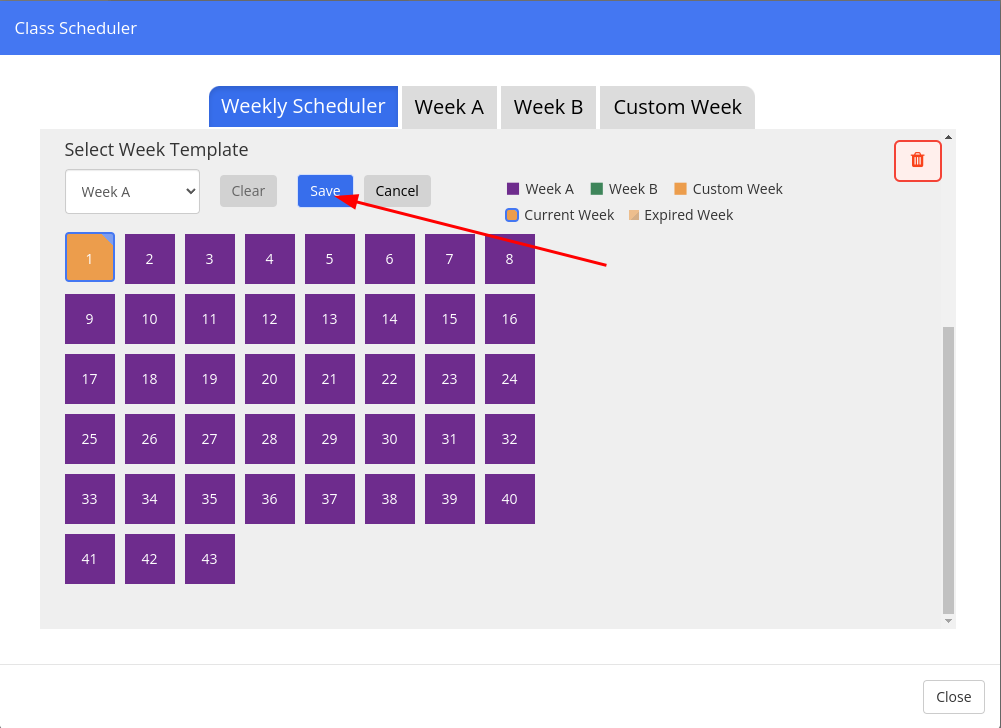
16. Click on the “Save” button.
[](https://info.wftigers.org/uploads/images/gallery/2026-10/U6PEoZZckRmsLlmY-9bfe994b2b4adb88385b65cdda1bd3e0a9a57350.png)
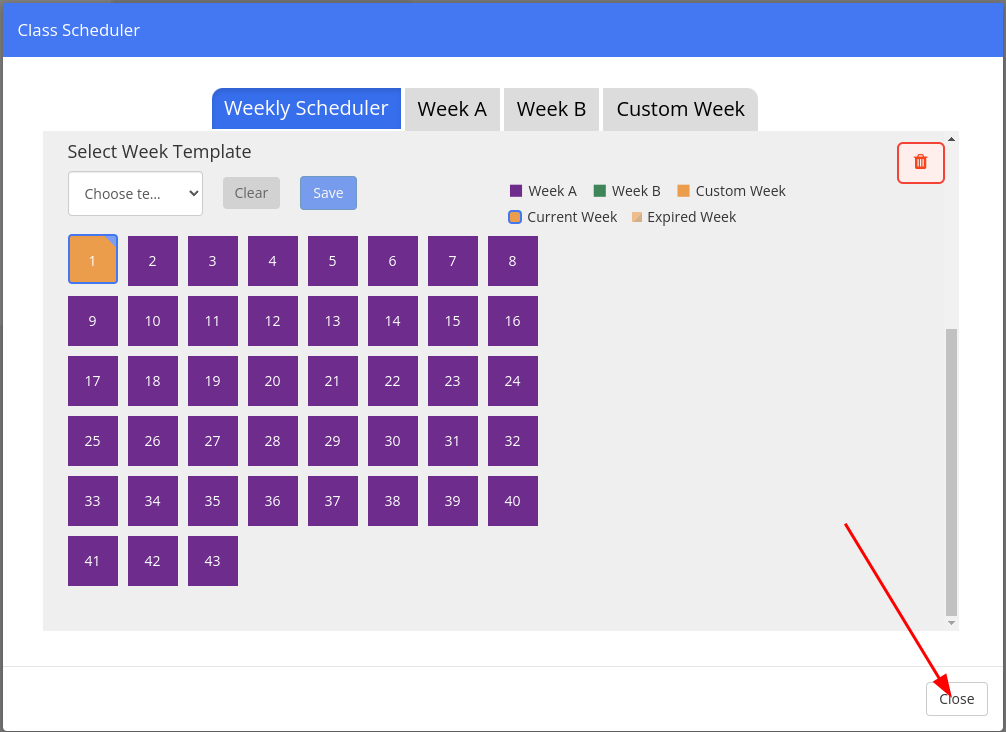
17. Click on the “Close” button.
[](https://info.wftigers.org/uploads/images/gallery/2026-10/sRaMHnfinGENPTRV-b521c4ab344f137a5d58db7bab389a49ff85aa55.png)
At this point, your classes should automatically start, and, if you have the minutes correct, they should automatically stop at the appropriate times.
### Please Note: for “Fast Friday” sessions, you will still need to stop your classes. There isn’t a way I am currently aware of to change the minutes on a per-day basis.
Originally posted by Cory Robbins on the West Fork Technology Hub (2023-08-29).
# Blocksi - Inviting a Substitute Teacher
Blocksi allows teachers to invite substitute teachers by email. Once validated and logged in, **SUBSTITUTE TEACHERS WILL HAVE IDENTICAL ACCESS AS THE TEACHER THAT INVITED THEM!** Please be cautious when using this feature. Subs will be able to create and delete classes. This isn't a huge problem since you can resync the class with Google Classroom, but it is something to note.
Inviting a Substitute Teacher
1. From the Blocksi dashboard, click on "SUBSTITUTE TEACHERS."
2. Enter the email of the substitute teacher. You can access this in Frontline.
3. Set a date for the access to expire. This should ALWAYS be set to the shortest timeframe available.
4. Enter and confirm as password that meets the requirements. This will be emailed to the sub.
5. Click on the "Send Invite" button.
6. You will see a message stating that the status is "AWAITING VALIDATION."
7. The substitute will receive an email like this one, which includes your email, the password, and a button to access the dashboard.
8. The tech staff has to validate each sub-request, so you need to send a tech ticket to let us know this needs to happen. Please include the email of the user you invited, and also try to include when the account is set to expire. It would also be good to give us a timeline of when the account needs to be available.
9. Once we have validated the request, you will see "VALIDATED" in the status area.
10. The sub will also receive an email letting them know that they may now log in.\[/details\]
Click here for instructions.
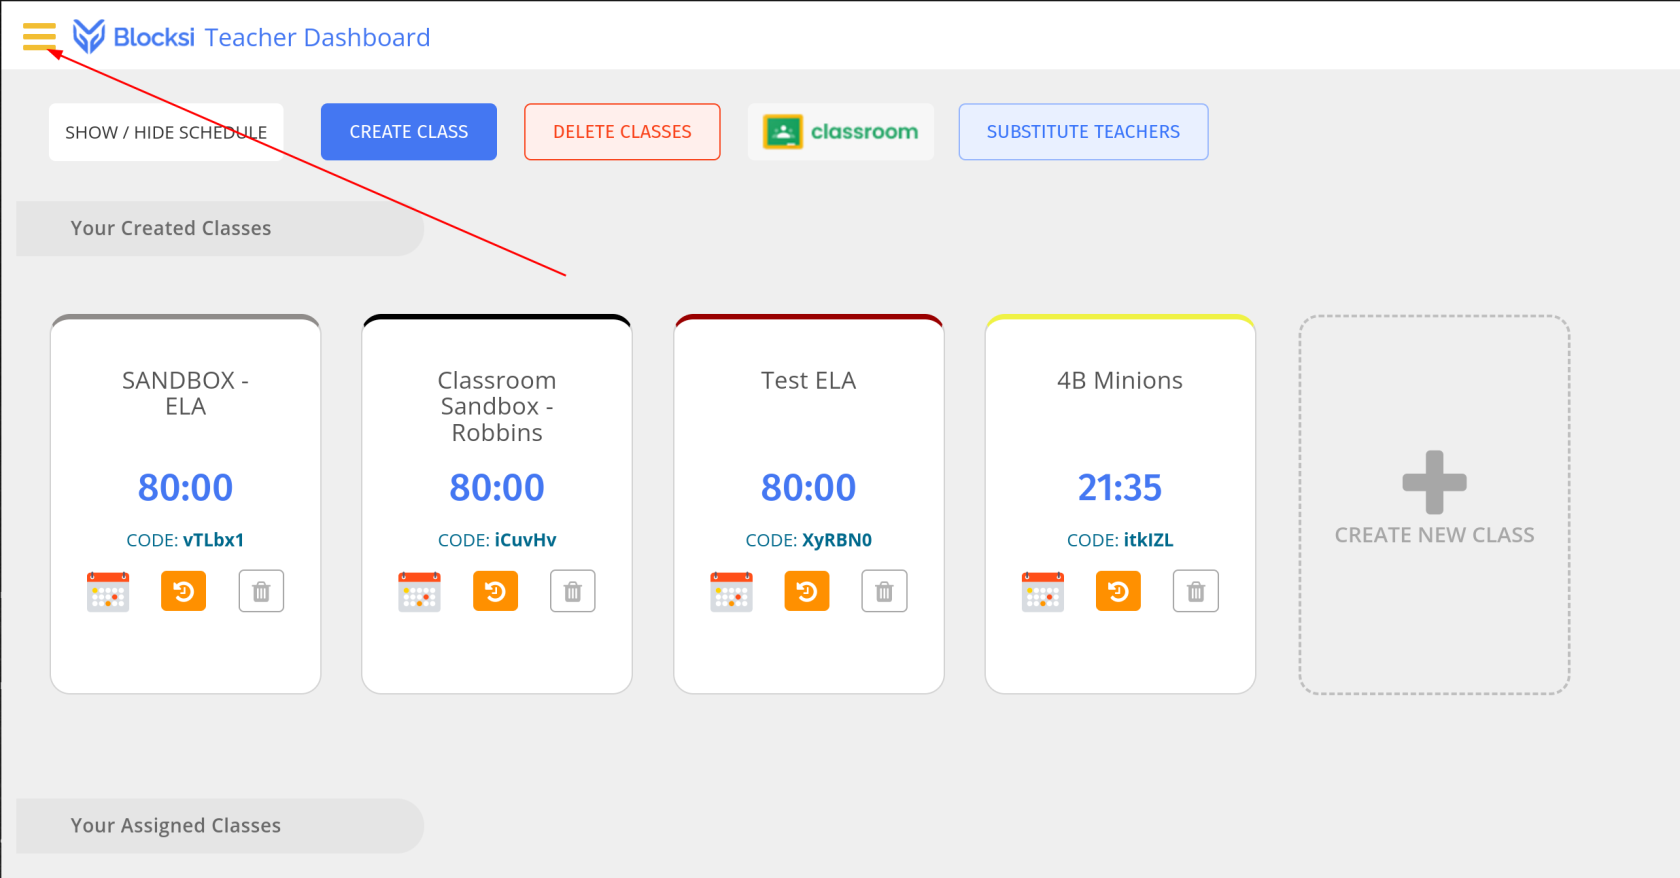
1. Click on the little yellow hamburger menu at the top left of the Blocksi page.
[](https://info.wftigers.org/uploads/images/gallery/2026-10/4iszmCRlmzEuJAnt-4615c86461bb93f14e6a14431d422d1934476aea.png)
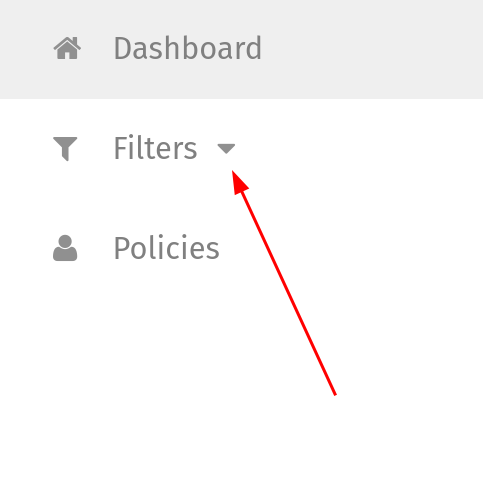
2. This will present you with you filtering menu. Go ahead and click on “Filters” to expand it.
[](https://info.wftigers.org/uploads/images/gallery/2026-10/wn5MNo1JkPyOkUEw-a9f29f43932957a75ac09235a94add31cf44b168.png)
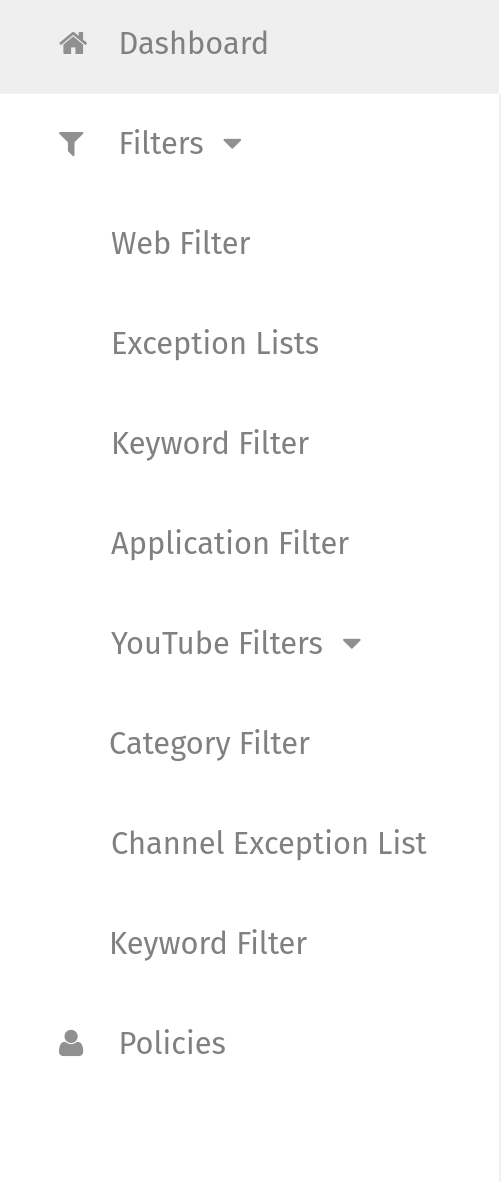
3. This opens the menu to include several options. We will go through each of them for our class filtering.
[](https://info.wftigers.org/uploads/images/gallery/2026-10/VxN5KkZolznZGwpk-f68f663a8b64c93f9e5336bc004fc991e59da010.png)
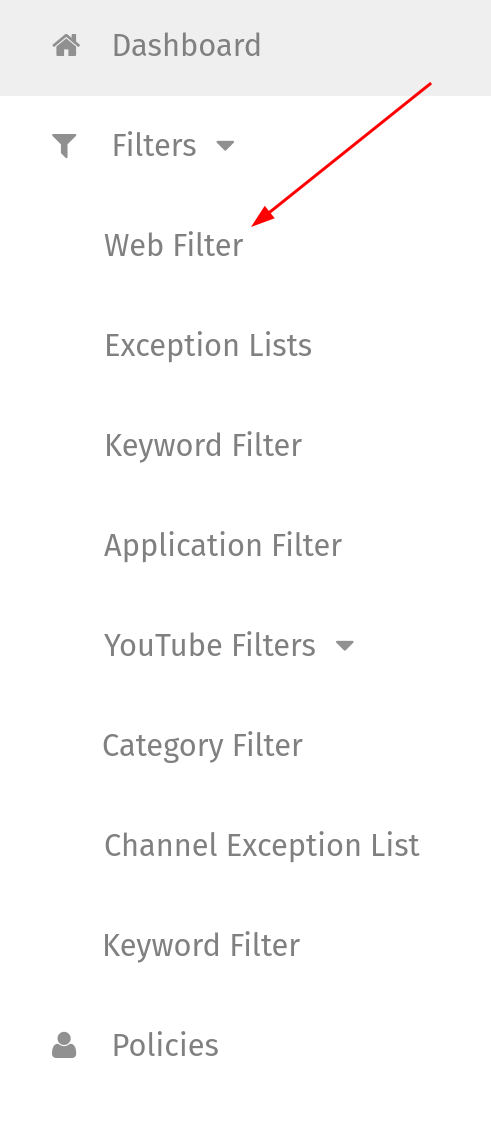
4. Click on “Web Filter.”
[](https://info.wftigers.org/uploads/images/gallery/2026-10/eA60xwvGxb7OrKJs-9e3b1cf961aff3c859957542da9c61c6ae7803d2.png)
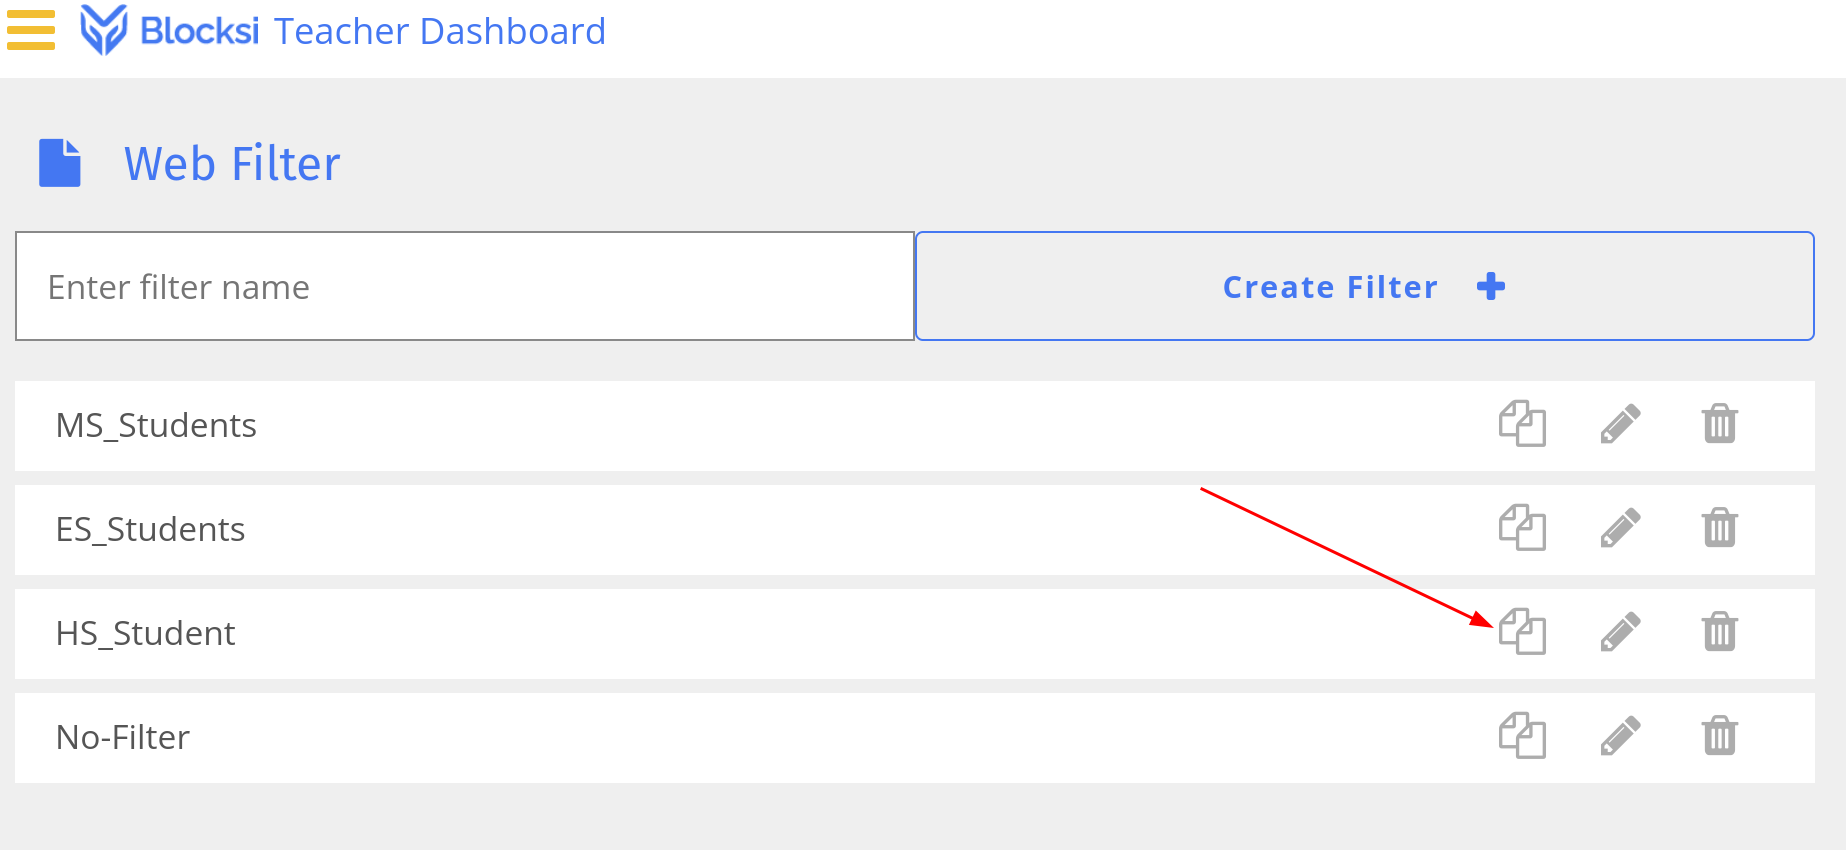
5. While not required, I recommend you pick XS\_Student as a starting point. Click on the little copy icon to duplicate the filter instead of starting from scratch.
[](https://info.wftigers.org/uploads/images/gallery/2026-10/mPL77lRCL4aNKb8w-f804f72e70be557aa9b4178f301eef7e8a0e7a0d.png)
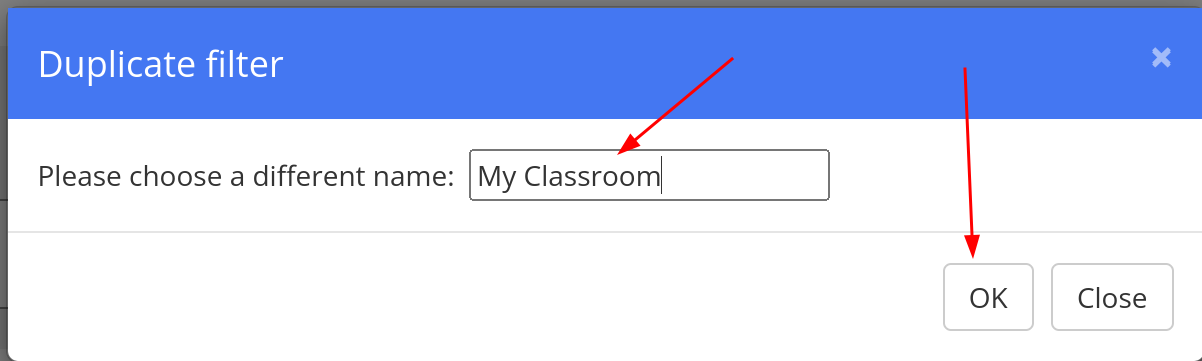
6. Enter a name (I’m using “My Classroom” for all of the names to make things less confusing), then click on OK.
[](https://info.wftigers.org/uploads/images/gallery/2026-10/4zNeswWBm7ZPG0AR-8999c54be20b68ae1410e54f9dda63d369abc5cc.png)
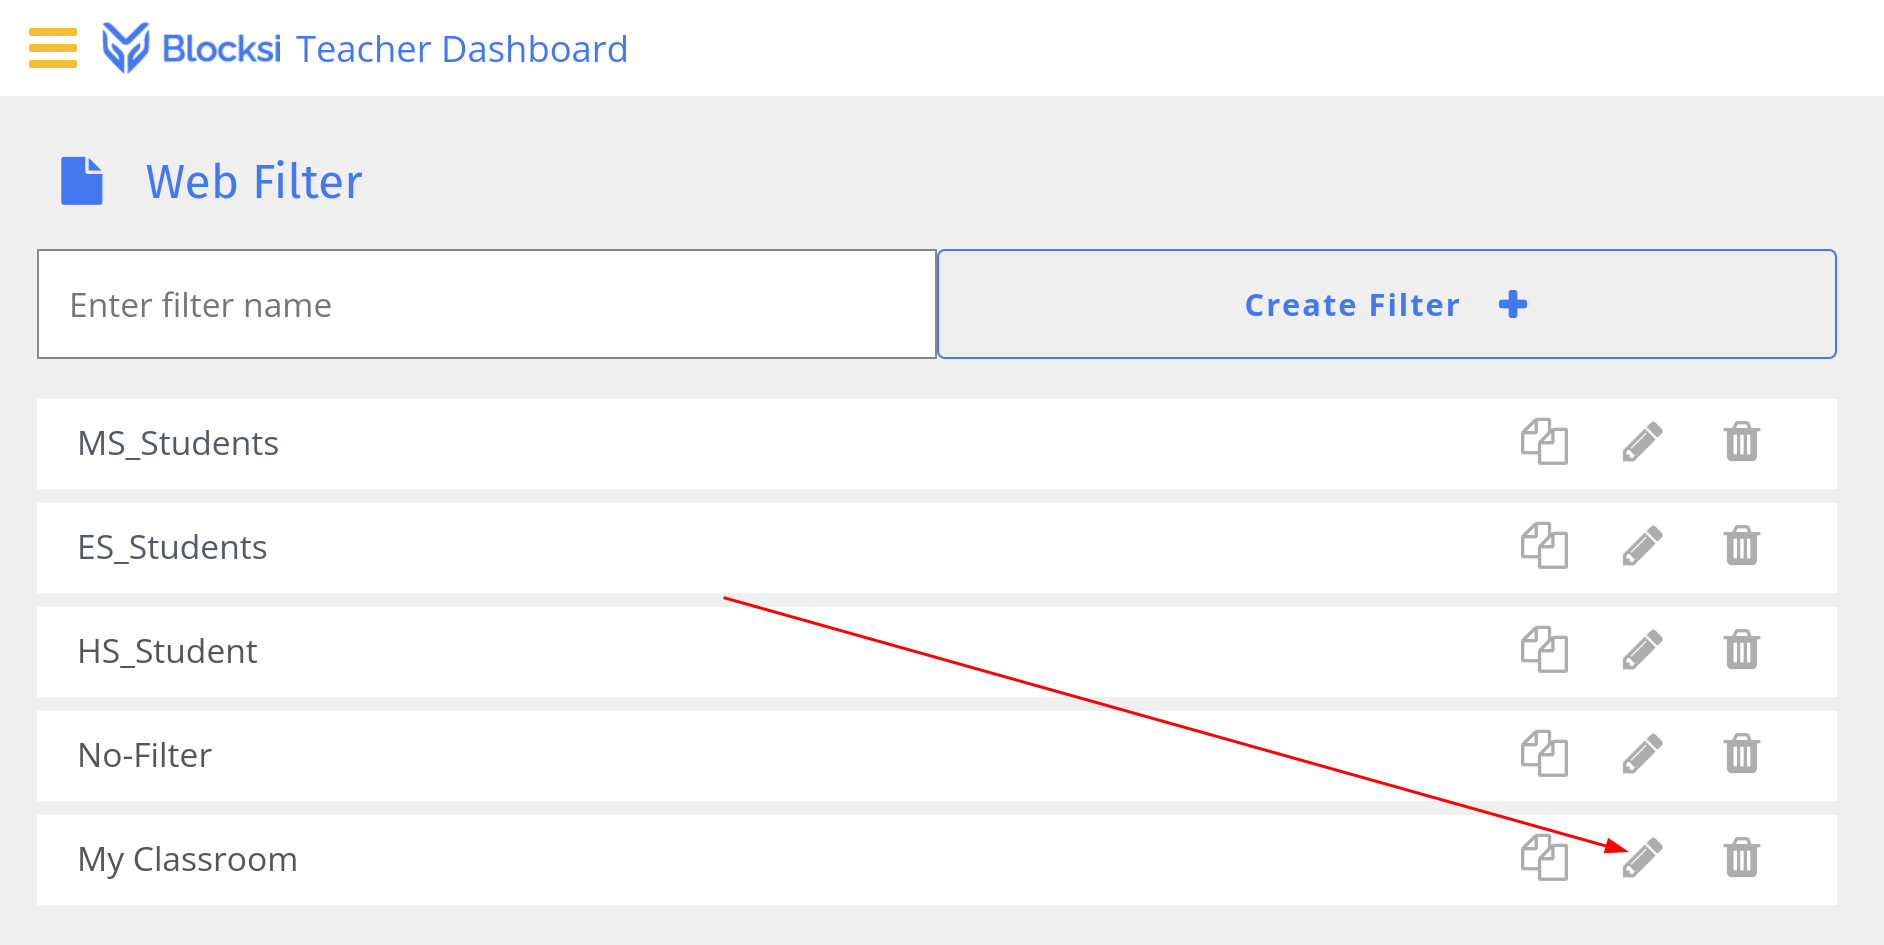
7. This will add “My Classroom” (or whatever you name it) to the web filter list. We will click on the pencil icon to edit the filter.
[](https://info.wftigers.org/uploads/images/gallery/2026-10/ybmKtltdySUWY8Zn-ff1f05c218fe16ba5be296306c5a8d1eef9bd2cb.png)
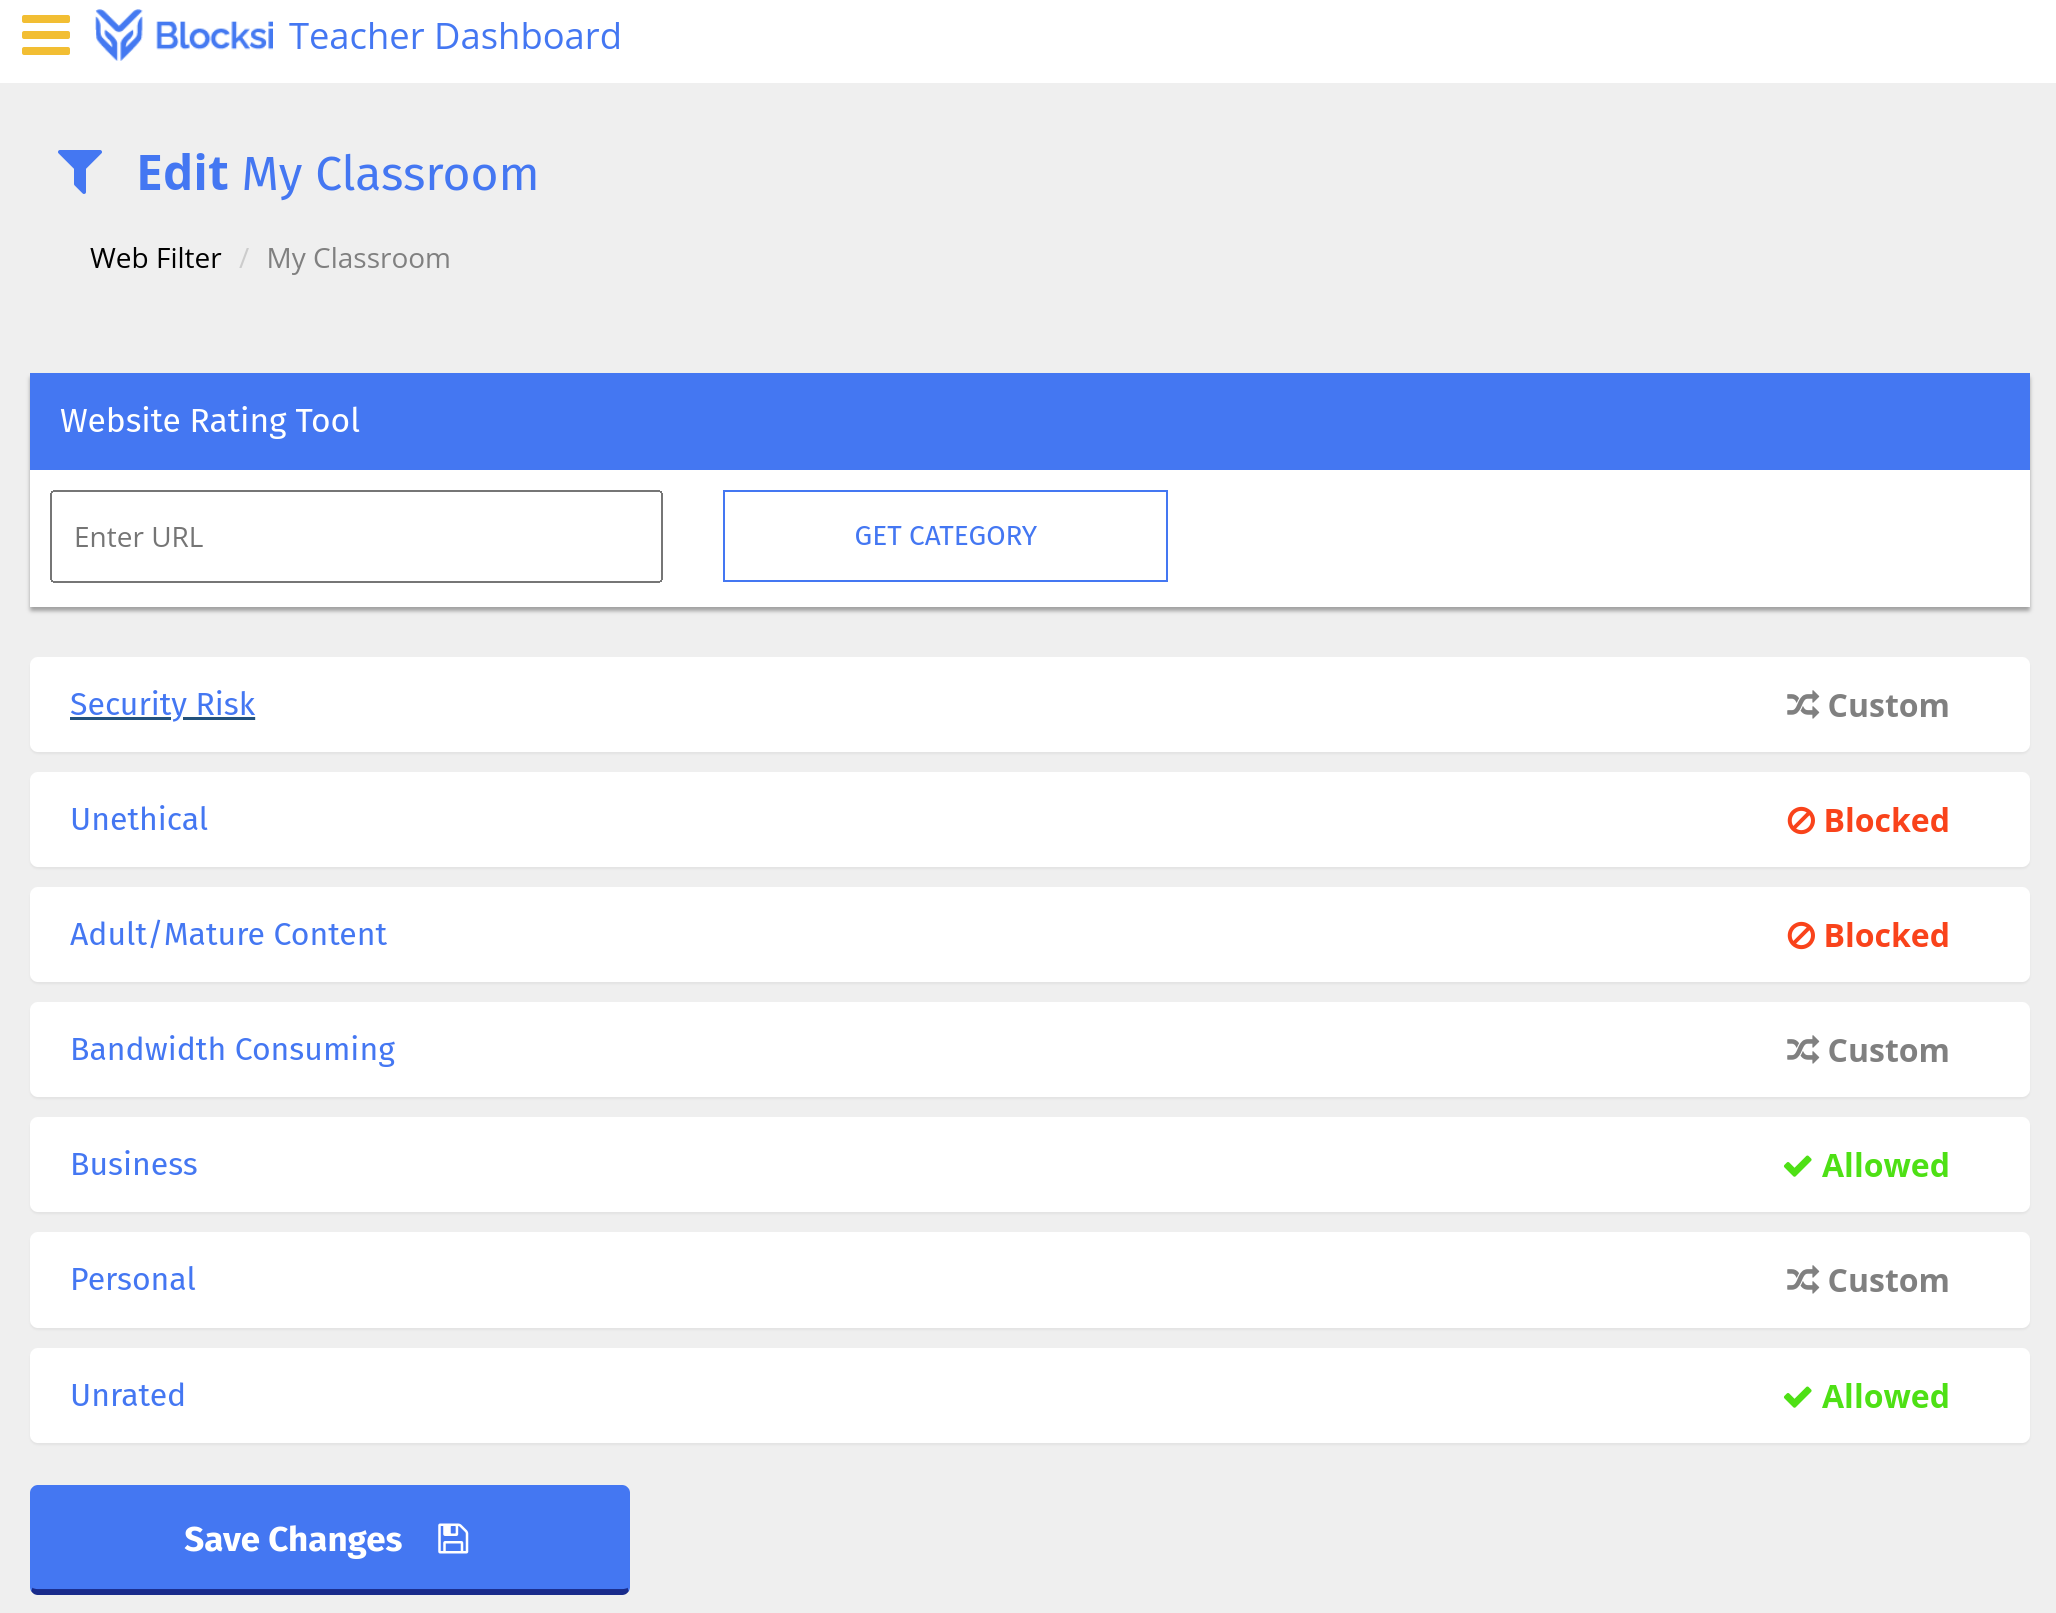
8. This page shows all of the various categories that Blocksi puts sites in. At the top, you can put in a web address, and Blocksi will tell you the category. Handy if you aren’t sure which category niggles you…
[](https://info.wftigers.org/uploads/images/gallery/2026-10/ym5RtDLNVbQwmzfi-53e7b654ecab1687de97290302abcc766c13ace9.png)
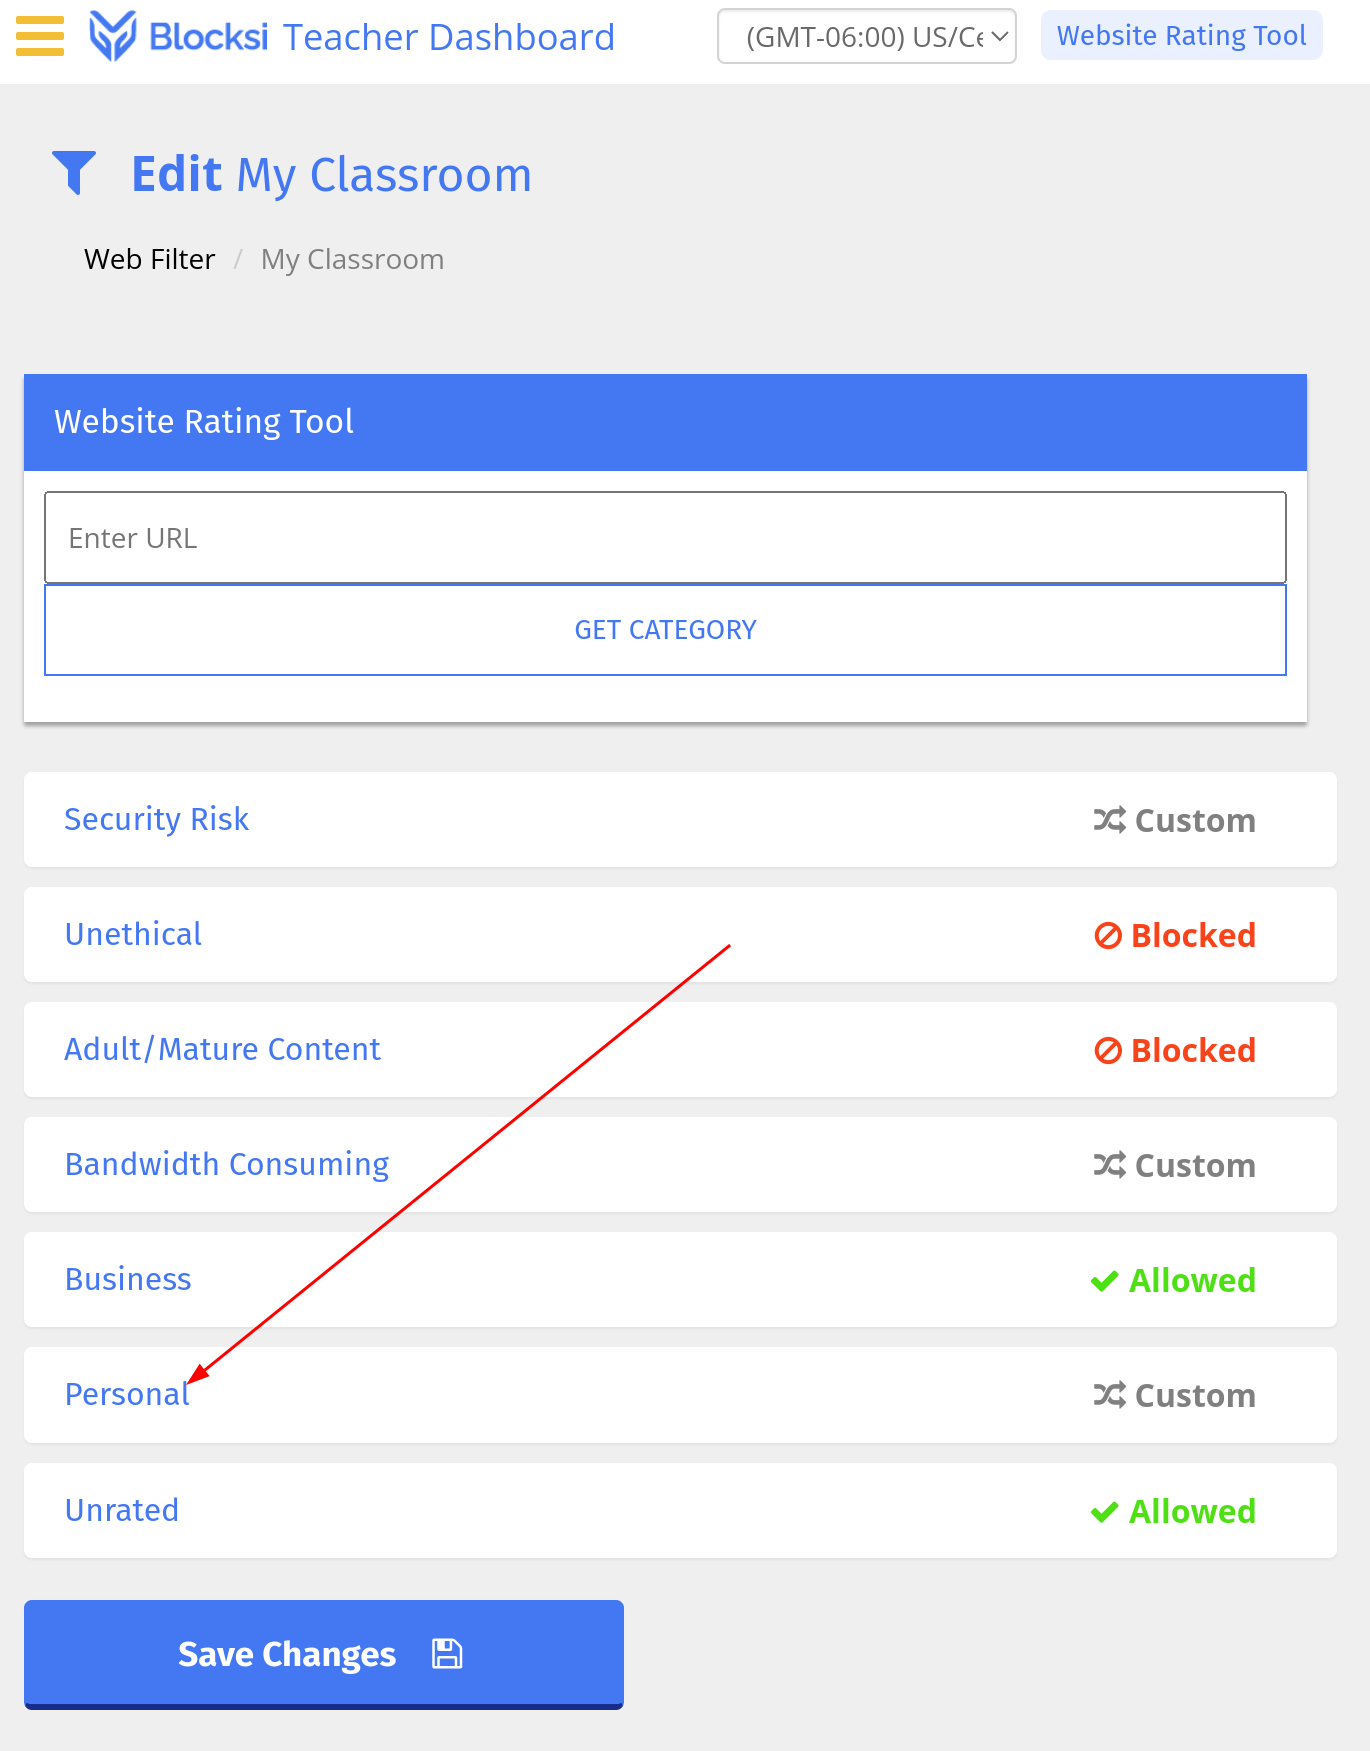
9. To edit the web filter, click on a category.
[](https://info.wftigers.org/uploads/images/gallery/2026-10/g96Df1edjO2Nf0No-3467b62885105f2164808ec49df947aa82666763.png)
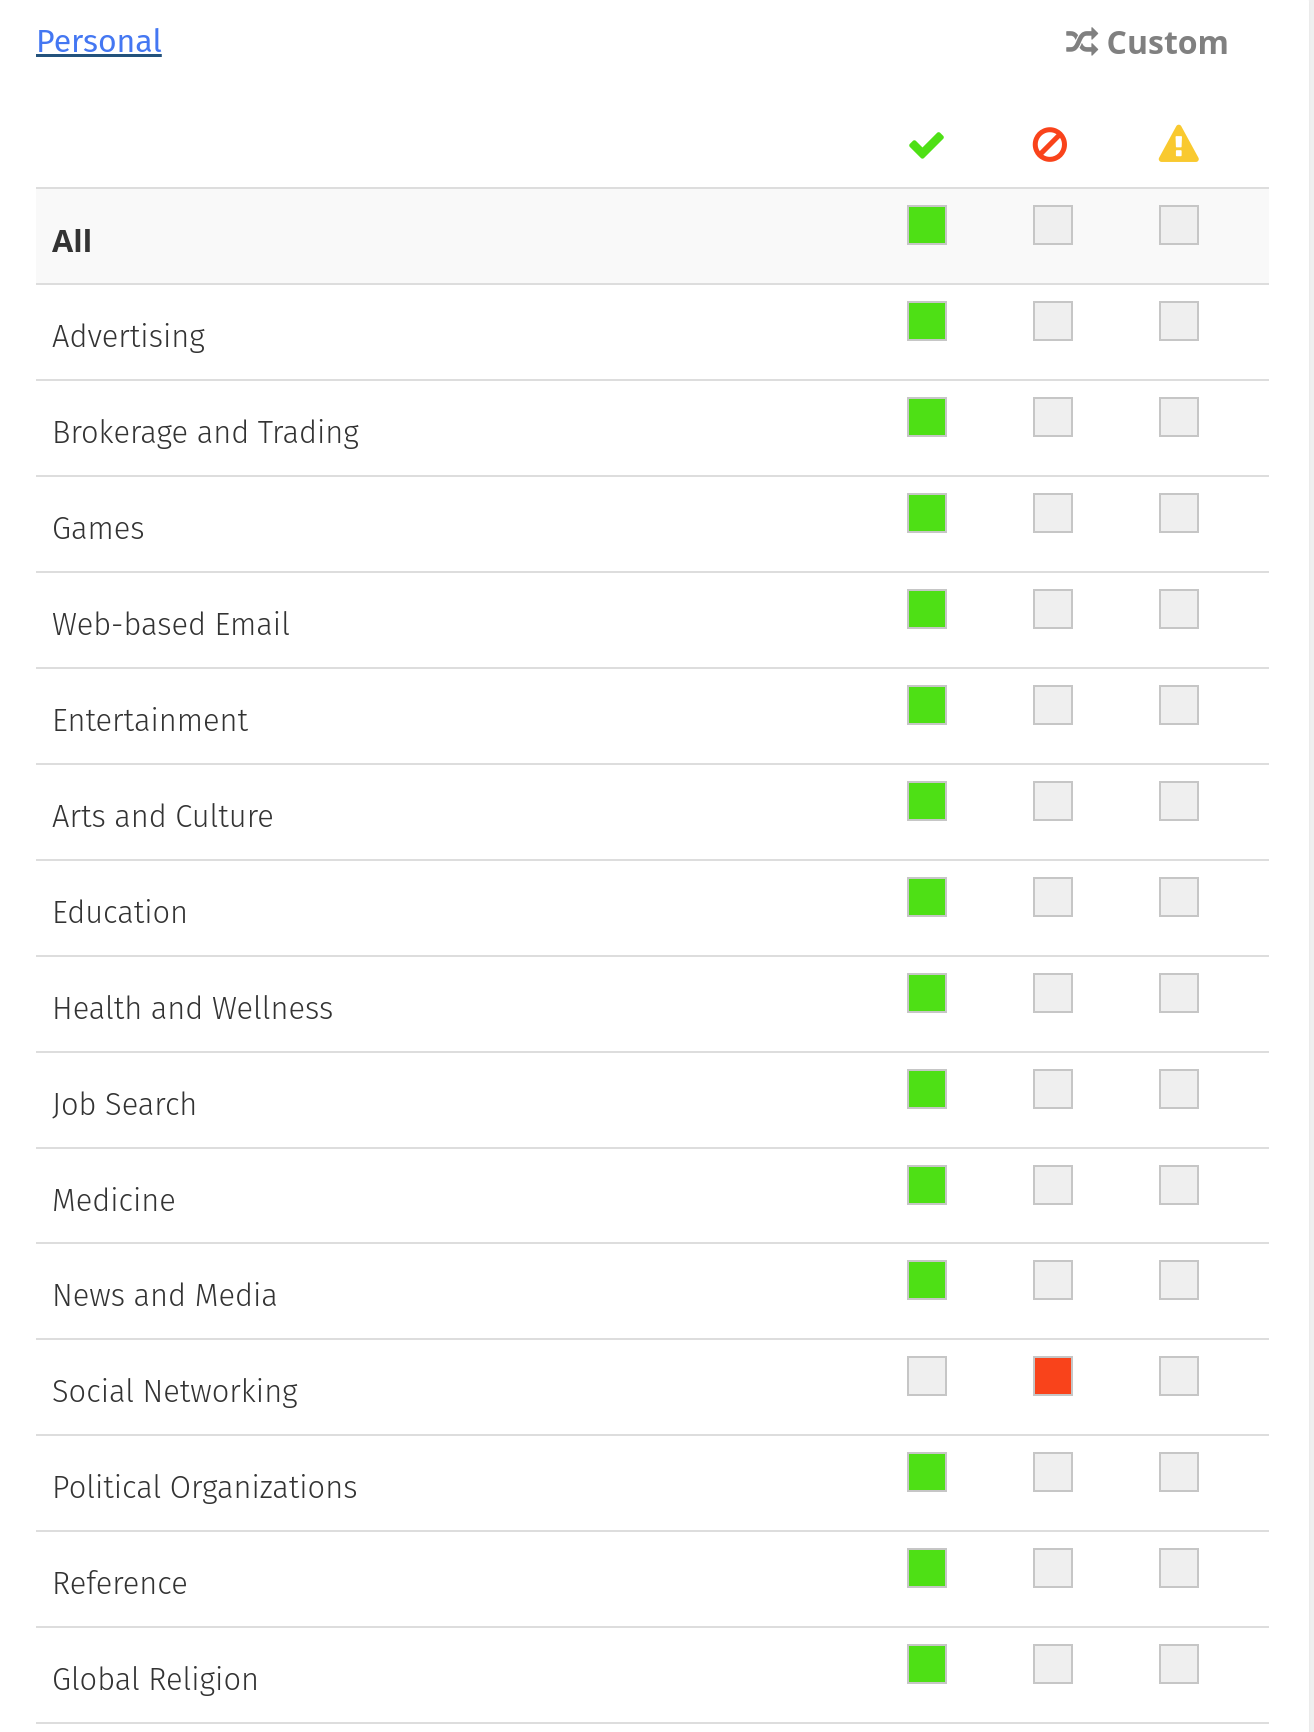
10. This will expand the category to show the sub-categories.
[](https://info.wftigers.org/uploads/images/gallery/2026-10/QV3Ujz9qWjX87Z22-476779397bd6664d4048e846d9ea323ad3c60776.png)
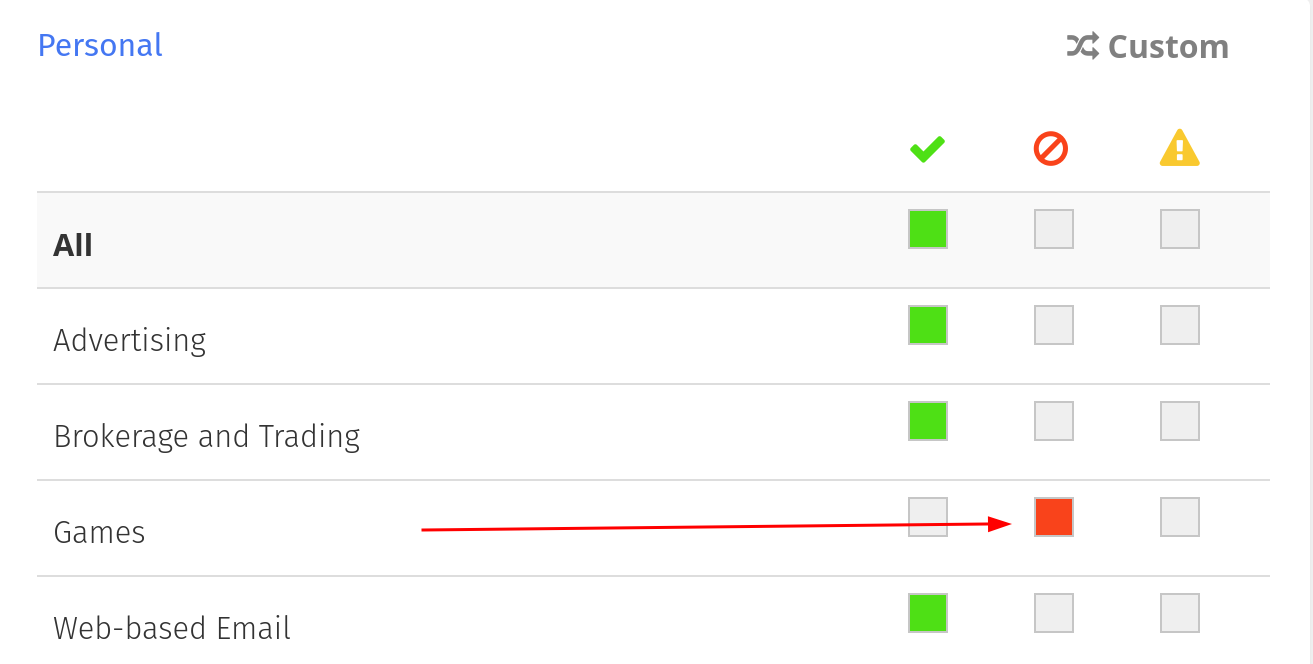
11. If you want to block something that isn’t blocked, activate the center square. If you want to allow something that is blocked (be careful, we blocked things for a reason), activate the left square. If you want to warn people when they visit a page, but you still want the student to be able to visit, click the right square.
[](https://info.wftigers.org/uploads/images/gallery/2026-10/QAr2ZO6TLNHKQ7RM-2b35b168191c118d37a85b4fd52f16e95c137e6b.png)
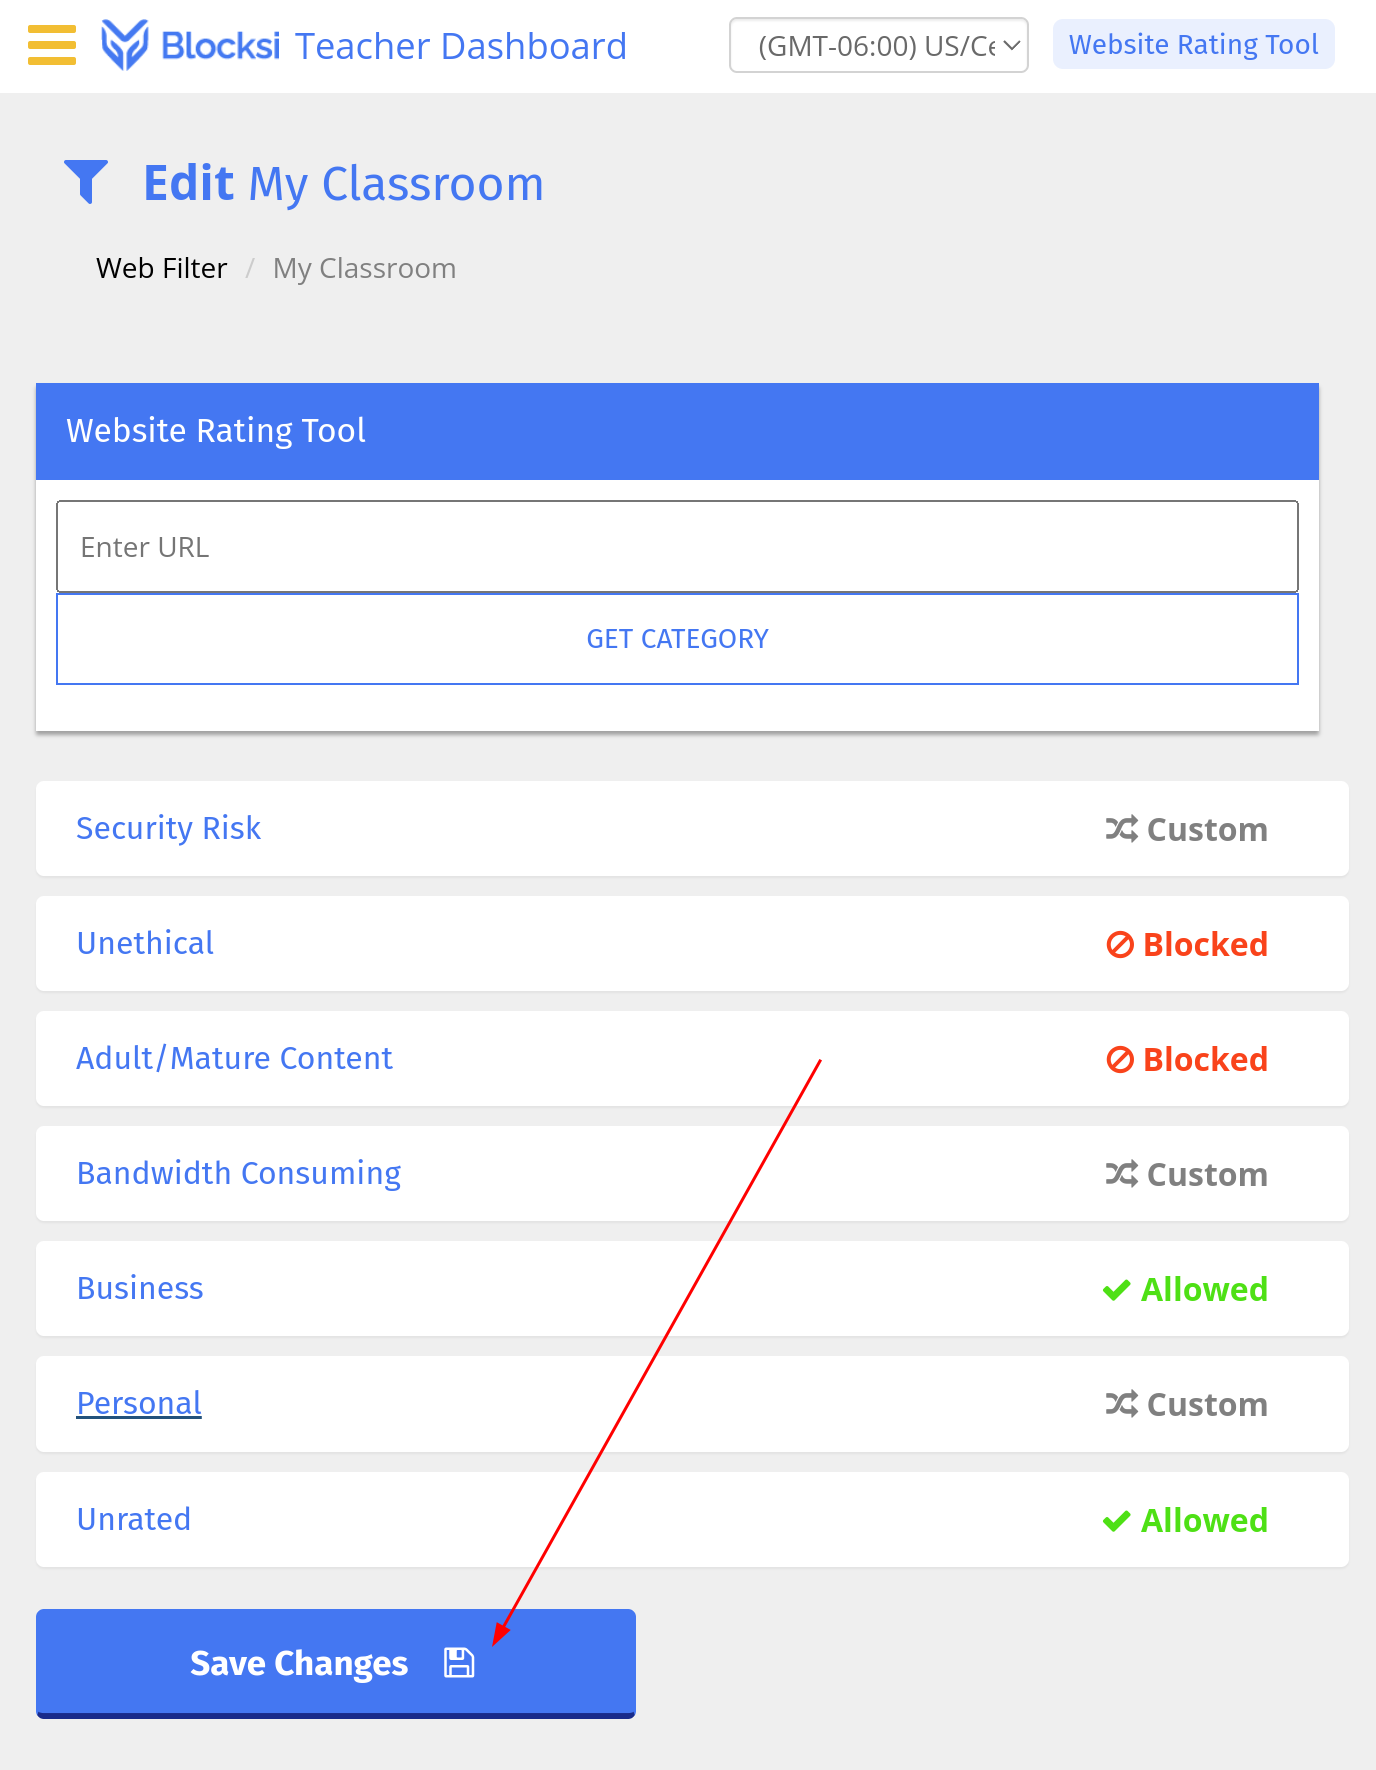
12. Once you have edited all of the categories to your satisfaction (you can always edit them again later), click the “Save Changes” button.
[](https://info.wftigers.org/uploads/images/gallery/2026-10/bRoaknIKw6yRbwW3-5d783e7120df0faf21c1c637830b7b59d9d94910.png)
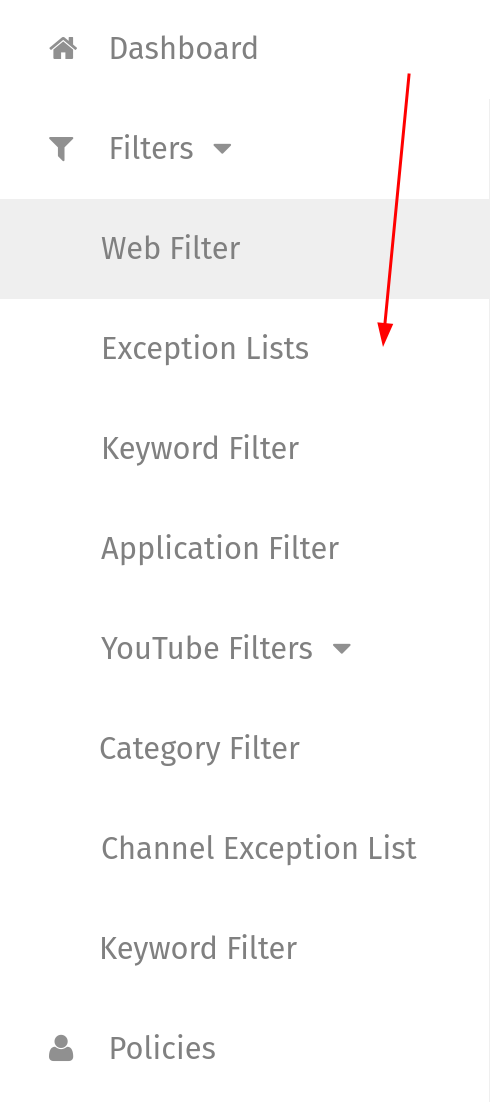
13. In our menu, let’s click on “Exception Lists”
[](https://info.wftigers.org/uploads/images/gallery/2026-10/IvEBXN92fa20XhFC-97d50194f0b85e91683babc0516f5ba40d172705.png)
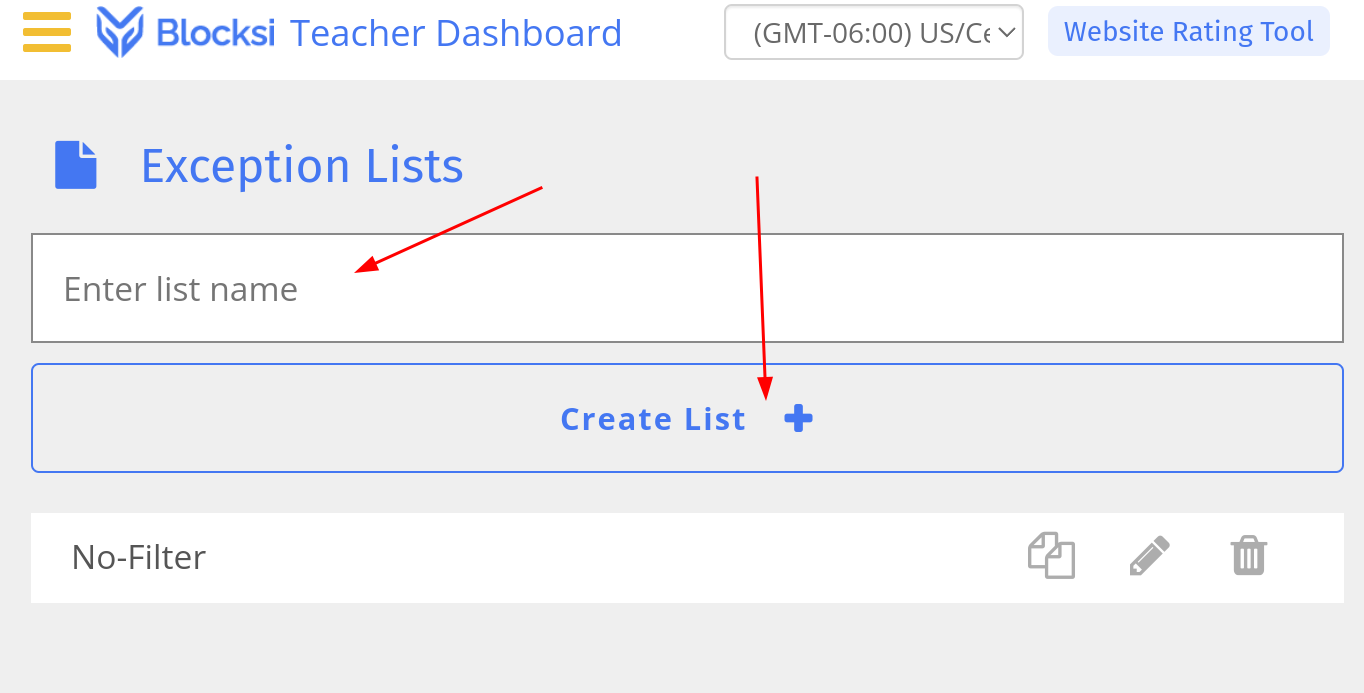
14. Enter a name (I used My Classroom again), then click “Create List.”
[](https://info.wftigers.org/uploads/images/gallery/2026-10/Ydc4ioJ1hxKqv3Pm-fbbbeda4c2f9f341f4fecfcf527d62508628ca5f.png)
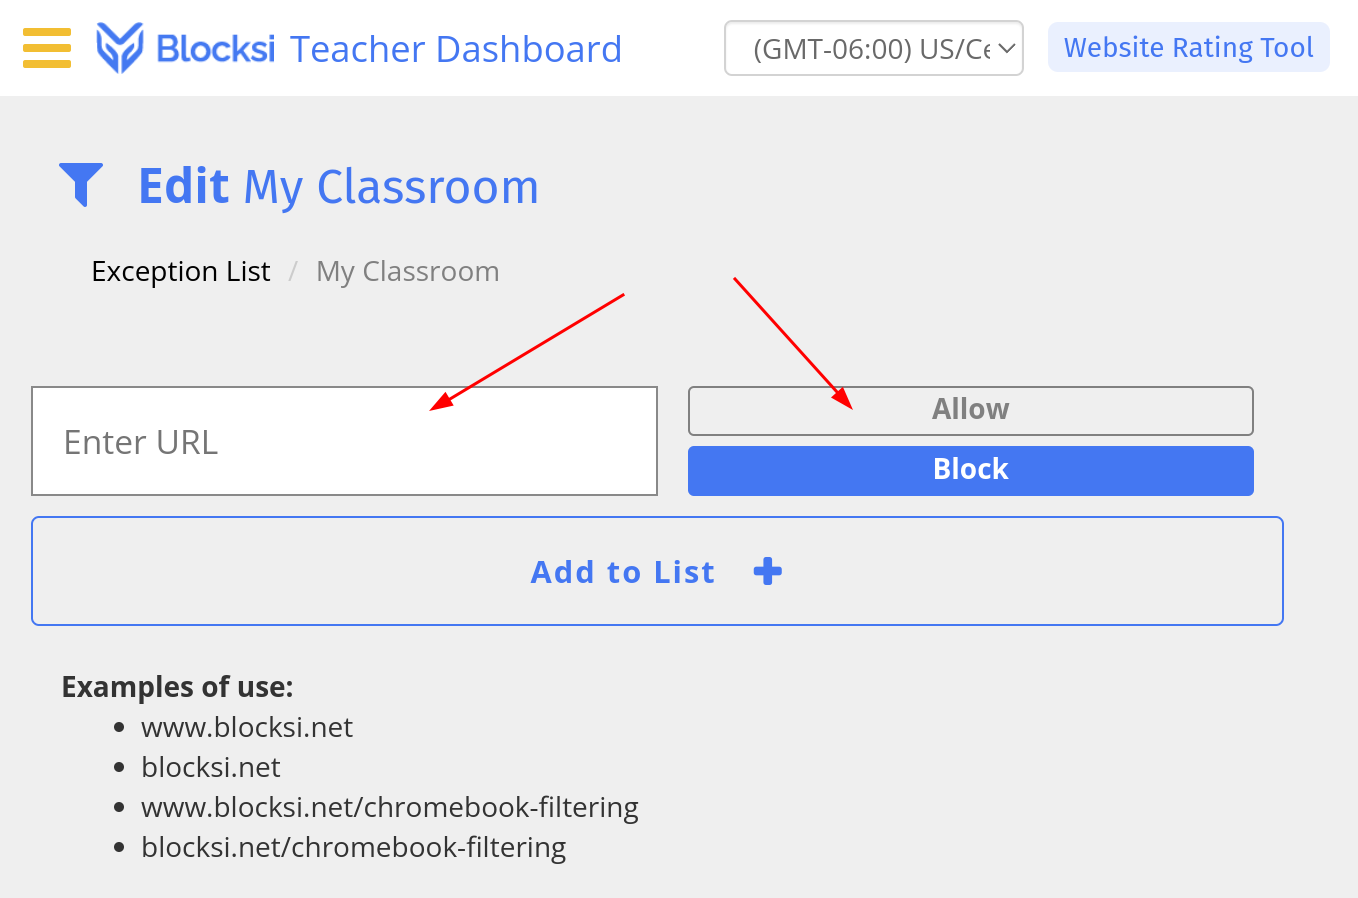
15. This opens the list editor. This list is both an allow and a block list. If you blocked a category in step 11, but you need a site that is in that category, you can paste that site in the “Enter URL” box, be sure that the “Allow” option is selected, then click on the “Add to List” button. Likewise, if you DON’T have a category blocked, you can enter a site in the box, choose the Block button, then click on “Add to List” to prevent access to that website.
[](https://info.wftigers.org/uploads/images/gallery/2026-10/tl3aMUx1tRH17Laq-b12053531770f8f9f877b751a64a73703a7da198.png)
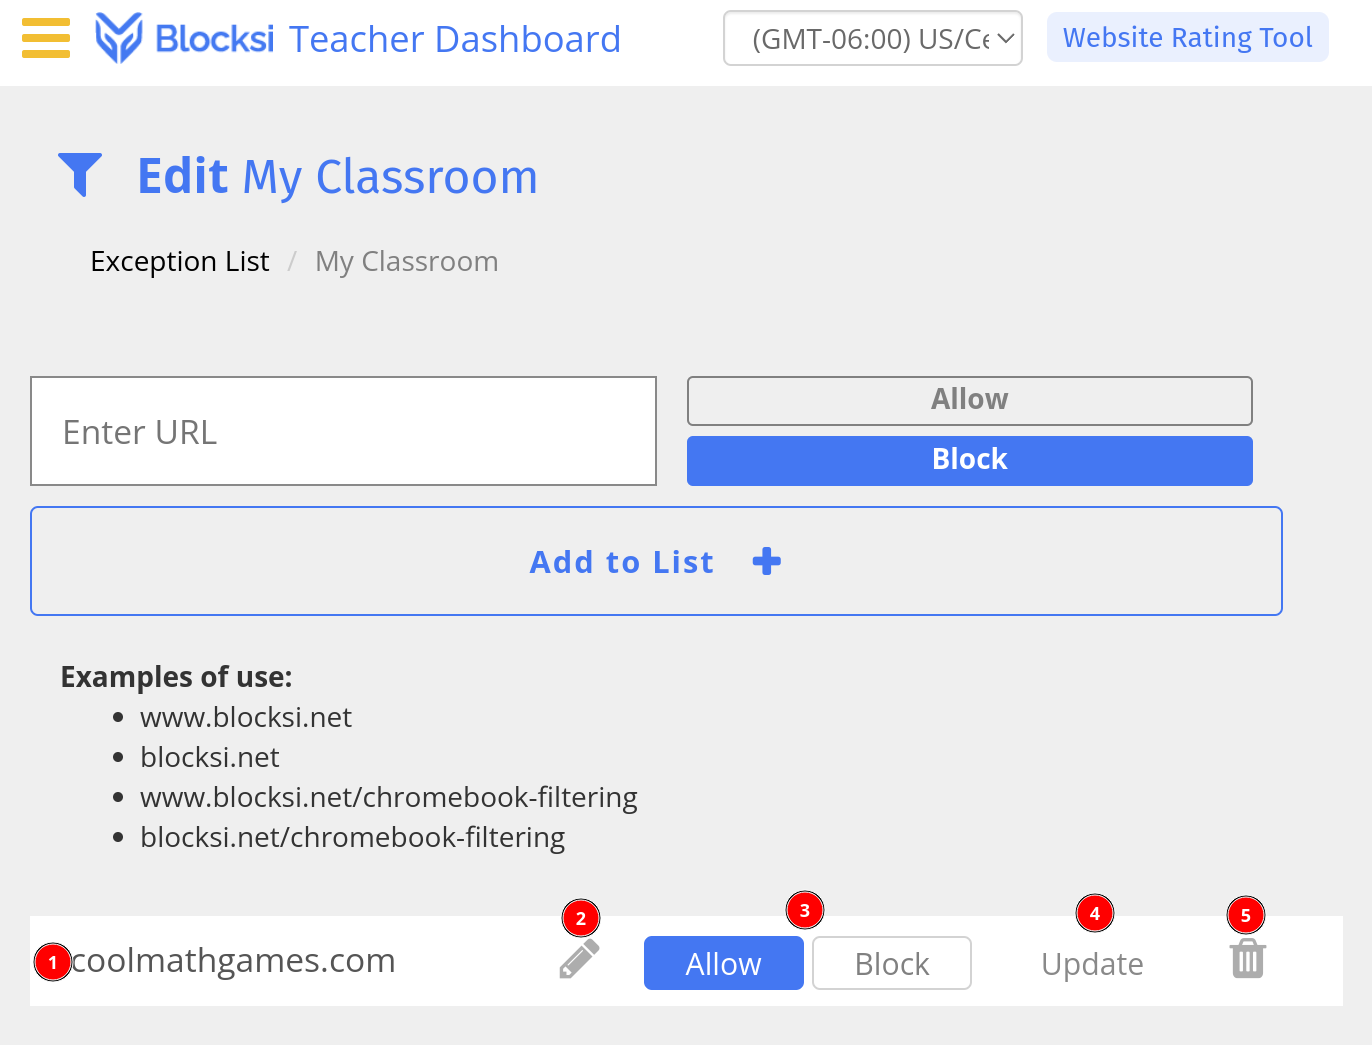
16. Once you add an item to the list, it will be listed at the bottom. You can see the site, edit it, toggle between allow/block, update your settings, or delete anything you add.
[](https://info.wftigers.org/uploads/images/gallery/2026-10/sla5kXOZiAcfpJ6t-835bad79f873318337719e9f3aa42305f299f0d1.png)
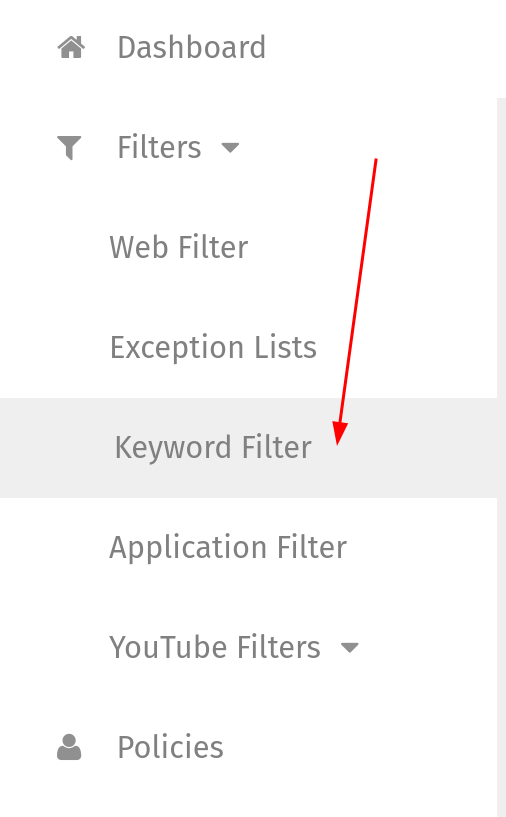
17. Let’s go to “Keyword Filter” in our menu.
[](https://info.wftigers.org/uploads/images/gallery/2026-10/qLM3SukIFyG9XsUy-6e424292f7c43370a6b72f38b8e949fc5b05b1d7.png)
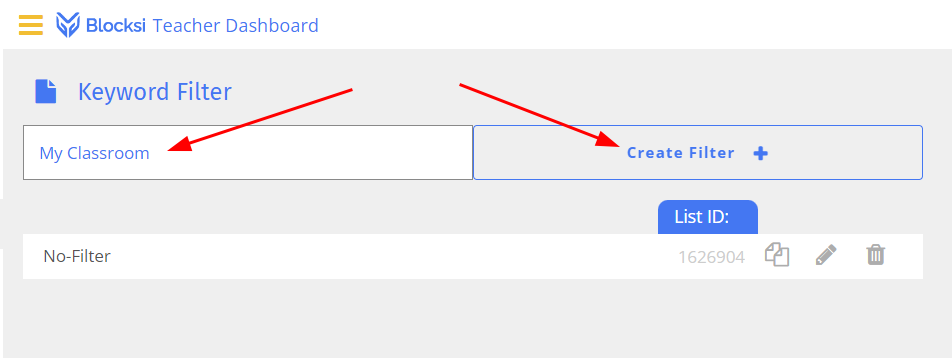
18. Keywords allow us to block websites that have certain words in them. You must be careful with this. It might seem like a good idea to block the word “naked,” but doing so also blocks any website with the phrase “naked truth.” Enter a name and then click “Crete Filter.”
[](https://info.wftigers.org/uploads/images/gallery/2026-10/OilLeHZkABjLlEcN-d08d7e8adc20d3d77b2589525cea3494c1d93bf0.png)
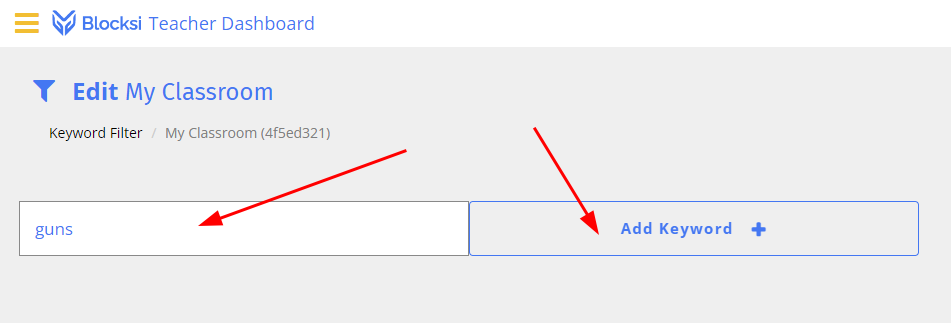
19. Enter the first word you want to block (must be at least 4 characters long), then click on “Add Keyword.” Side note… “guns” could also block a LOT of legitimate resources as well.
[](https://info.wftigers.org/uploads/images/gallery/2026-10/FkNBIX1kym37q3I4-aef72cd2b599f1dfd8b6d493685f7306fe3cd7be.png)
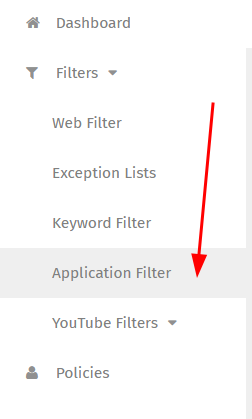
20. Let’s go to the “Application Filter” now.
[](https://info.wftigers.org/uploads/images/gallery/2026-10/Ff3BQOBTyLLbjgg2-aeb1ffb1bca82115f4135fd621efb57dd5e42ecb.png)
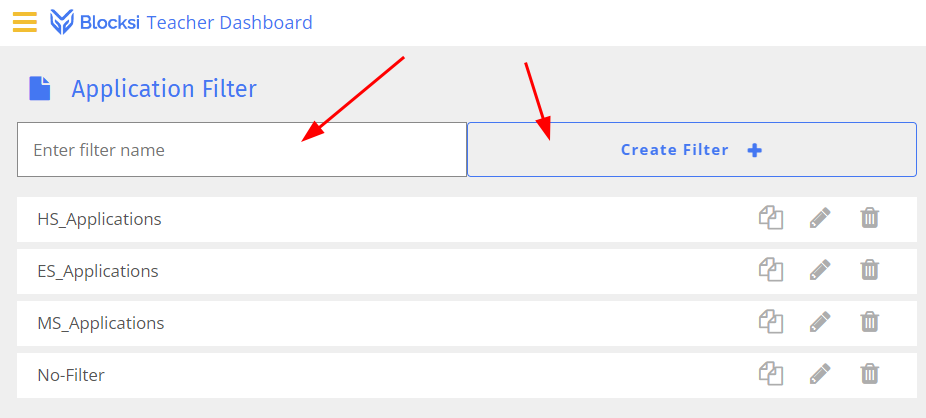
21. Enter a name, then click “Create Filter.”
[](https://info.wftigers.org/uploads/images/gallery/2026-10/LtDTufXj7JJsgJBP-642eb888aacffa4fbaa2b4e7589ea8168e8fdb70.png)
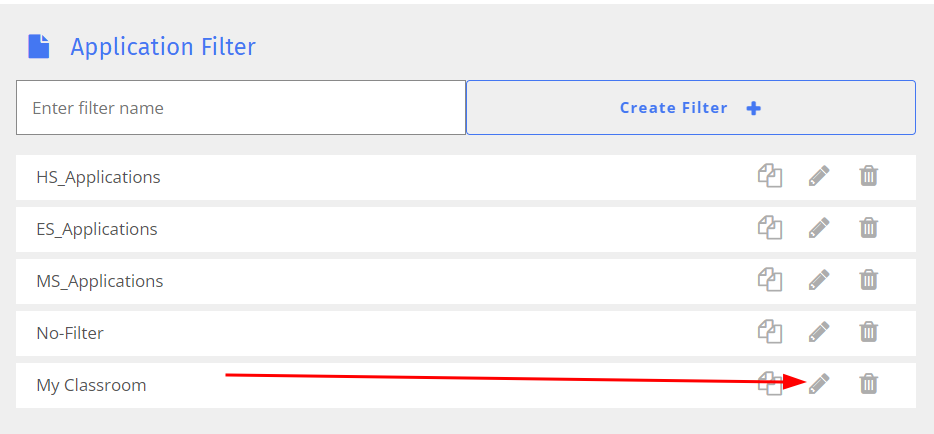
22. Click on the little pencil to edit the Application Filter you just added.
[](https://info.wftigers.org/uploads/images/gallery/2026-10/a3FO2IE5WCiz5d2N-6f8dafb85edef5519bfebf83c3e561200c74f435.png)
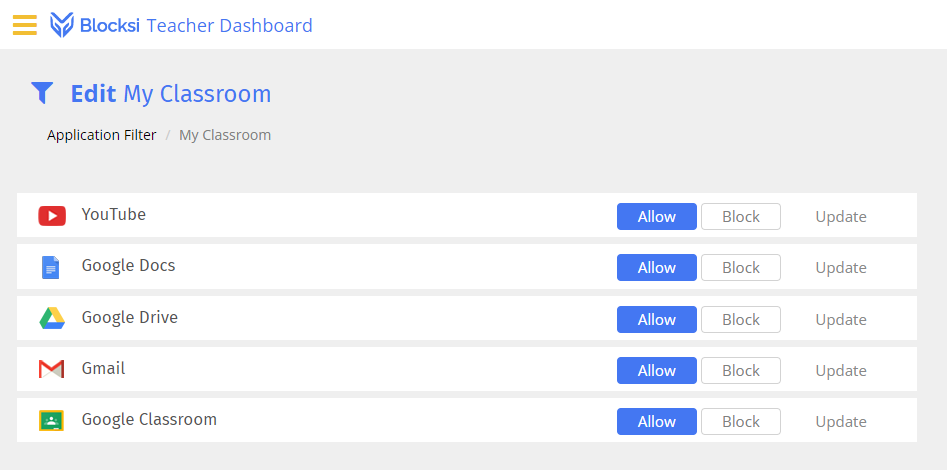
23. The following page shows the main Google apps. You can turn off any of these that you choose, but think about each option carefully. It is possible that you have a class where it isn’t at all helpful to have access to email. If that is true, Block Gmail. You may also choose to block YouTube, but this is more aggressive than blocking YouTube in our Exception Lists. It MIGHT work, and there is no harm in trying.
[](https://info.wftigers.org/uploads/images/gallery/2026-10/d1TIwboWNtPoJORh-a10875d03e348aa804dce73d38481bf14f6e0f22.png)
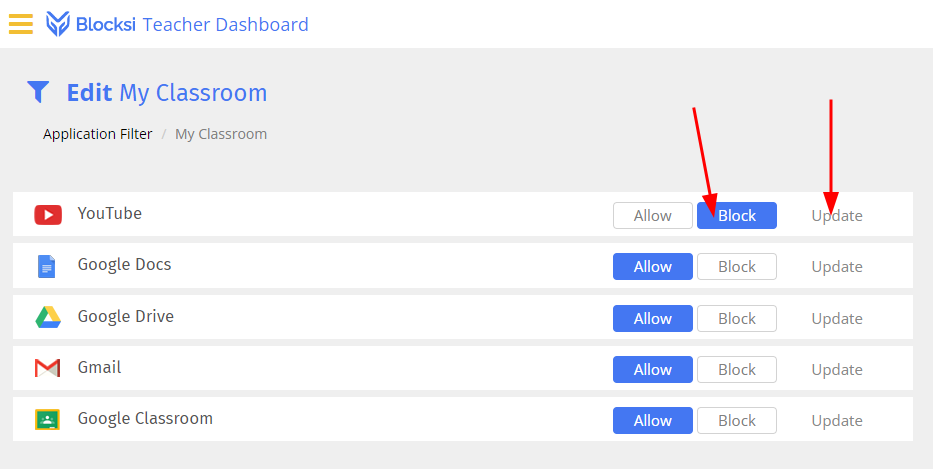
24. To block an item, click on “Block,” then click on “Update.”
[](https://info.wftigers.org/uploads/images/gallery/2026-10/o0QqwJIE6FQ2uhRp-8613507741079524a312dbc756607bde91e0e27b.png)
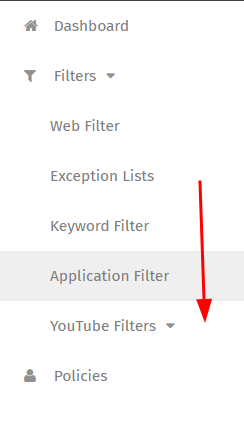
25. On to the YouTube Filters! Click on the menu item to expand it.
[](https://info.wftigers.org/uploads/images/gallery/2026-10/g37l1GbHQnYaBbuu-b8c814a25d2c197c1008dc2dfd471d01812e763a.png)
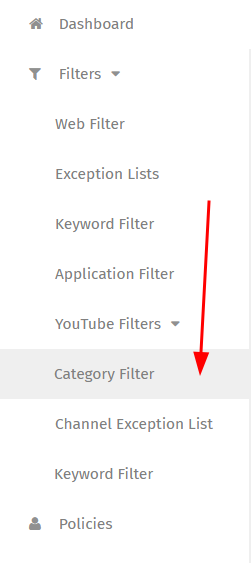
26. We will start with the “Category Filter.”
[](https://info.wftigers.org/uploads/images/gallery/2026-10/MDLFBwVUBq1ulRqR-88c88d25d030e212cac9914e1f7c27733b4fd8d7.png)
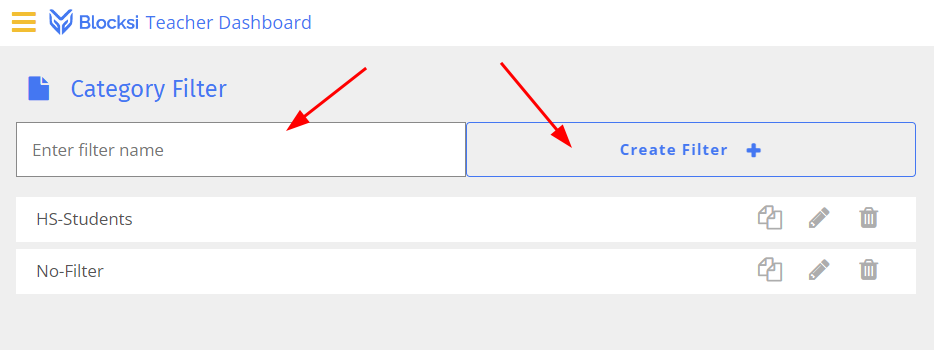
27. As should now be familiar, enter a name, then click “Create Filter.”
[](https://info.wftigers.org/uploads/images/gallery/2026-10/fswyWywZ3FcKv45j-fb2d9300a3dd4d3ce7f89ee9636acbc10d8f1ae0.png)
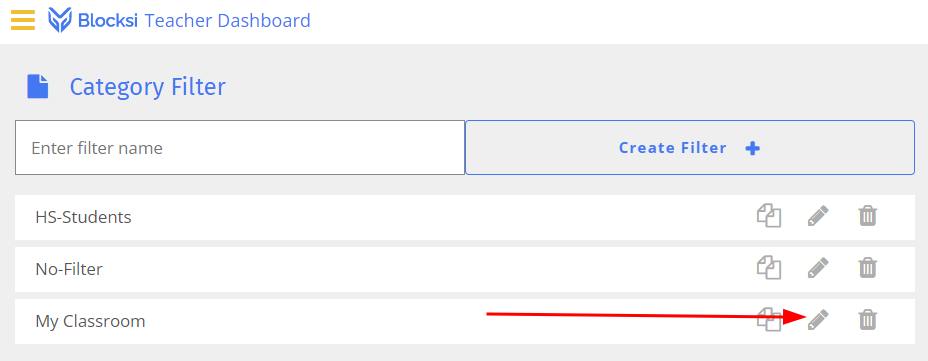
28. Click the pencil icon on the filter you just added.
[](https://info.wftigers.org/uploads/images/gallery/2026-10/ROVv6FGZigTpDgTW-0306482bab2b5383d9c312b7a95c1ebd0d22fa85.png)
29. This will bring up EVERY category within YouTube.
[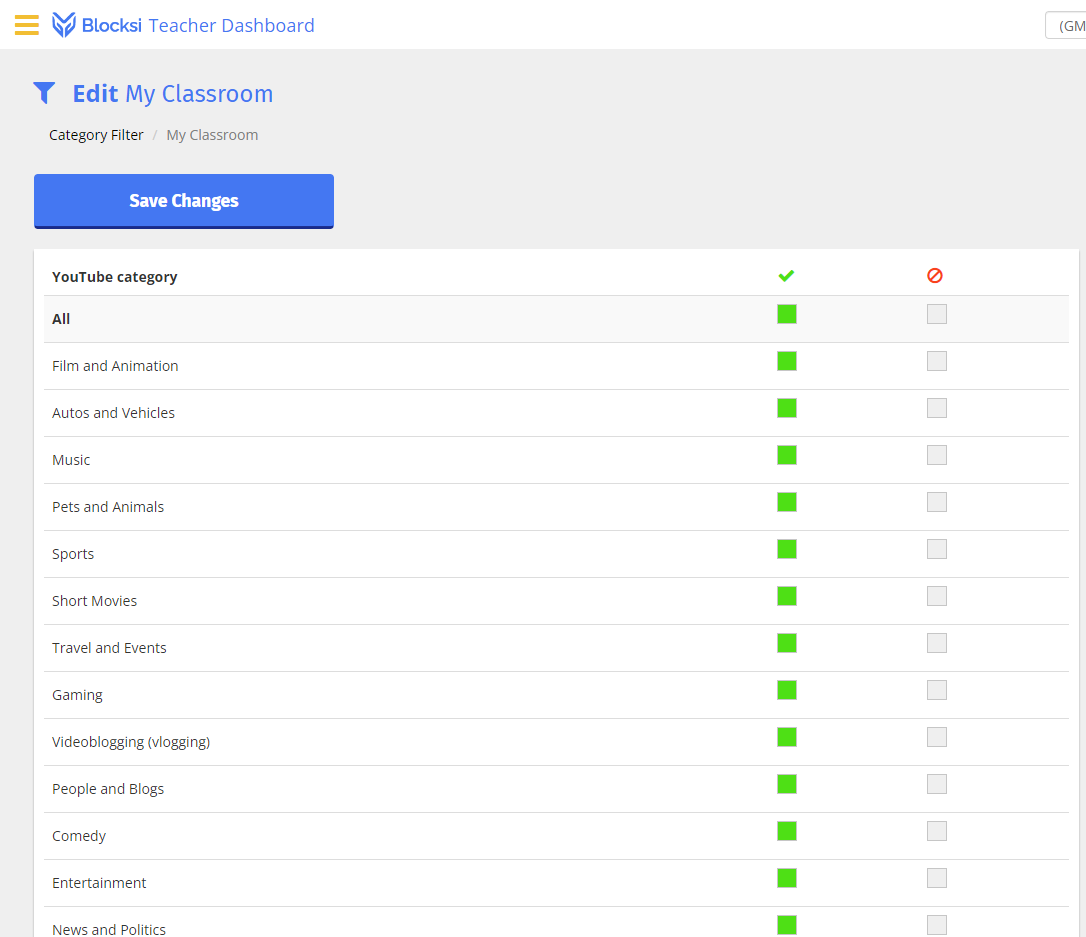](https://info.wftigers.org/uploads/images/gallery/2026-10/BGcpfmlnoC4YOY0G-ed6e090cc51f46ba08fb1387d9a85d09040b8c0a.png)
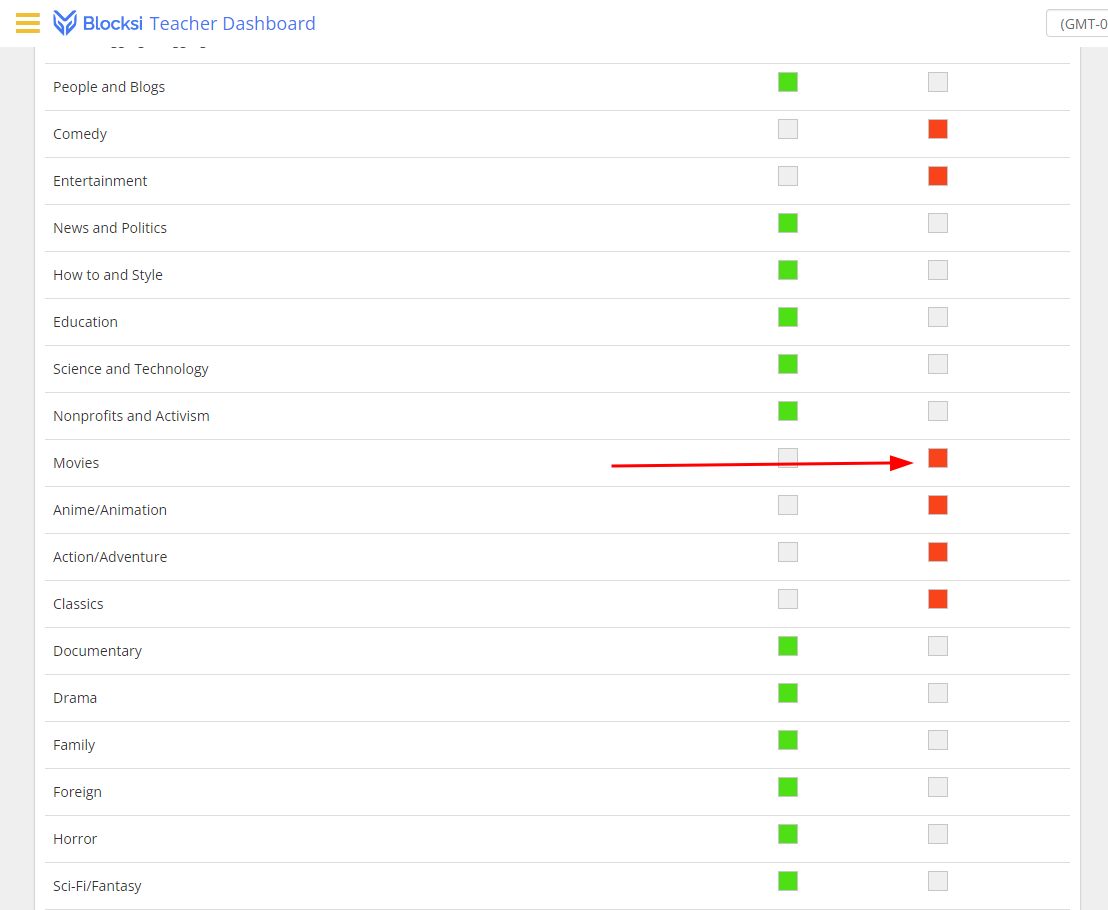
30. Allow (left box) or block (right box) any categories of videos you want to work when students are within your room. You could effectively block YouTube by clicking every box, then you can use step 36 to allow access to only your videos and those of channels you trust.
[](https://info.wftigers.org/uploads/images/gallery/2026-10/JF2i43rCDQ0odEuU-e7c1233b020d3309b50bc5d70a082a8638ac44a4.png)
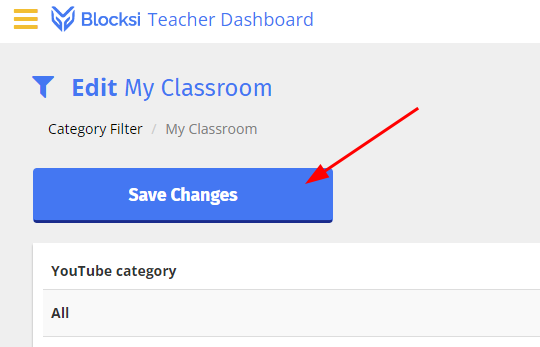
31. When you are finished, go to the top, and click the “Save Changes” button.
[](https://info.wftigers.org/uploads/images/gallery/2026-10/WfSubxQOsqilJYbe-ef872cd8890801b11a54929f2579a67d89b8dd3b.png)
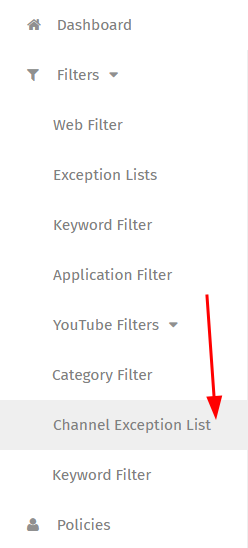
32. Go to the “Channel Exception List.”
[](https://info.wftigers.org/uploads/images/gallery/2026-10/Mx9RkyPK8KmAzJIX-1d30fdae0aff2539b197347ff8e3f12c2e409346.png)
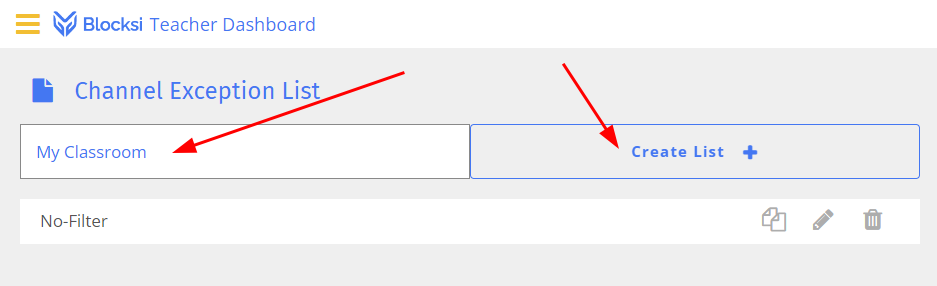
33. Enter a name and create your list.
[](https://info.wftigers.org/uploads/images/gallery/2026-10/XGhwIenQNtOUiWzj-d5441e2999ed9e3863614f4f7c12488646c4842a.png)
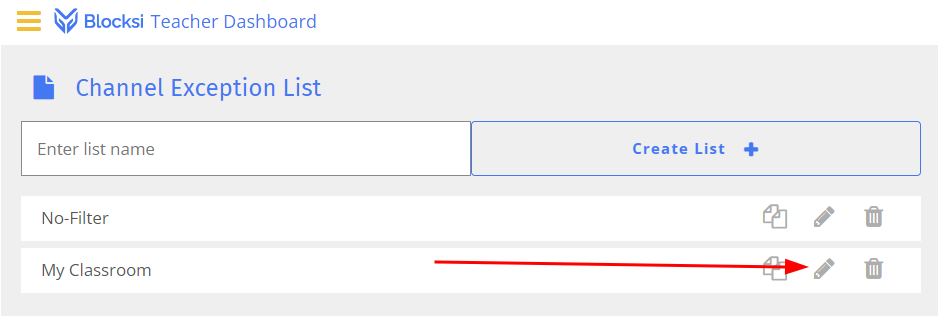
34. Click the pencil tool for your list.
[](https://info.wftigers.org/uploads/images/gallery/2026-10/9fTGfmJgVLJEJAyx-3ea2598f3a8aafd89474d2f75313710412fe8355.png)
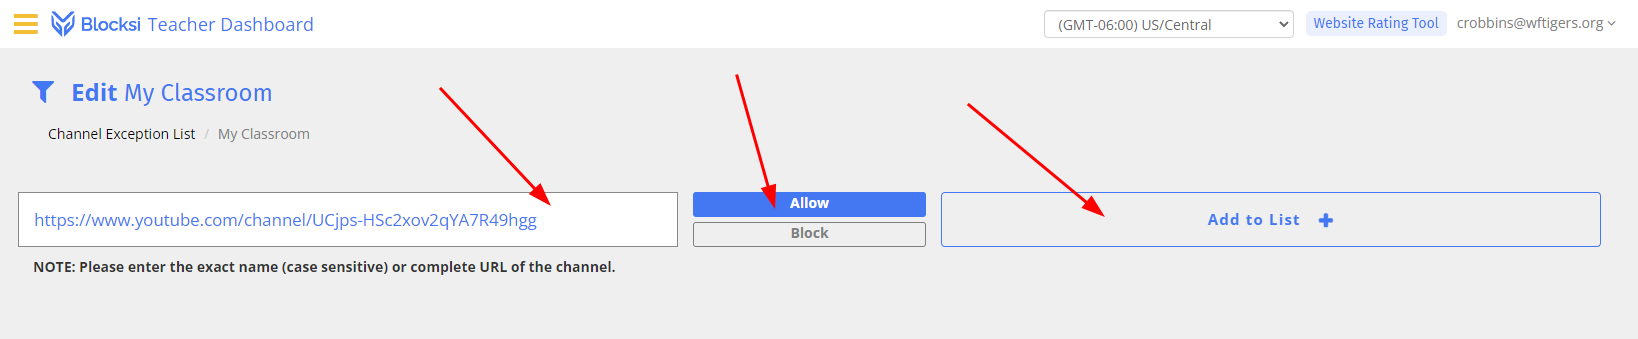
35. This method allows any video within a chosen channel to be accessible. For this example, I included my channel address. I’ve made sure to choose the “Allow” option, and then I hit "Add to List. I can also use the same method to block an entire channel if I use the “Block” box.
[](https://info.wftigers.org/uploads/images/gallery/2026-10/2K4CyjTni0bd4KeF-eb3d81d35c7277abcf386d182343b49ad092692b.png)
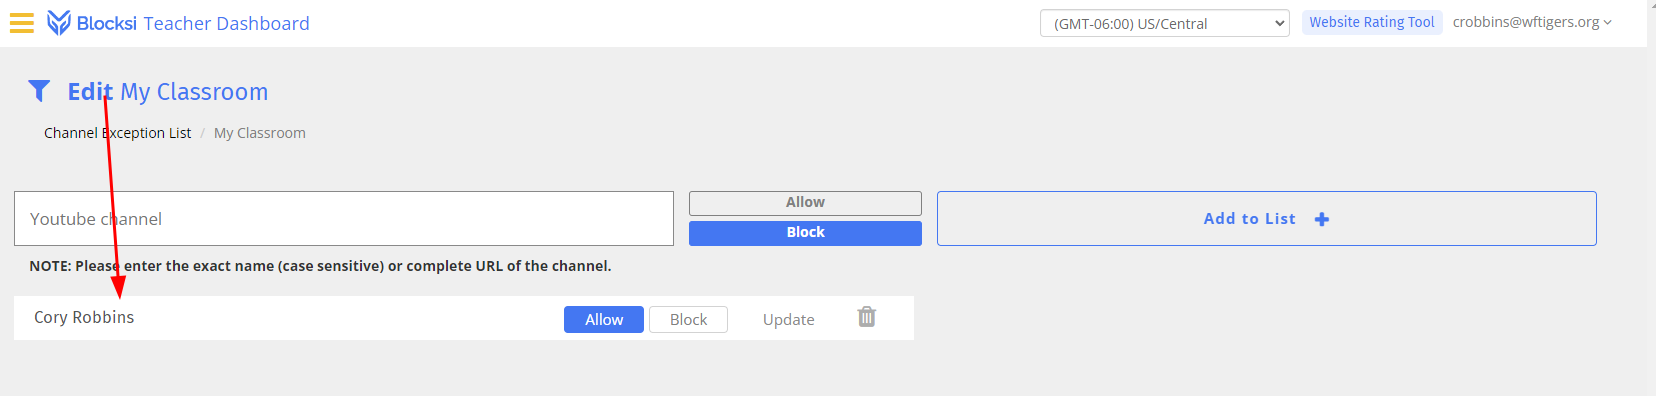
36. Blocksi looks up my Channel name and lists it below.
[](https://info.wftigers.org/uploads/images/gallery/2026-10/L2ixTEUmStY1RftW-1660f1c7d41fba662744d1aa008e49d07e24f300.png)
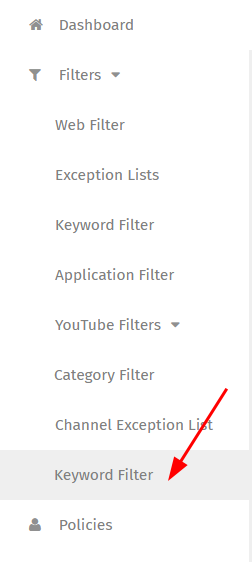
37. Go to the “Keyword Filter” item under “YouTube Filters.”
[](https://info.wftigers.org/uploads/images/gallery/2026-10/RSlehyitmtEU6Wmn-ae86c45fc112256a4fde19e8c75bb821f7c4659e.png)
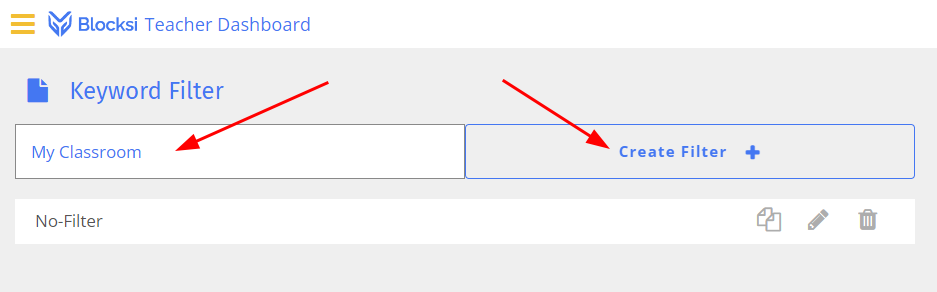
38. Enter a name, and click “Create Filter.”
[](https://info.wftigers.org/uploads/images/gallery/2026-10/SyoCWRsiN5KPN06N-e61bcc449f3b13157994b5ab5e3afbd8da531b13.png)
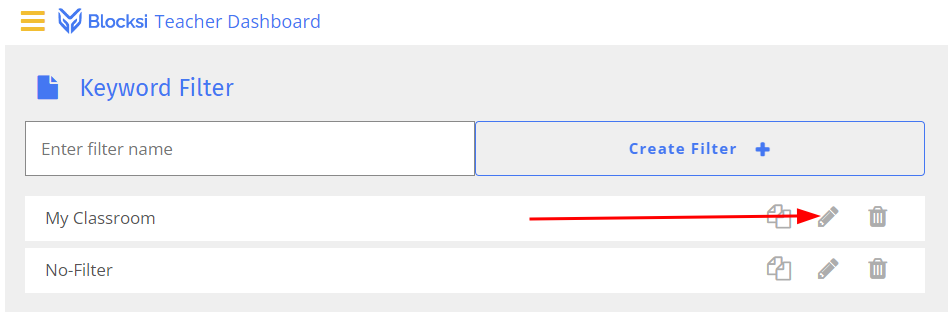
39. Edit the list with the pencil tool.
[](https://info.wftigers.org/uploads/images/gallery/2026-10/iTnkMyjT88zFTk5Z-62ac343cb04dfd871015eb1925a0ca5c2ae782b5.png)
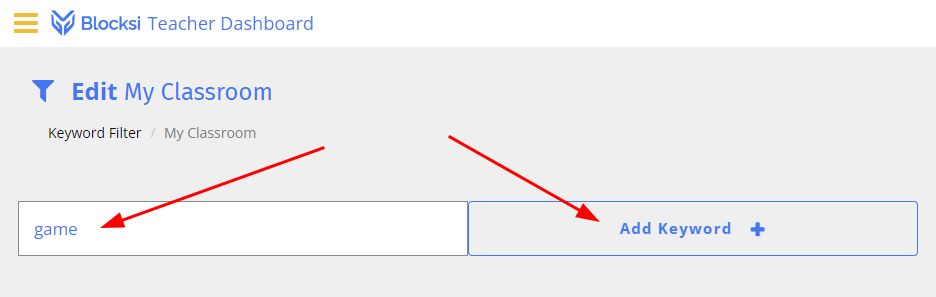
40. This filter is similar to the previous “Keyword Filter” option. It will block the ability to search for these words within YouTube. Be cautious, but enter the word of your choice, then “Add Keyword.”
[](https://info.wftigers.org/uploads/images/gallery/2026-10/0NbQJOFMOHOMBlAF-321bc229065cf1a3ed13a34d1fc1b4e3967ffc9f.png)
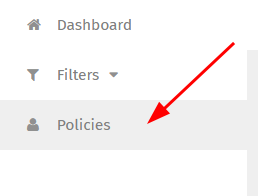
41. Click on “Policies” in the menu.
[](https://info.wftigers.org/uploads/images/gallery/2026-10/hE1ttwWFvdDkDmfJ-57ba6cc63d4b2645b49a21d5fd053bb1290ff6ce.png)
42. Enter a name in the top left, then click “Create Plicy.”
[](https://info.wftigers.org/uploads/images/gallery/2026-10/Wd1CgvUOV1n4utqk-6fb7a4571ec080c1337c902d48d2454e44784704.png)
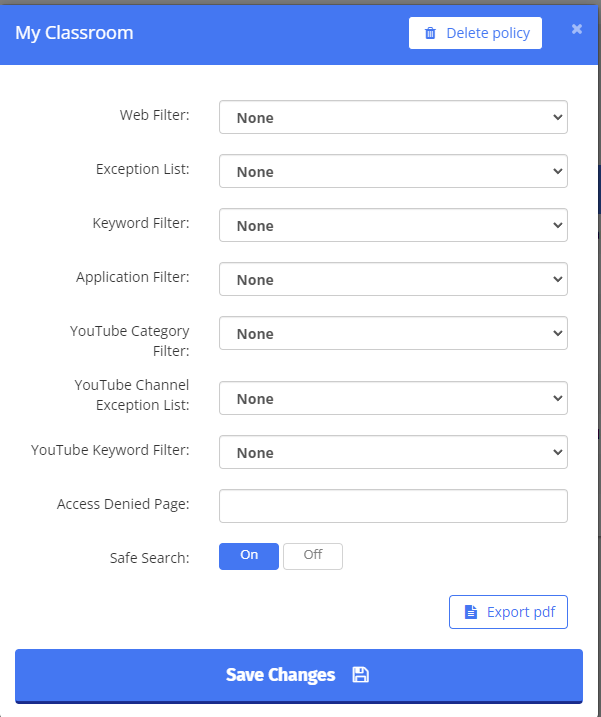
43. The window that opens will say “None” all the way down.
[](https://info.wftigers.org/uploads/images/gallery/2026-10/vtKU4zT5QjH2bvoc-4f7970d776cd39796c9b4d8c44c7456cf89bb116.png)
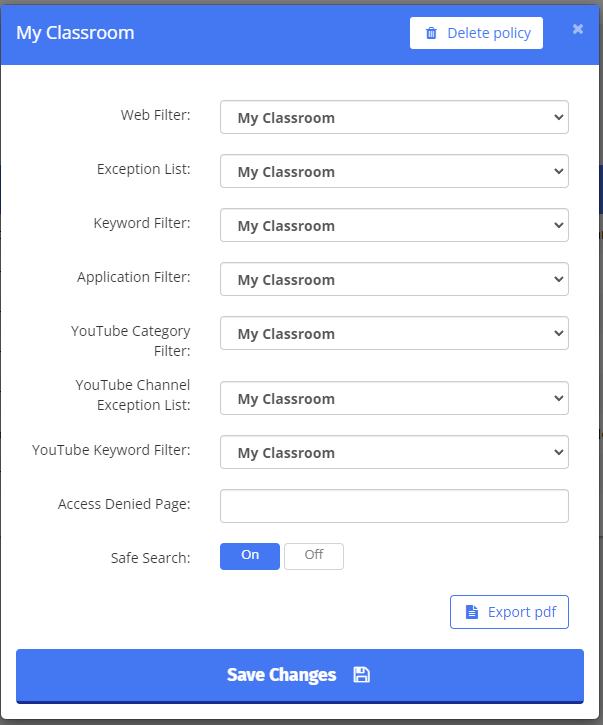
44. We want to choose “My Classroom” or whatever you named each of the previous things for each of the items available. There are two other settings to look at here… The “Access Denied Page” can be set to a custom block page. If you want to add a “hidden” page in your Google Site, you can enter that address here. I recommend that you leave it blank though. I also recommend that you leave “Safe Search” to “On.” Then click on “Save Changes.”
[](https://info.wftigers.org/uploads/images/gallery/2026-10/Ui95c5U6w6SEcwfZ-6768fdf63304672a0a6fb52e777a28e2fc4f03f5.png)
Click here for instructions.
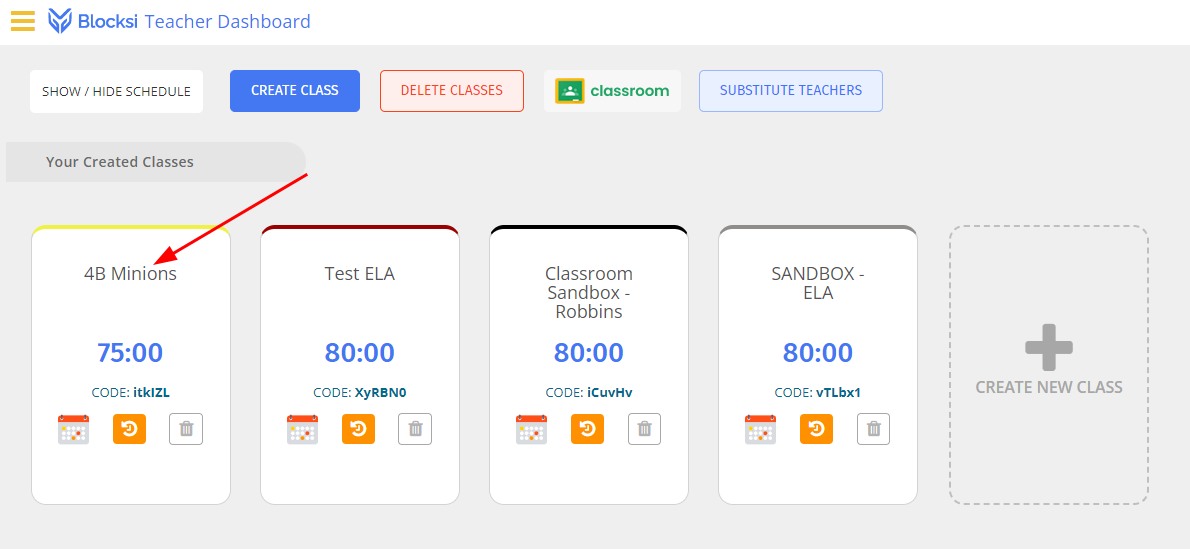
1. Open a class.
[](https://info.wftigers.org/uploads/images/gallery/2026-10/gpKzz2paU0cvV3rs-474cd38bf18ca07fd885799d79fc748ff8fd4290.png)
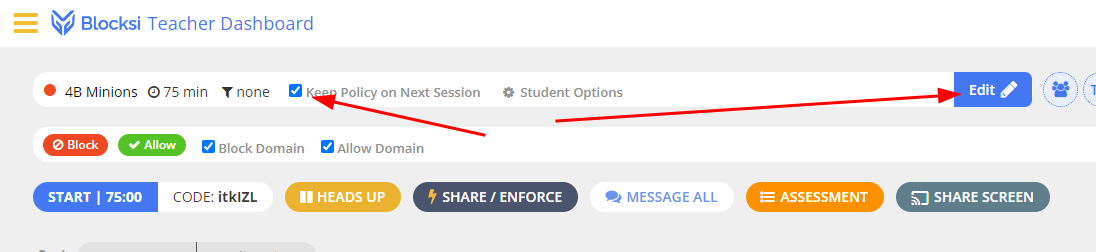
2. At the top, click on “Keep Policy on Next Session,” and then click “Edit.”
[](https://info.wftigers.org/uploads/images/gallery/2026-10/vI2lj8t4nDYUSF1Q-03e2f69a73788554c29d3edd7f07715ca9cf9818.png)
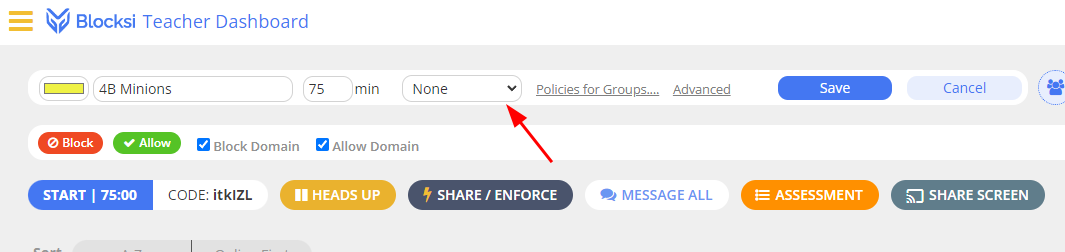
3. There should be a dropdown to the right of the time. Click on that and choose “My Classroom” or whatever you named your policy.
[](https://info.wftigers.org/uploads/images/gallery/2026-10/EbEYxtYKdtFuY5dS-b1d51d7a111c2782e6c79a036c87fd02ae62e3fb.png)
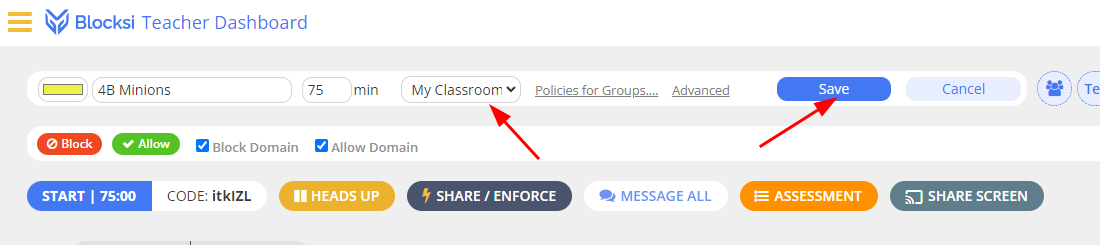
4. Make sure you have the correct policy, then click “save.”
[](https://info.wftigers.org/uploads/images/gallery/2026-10/PaGiwNnoL9VhyZE6-4c8288edb3506371729cff9e5326ad12d3bd48c9.png)
5. Click on the dropdown arrow at the far right.
[](https://info.wftigers.org/uploads/images/gallery/2026-10/gcpVjQ0awPRpwHQS-b30ce1bcc104a6b2fe83a113590495d047fd0955.png)
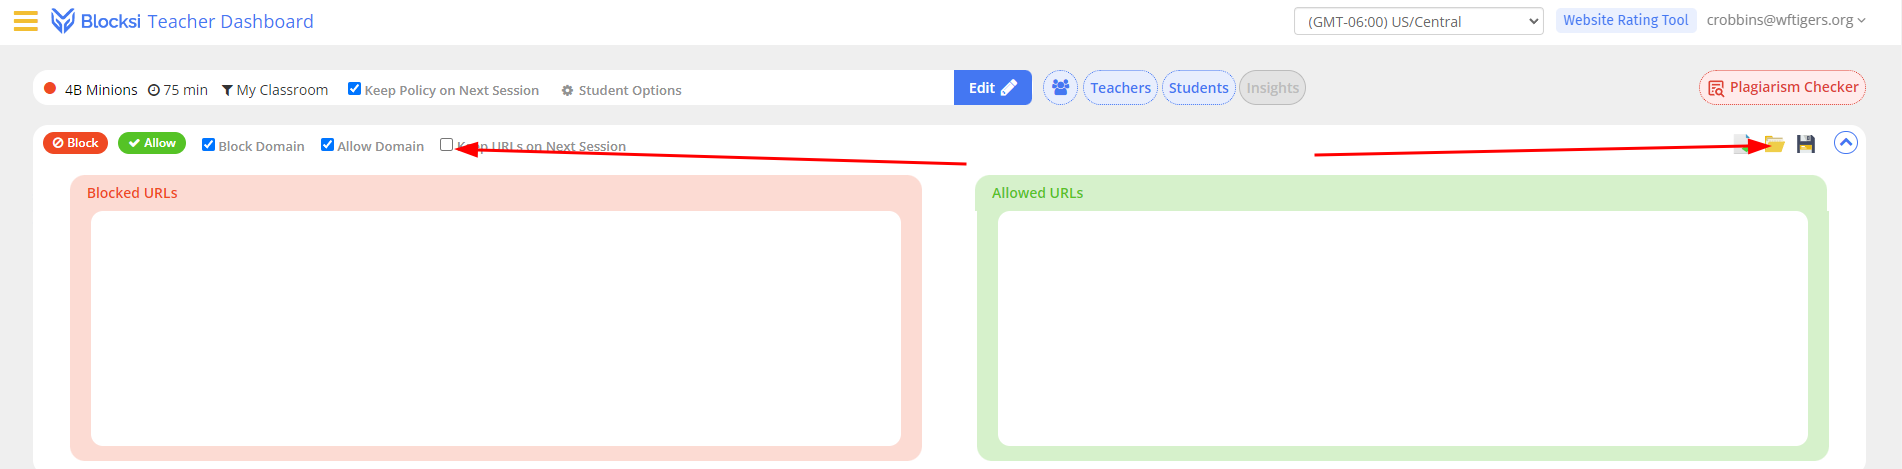
6. Click on the checkbox that says “Keep URLs on Next Session” then click the little folder icon.
[](https://info.wftigers.org/uploads/images/gallery/2026-10/J5ecVDlzq57YxmL9-ce2da304b7a08fca25a1f29e5bfe097253946834.png)
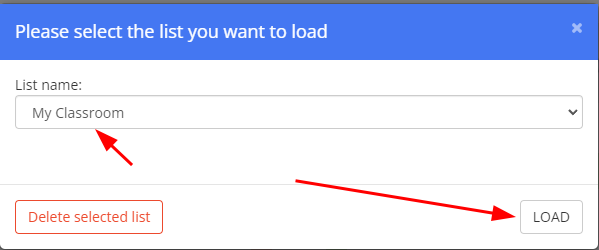
7. Under “List name,” choose “My Classroom.”
[](https://info.wftigers.org/uploads/images/gallery/2026-10/dWN3FK9fHreR9ywz-2fc3801d04d4a35999aa2df04db5650fdee60e54.png)
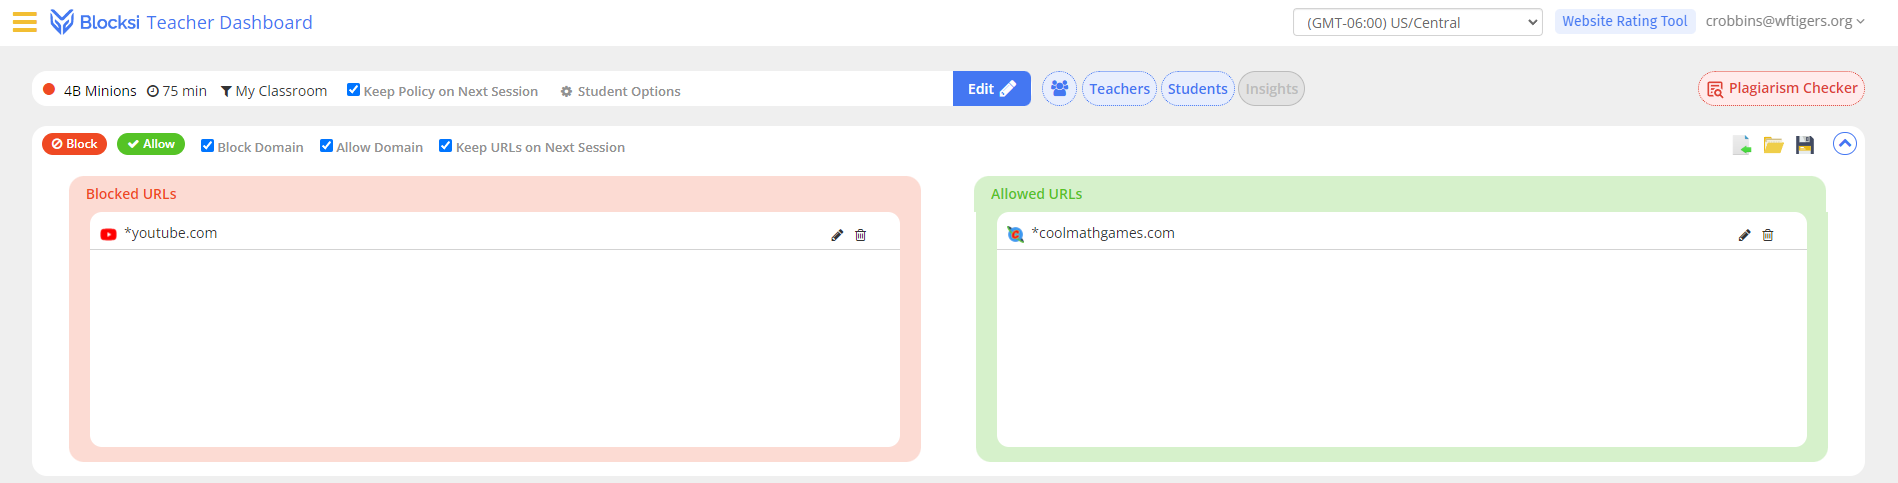
8. That should have pulled a list of all of the sites you blocked and allowed.
[](https://info.wftigers.org/uploads/images/gallery/2026-10/wZczwH9HiGfFUoO1-c19aebf63fd5a7accb6d5bc51f7e06a14ffe28ca.png)
Click here for the solution
It is possible that your web filter page will not have the XS\_Student starting point. If that is the case, you can create your own and follow these screenshots as suggestions:
[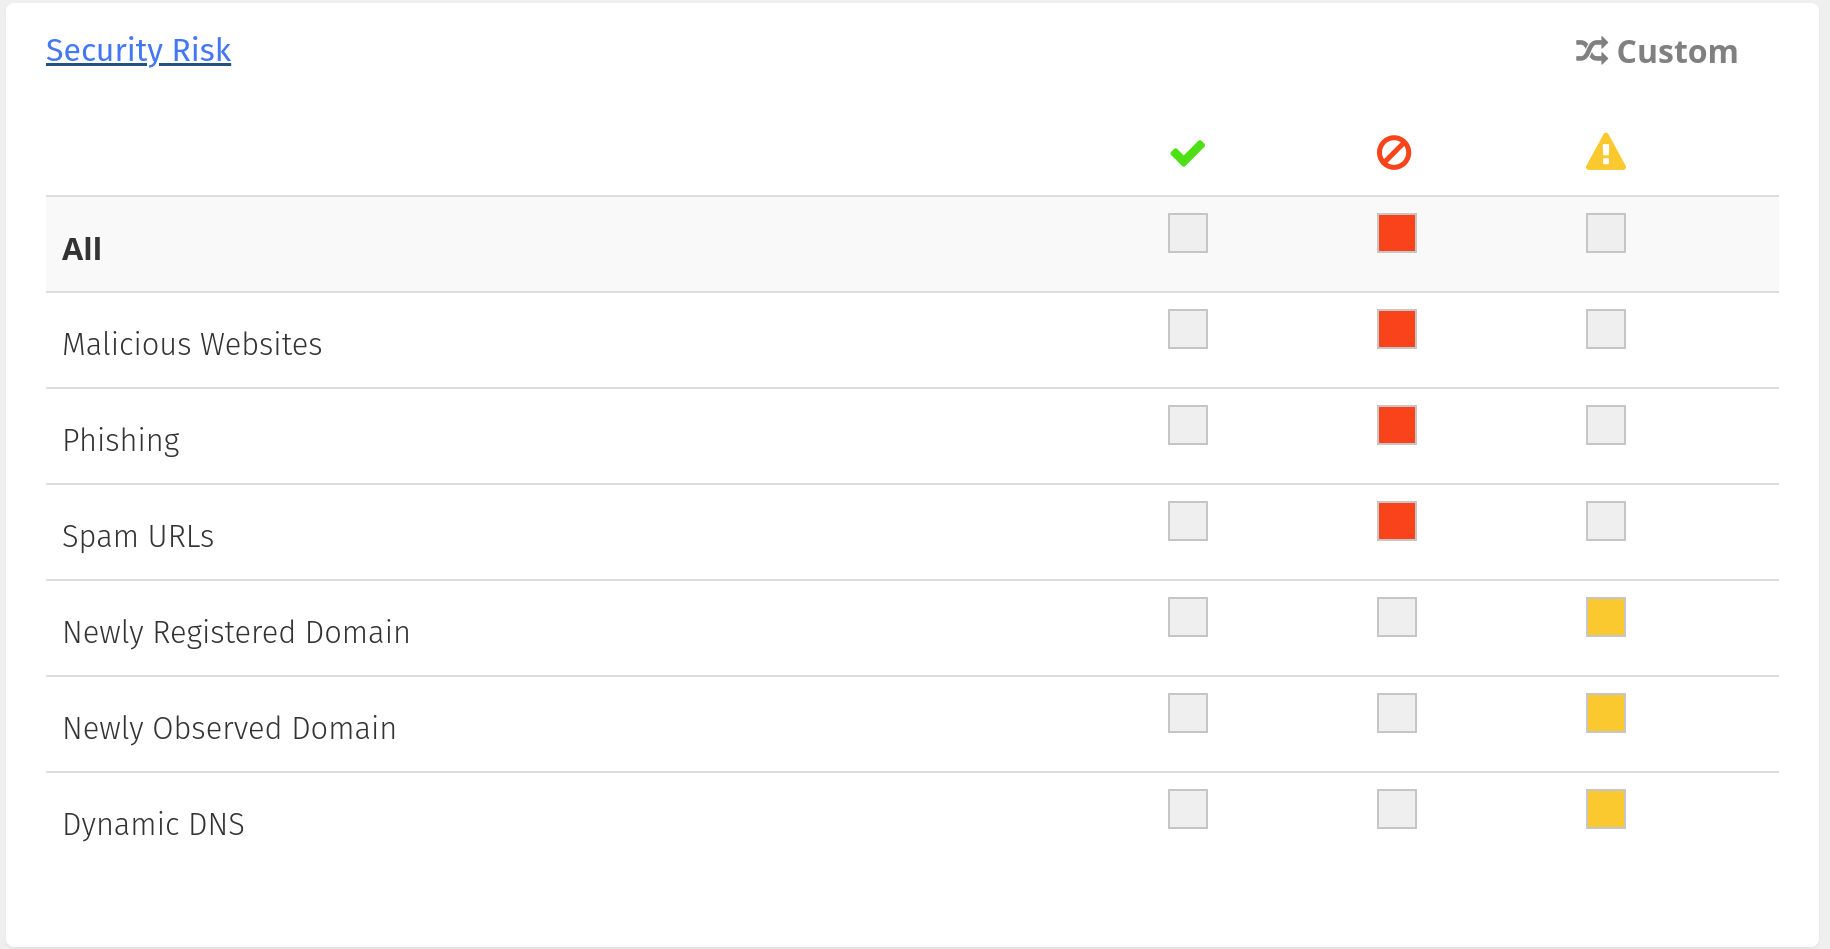](https://info.wftigers.org/uploads/images/gallery/2026-10/wbCrXzrN5Xlw36zN-06656c325222e0cd4930a6ffc90059d75cbb648a.png)
[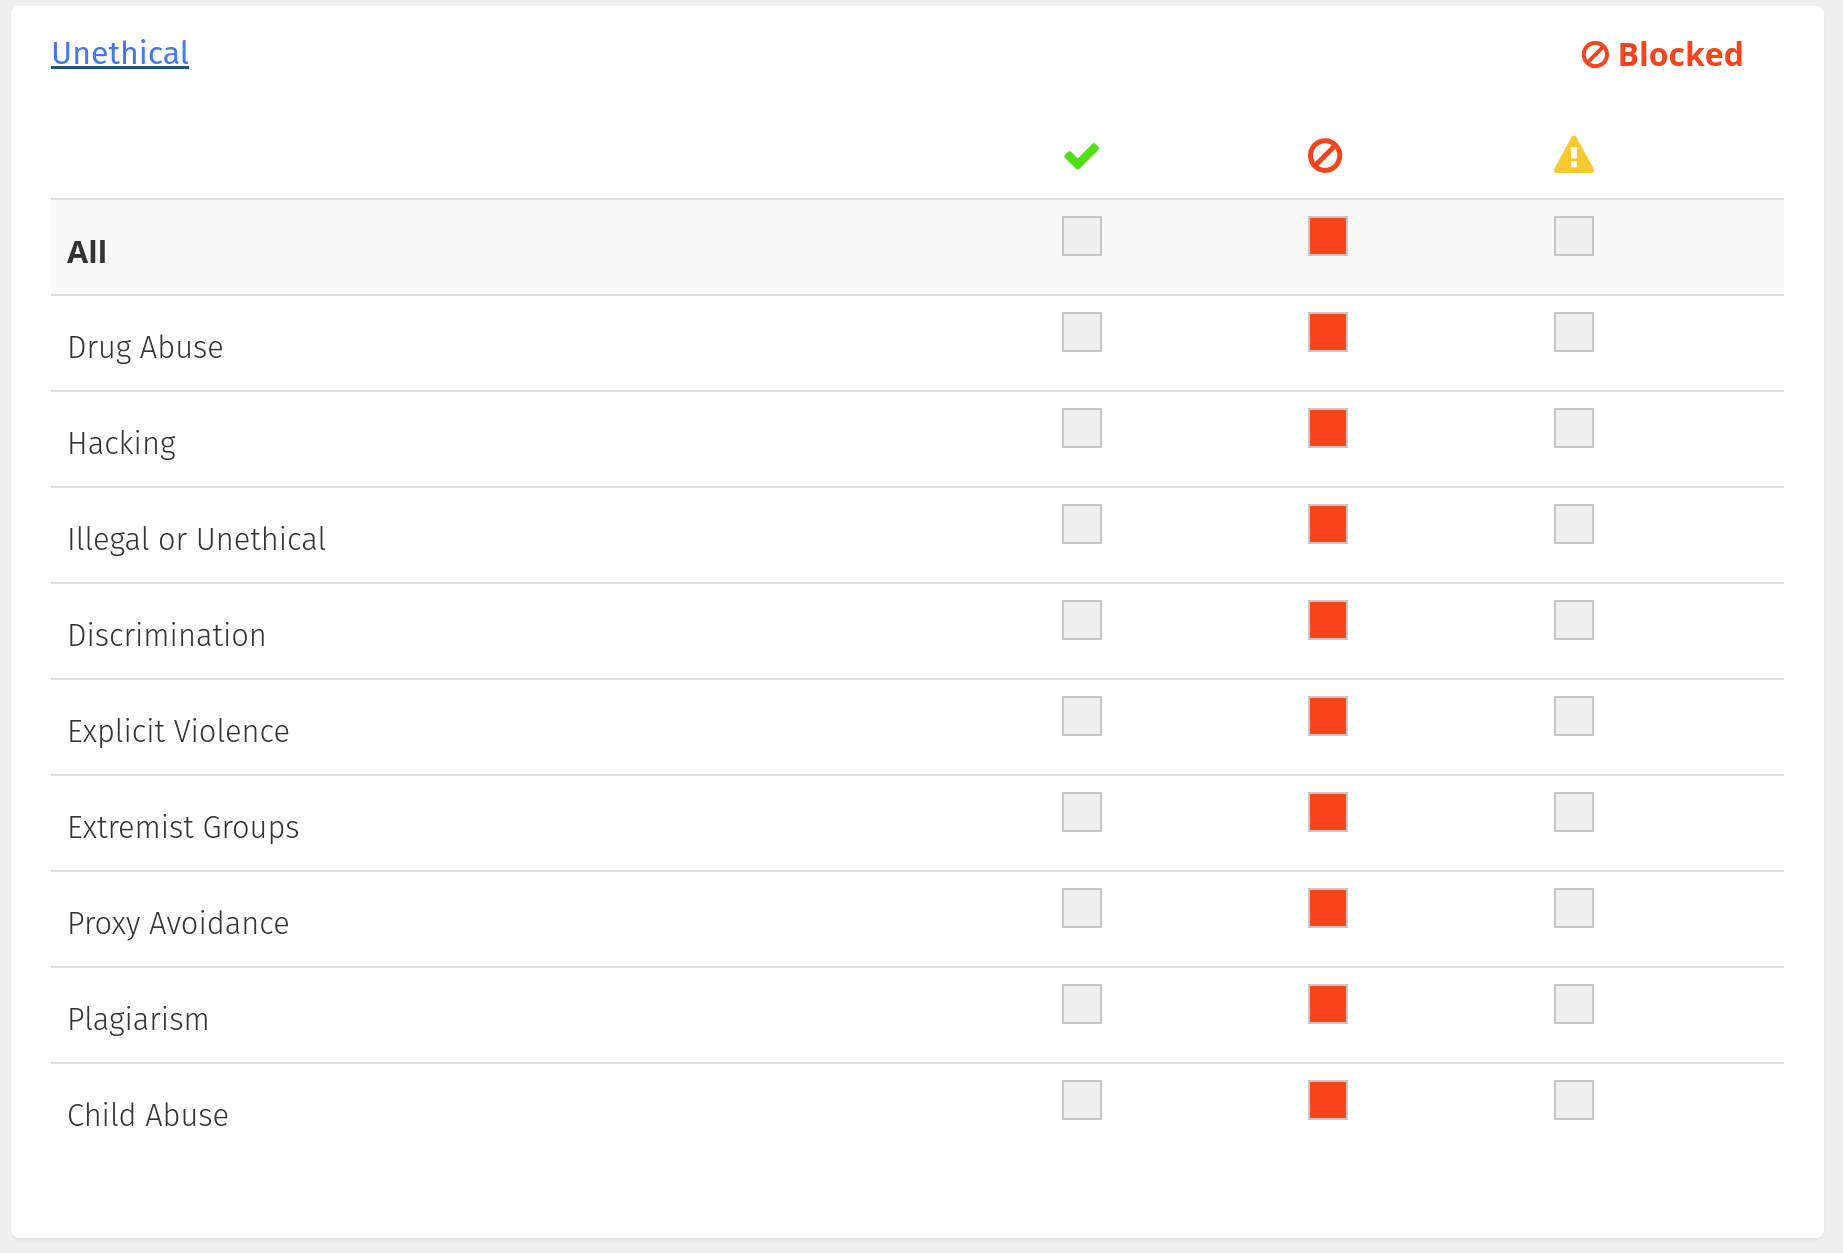](https://info.wftigers.org/uploads/images/gallery/2026-10/iucSVpu4R0Q6c2Jm-be81e07c88c9ddf2c0eae44b1fdfe6d4b5cd15c5.png)
[](https://info.wftigers.org/uploads/images/gallery/2026-10/ikgBm03b9vjyOuN4-1b61f659009053ff375a4f1021bd56ee097078d3.png)
[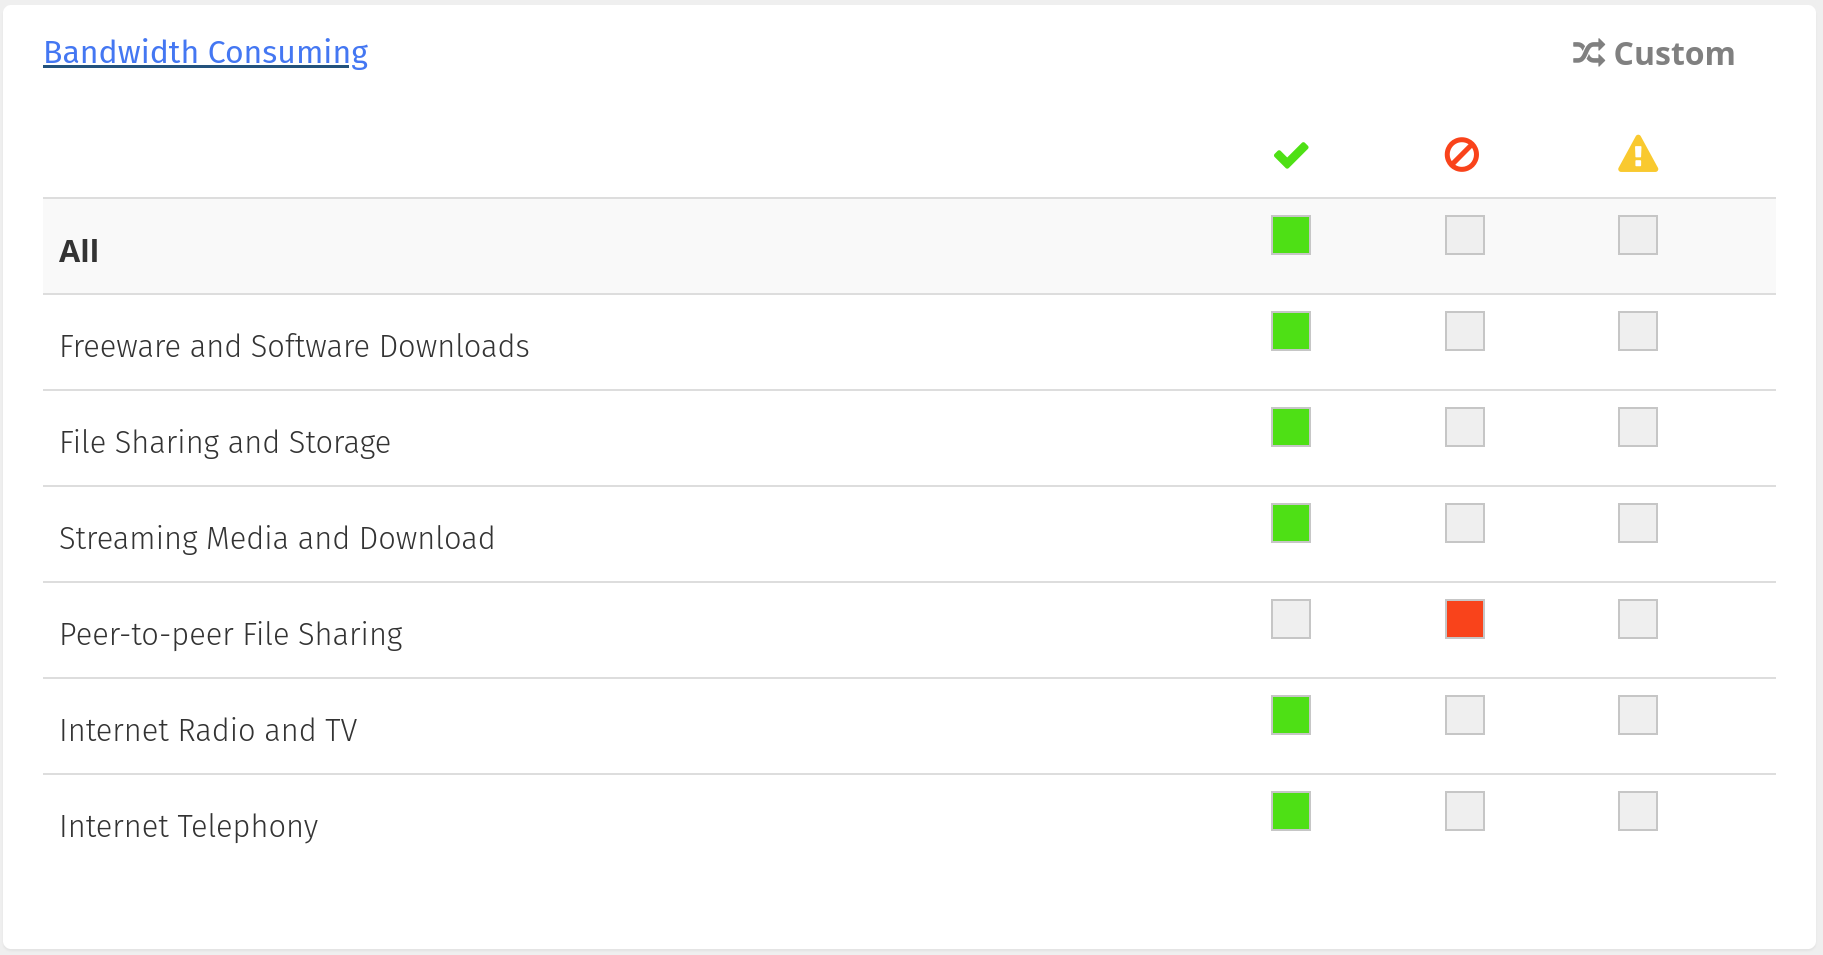](https://info.wftigers.org/uploads/images/gallery/2026-10/PAwSdb3fx778bIgy-9977041aad45427eccdfdc2c2e32d830ca2ab021.png)
[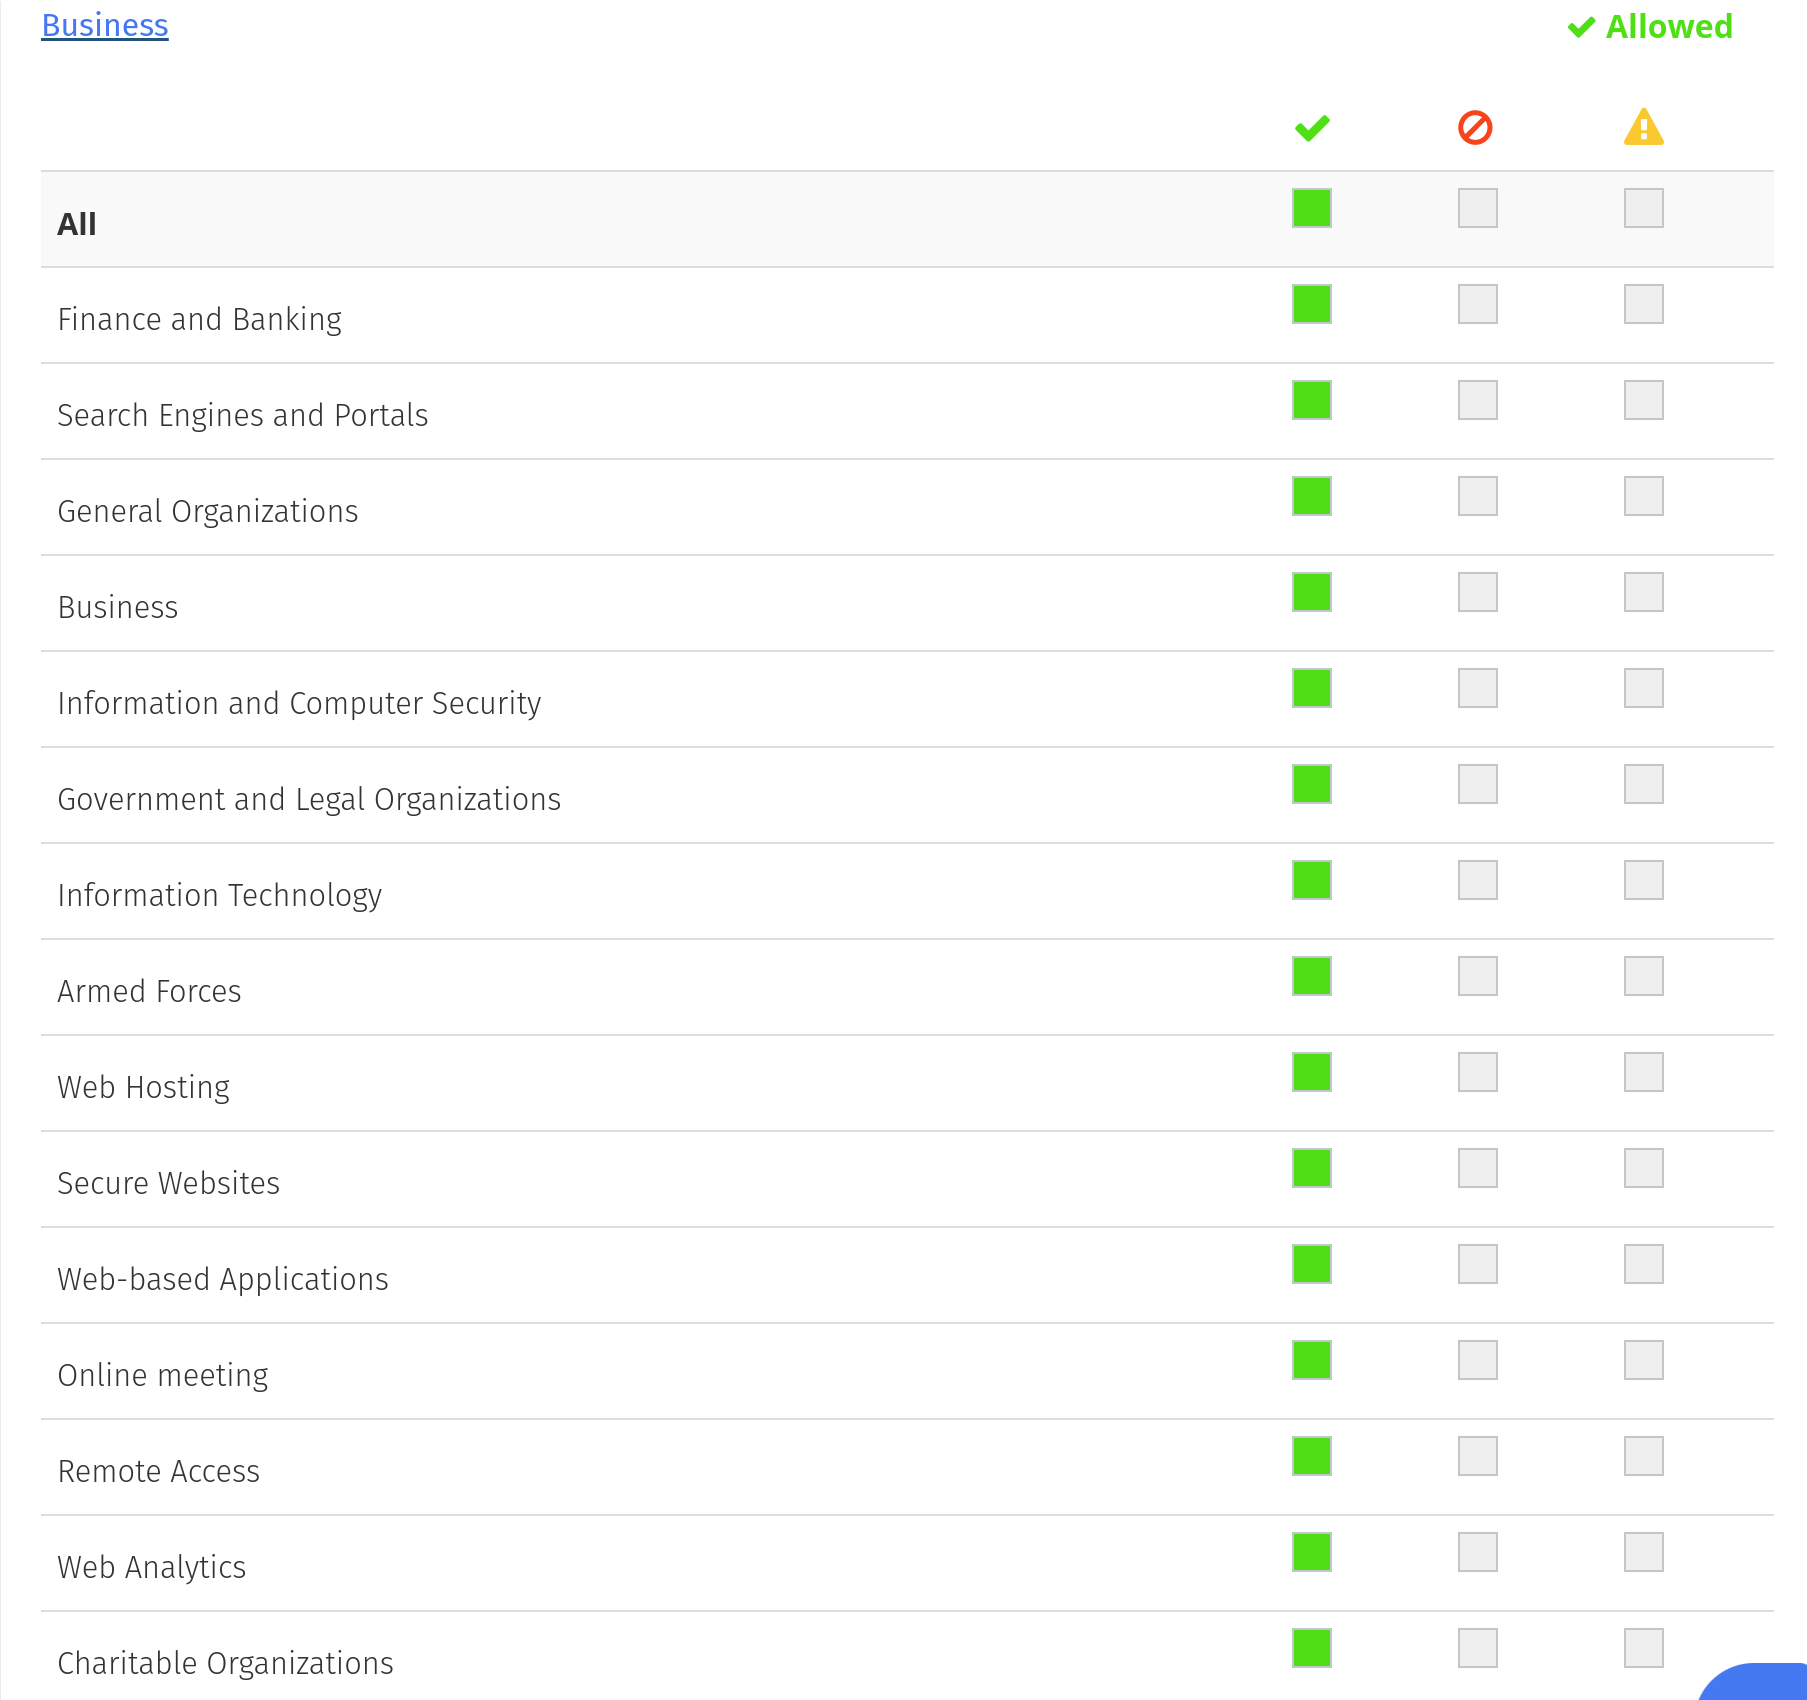](https://info.wftigers.org/uploads/images/gallery/2026-10/nbaiTMuXBHqndZZA-c72750237174d848197c637863e528a1a5b339e1.png)
[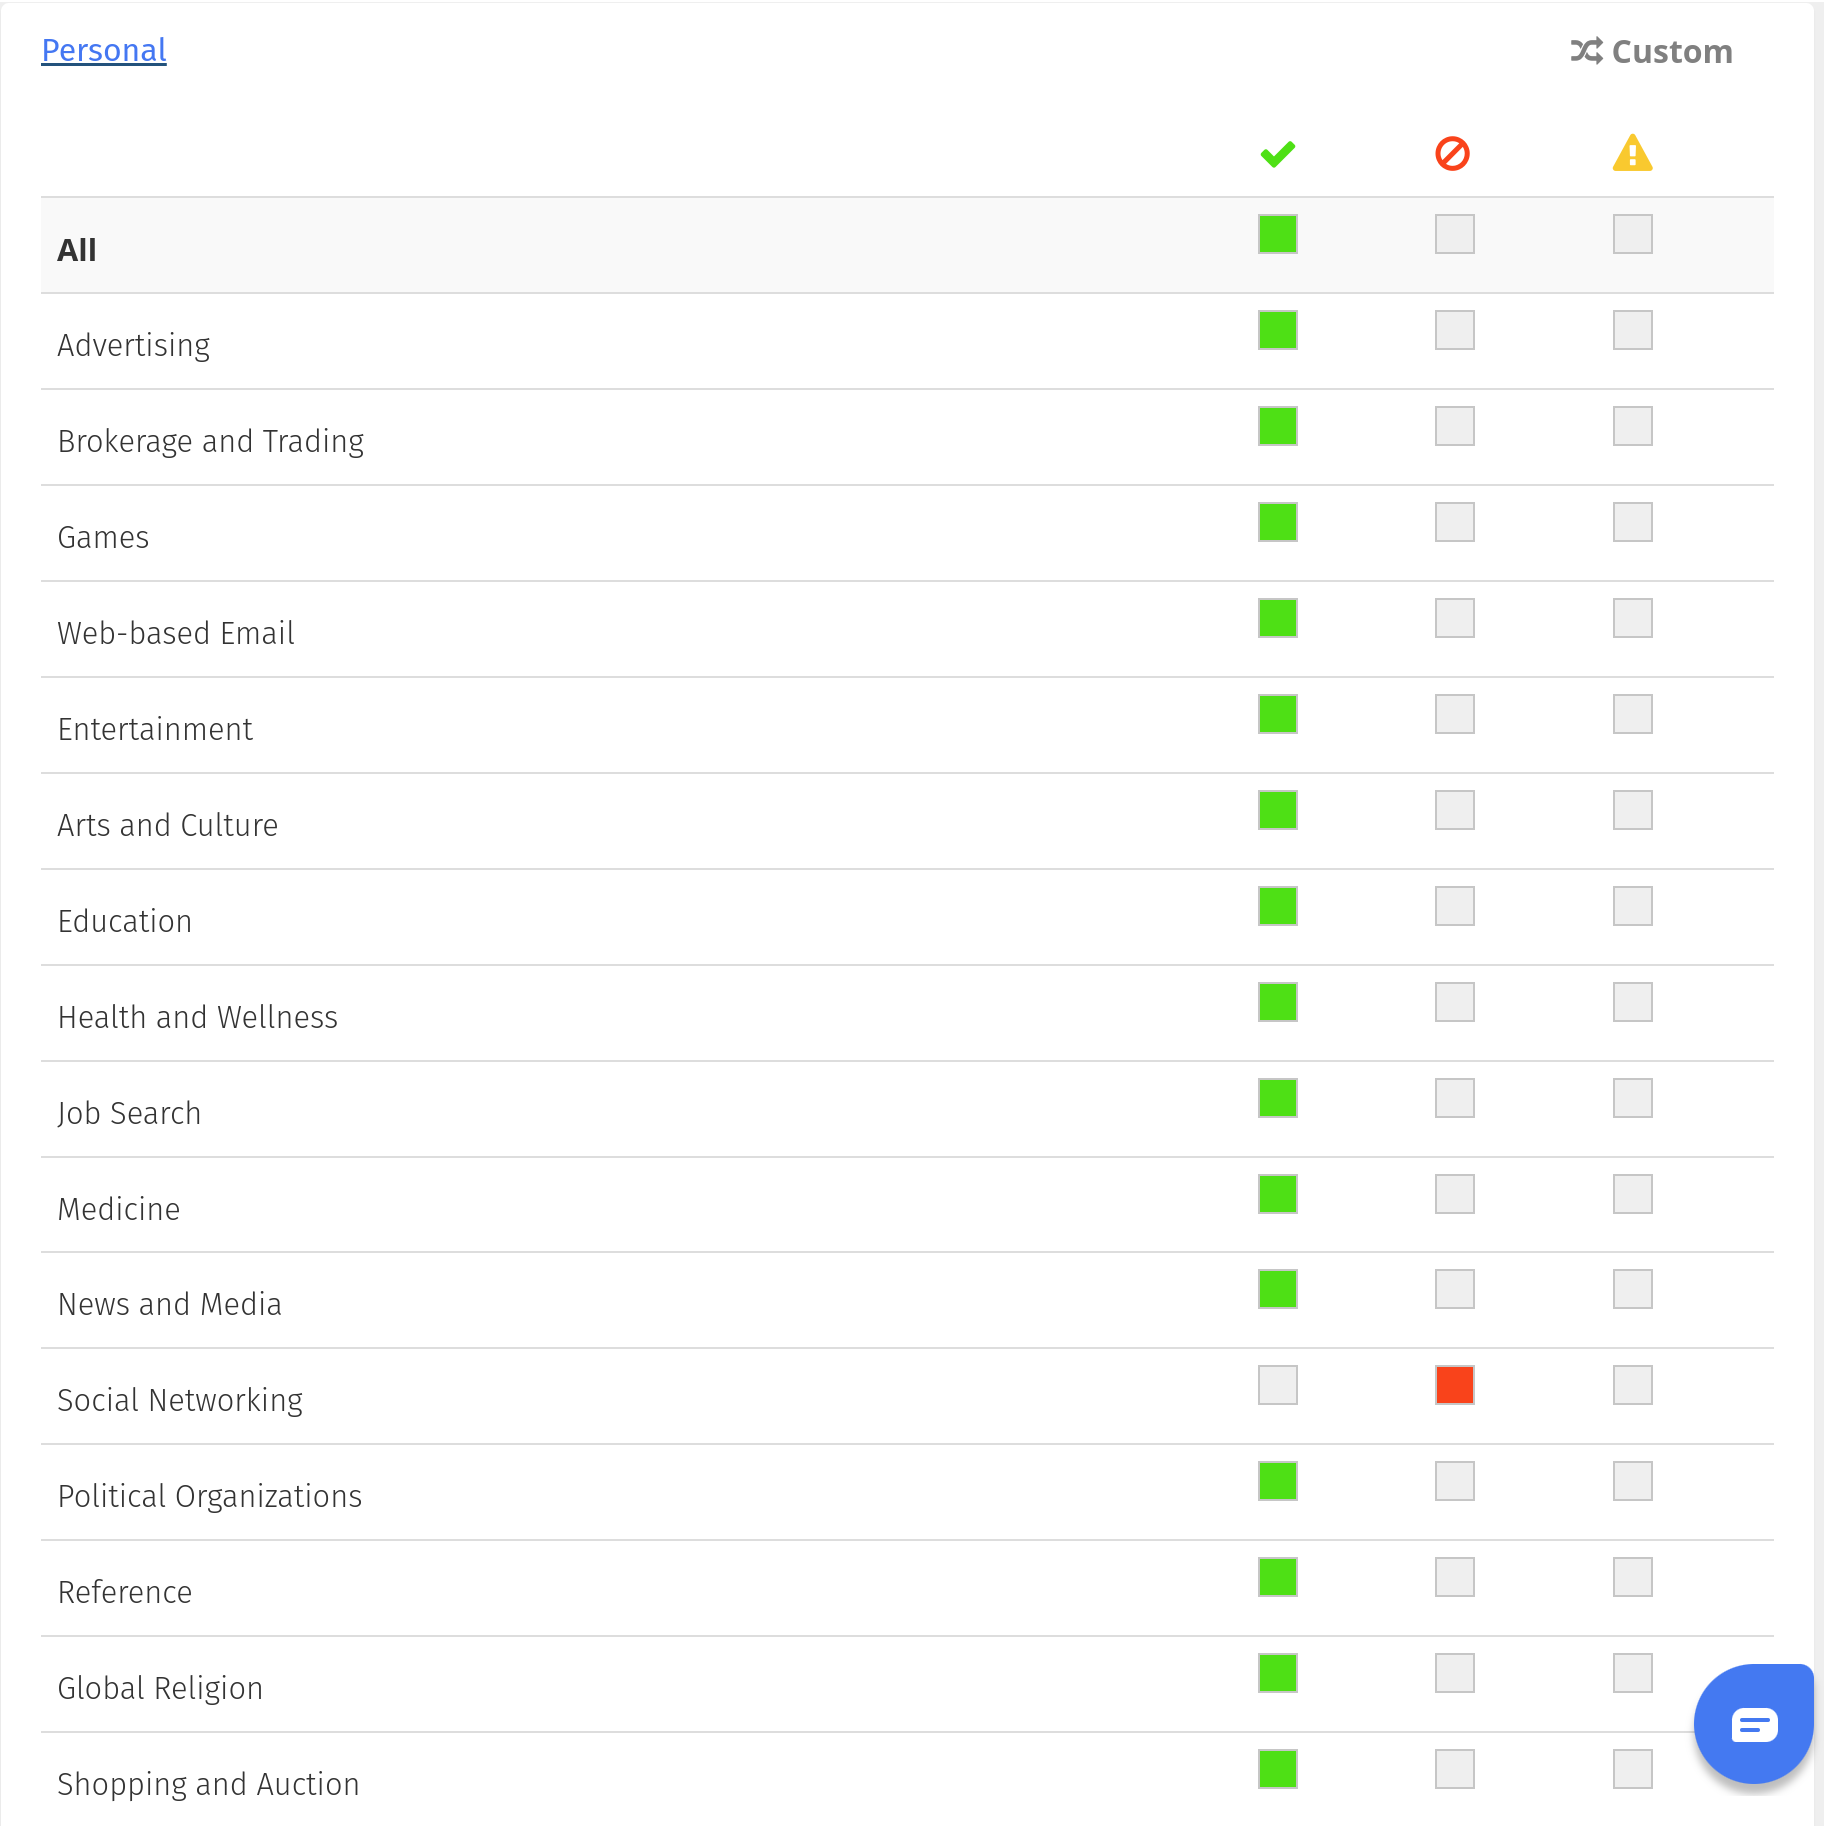](https://info.wftigers.org/uploads/images/gallery/2026-10/z1WnoSMq4tH2bVyI-5ab9847bb666e80821a4f502413b65caae088e9c.png)
[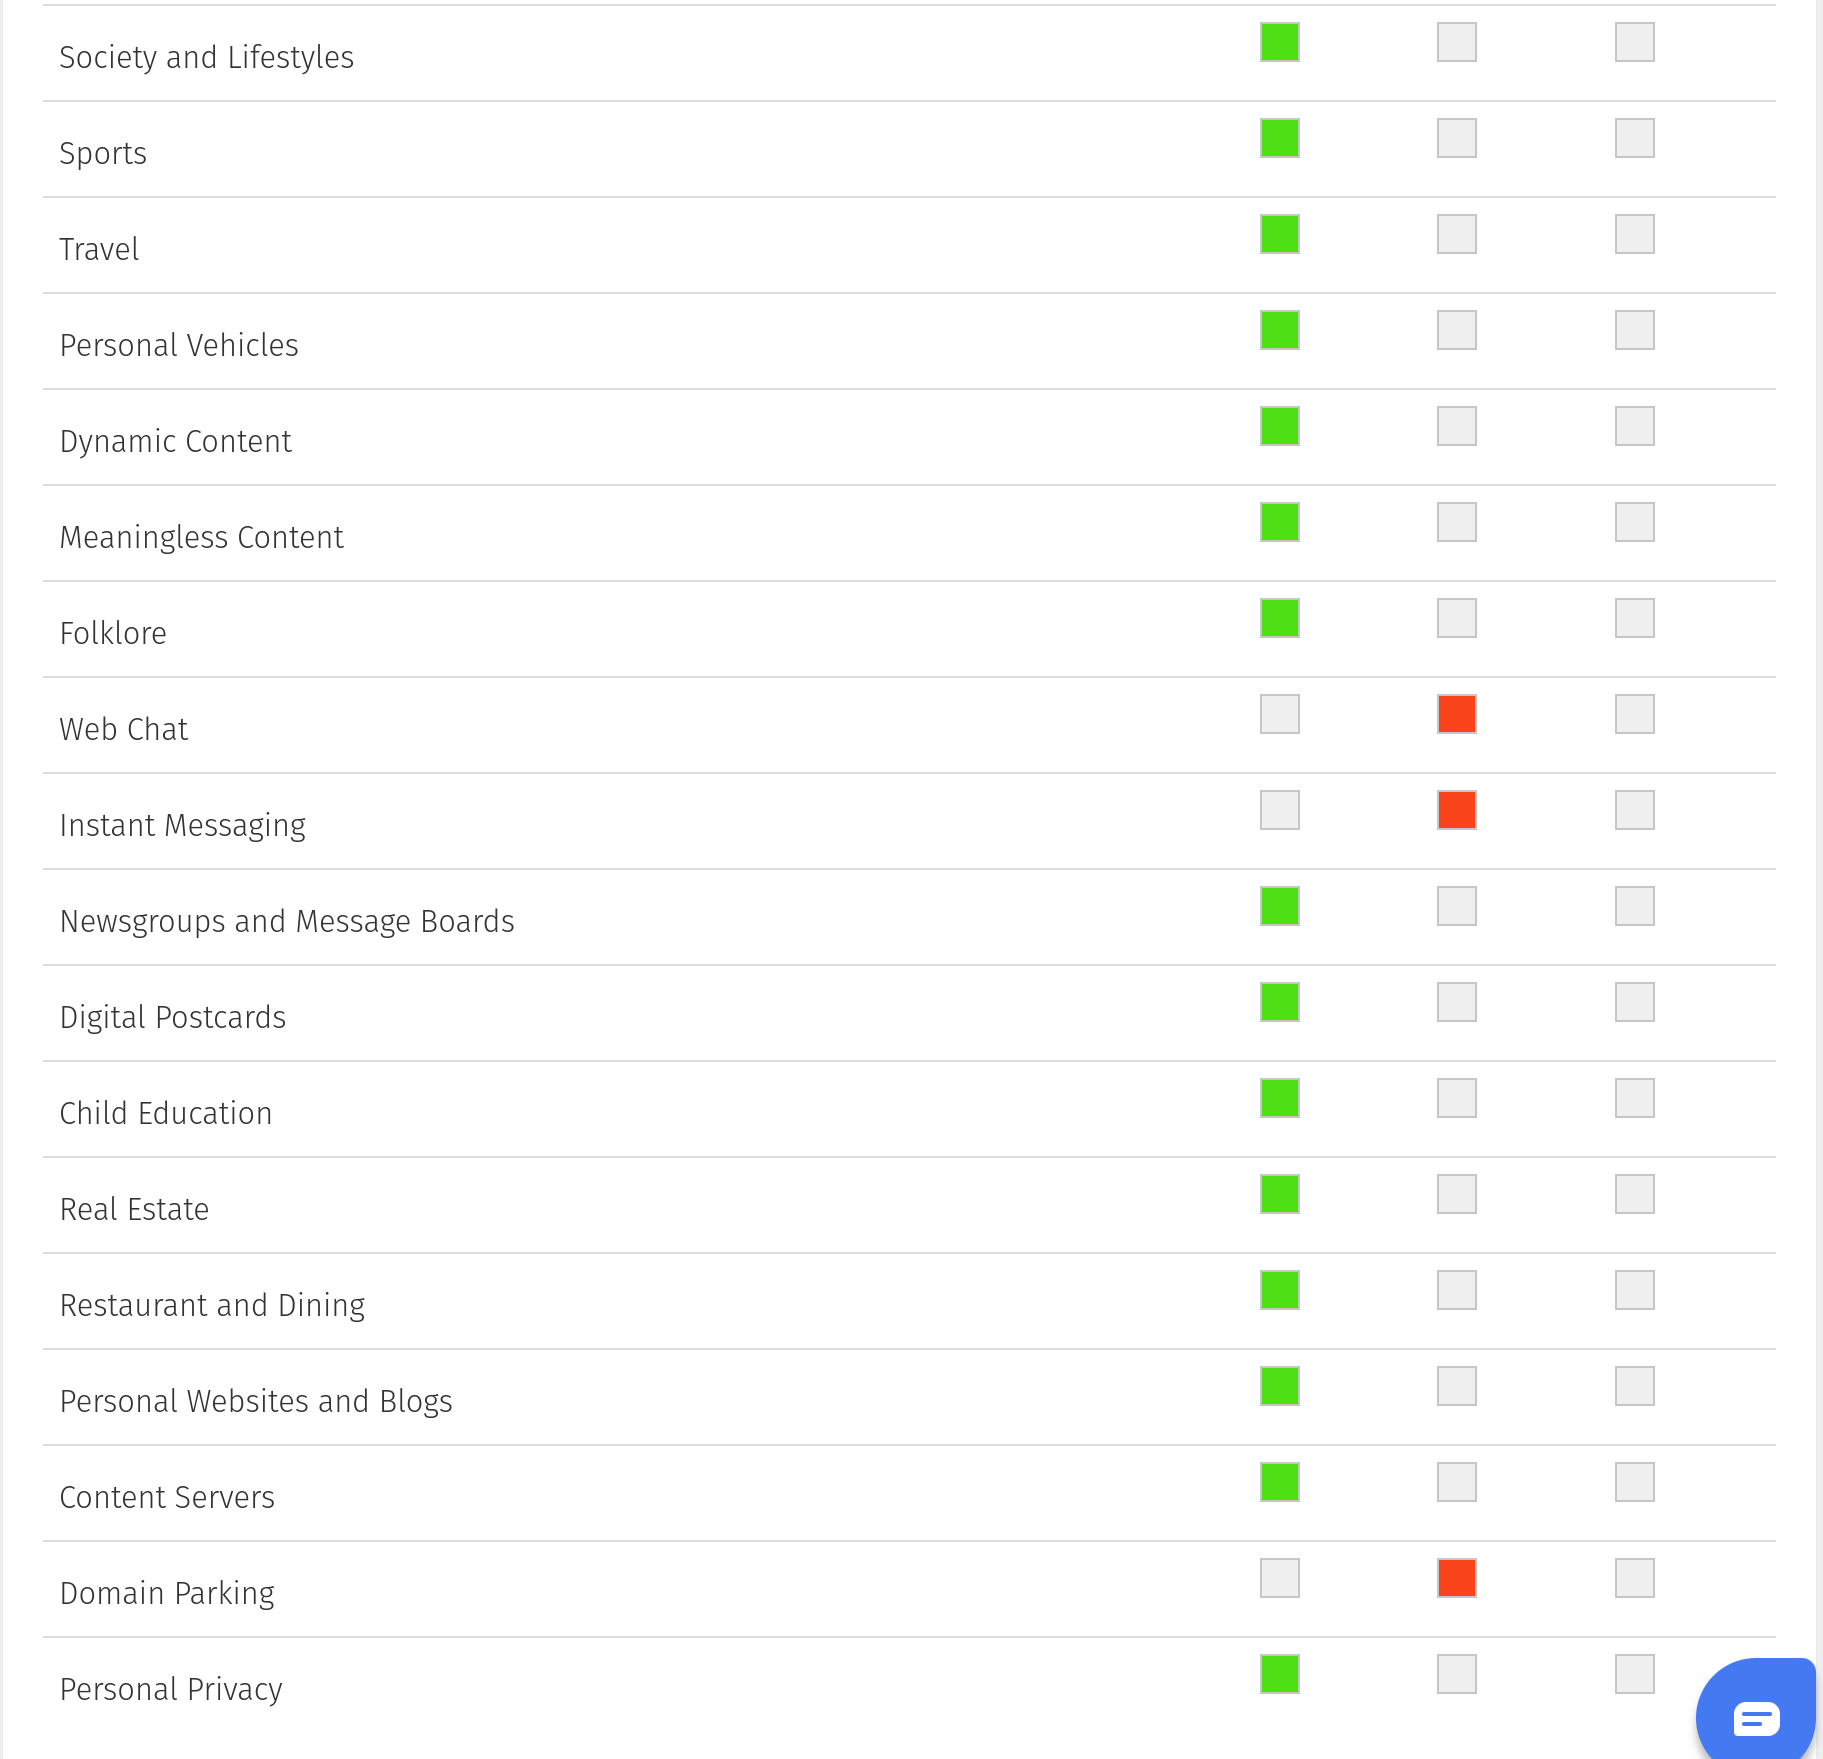](https://info.wftigers.org/uploads/images/gallery/2026-10/seySdc1HvDXcGTqz-3f8cf93156cbd38b4d1ca83eeed237329b080378.png)
[](https://info.wftigers.org/uploads/images/gallery/2026-10/kQmAl2QZM1fEYS3o-82461b93b141b7f3c4f6000154e846287d413216.png)
Originally posted by Cory Robbins on the West Fork Technology Hub (2023-09-27).
# Blocksi - Alternative URL Blocking (NOT FULL DOMAINS)
[](https://info.wftigers.org/uploads/images/gallery/2026-10/vaIJ8opAkpZc7Y5S-9027b3ccbefd51249b098d33024d13f8e0bd7f4b.png)
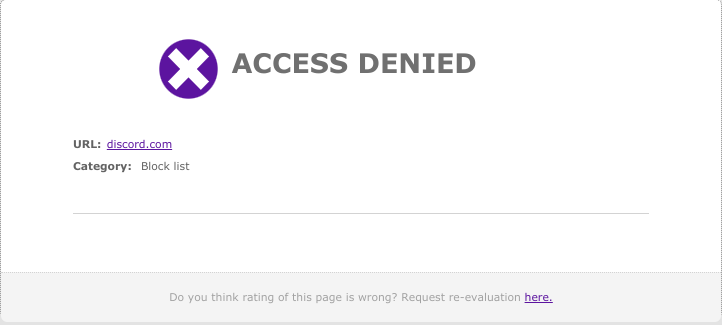
We have had some teachers struggling with blocking access to specific pages, mainly different Google Sites. When they try to block the Google site, it actually blocks all of Google.
The BEST way to do this is to add the full address, for example:
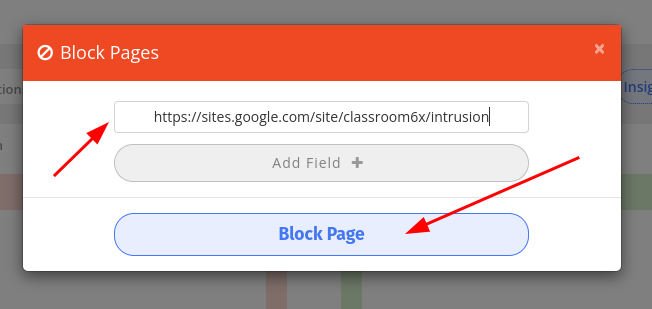
`https://sites.google.com/site/classroom6x/intrusion`
To an **Exception List** that is tied to a policy that you connect to your class. Here are the instructions for doing that: [Blocksi - Filtering Policies and Assessment Mode](https://info.wftigers.org/link/1846)
{{@1846#bkmrk-click-here-for-instr}}
If, for whatever reason, you don’t wish to do that, you can also do it this way:
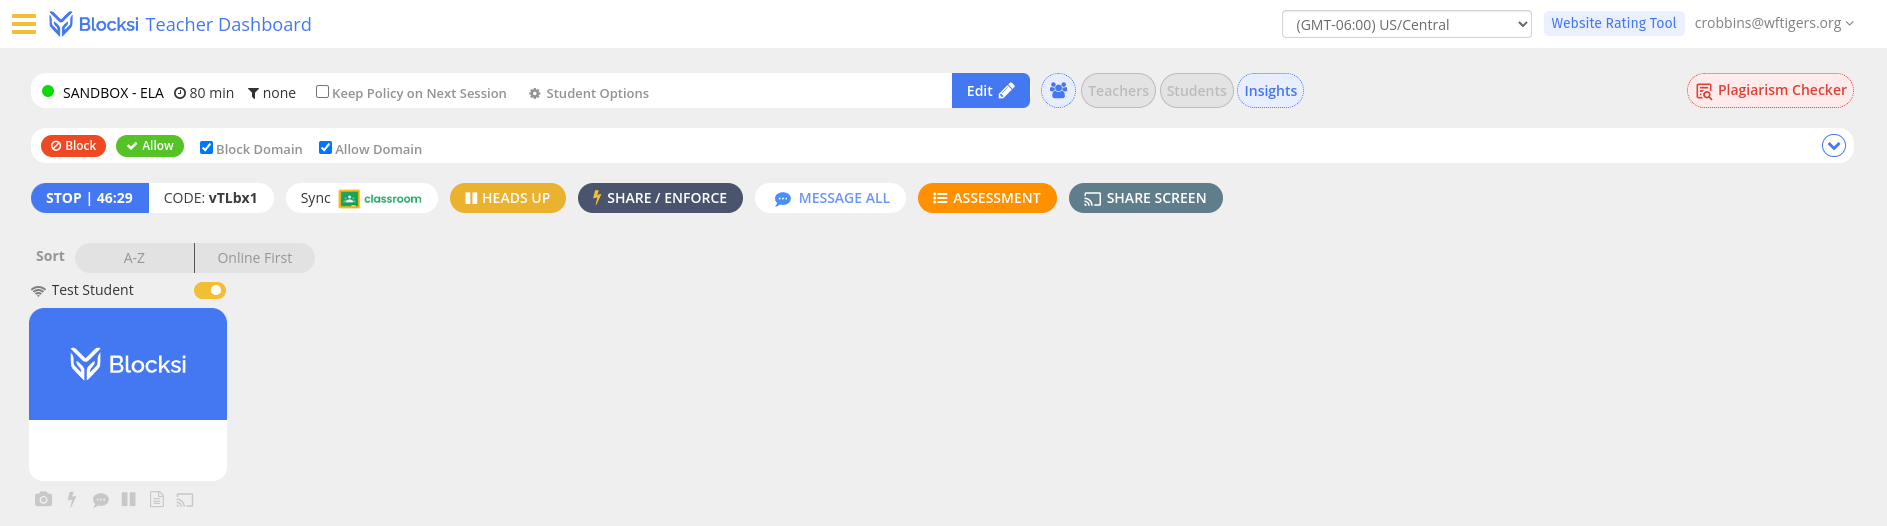
1. This is the default class setup, meaning that there isn’t a policy assigned:
[](https://info.wftigers.org/uploads/images/gallery/2026-10/1THxWoPSiIQtlxFp-b9202d0ef65b7f138878365cdecc2c68b055f721.png)
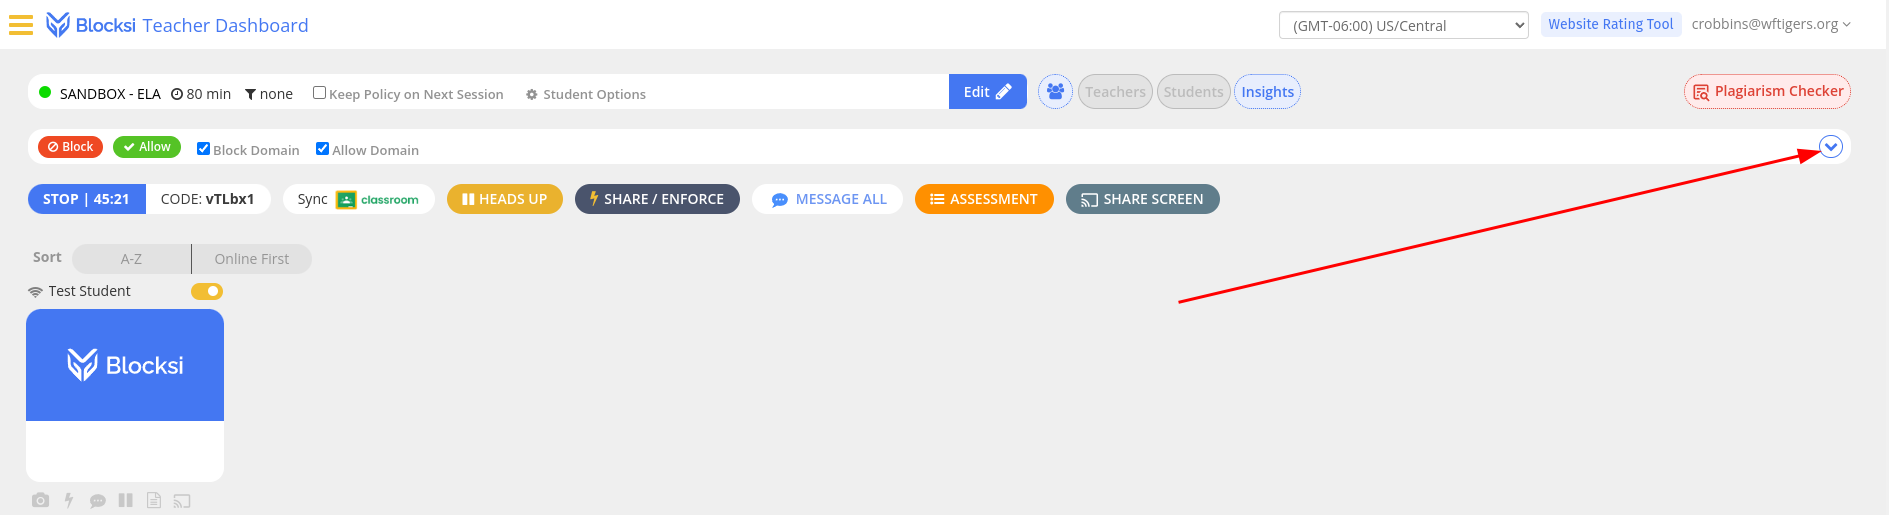
2. Click on the little disclosure triangle to view the full list of sites being blocked and allowed.
[](https://info.wftigers.org/uploads/images/gallery/2026-10/vkxzbdf0pSsl2NPS-3cee460c409f3ab69278ca2a3f8737744950dac1.png)
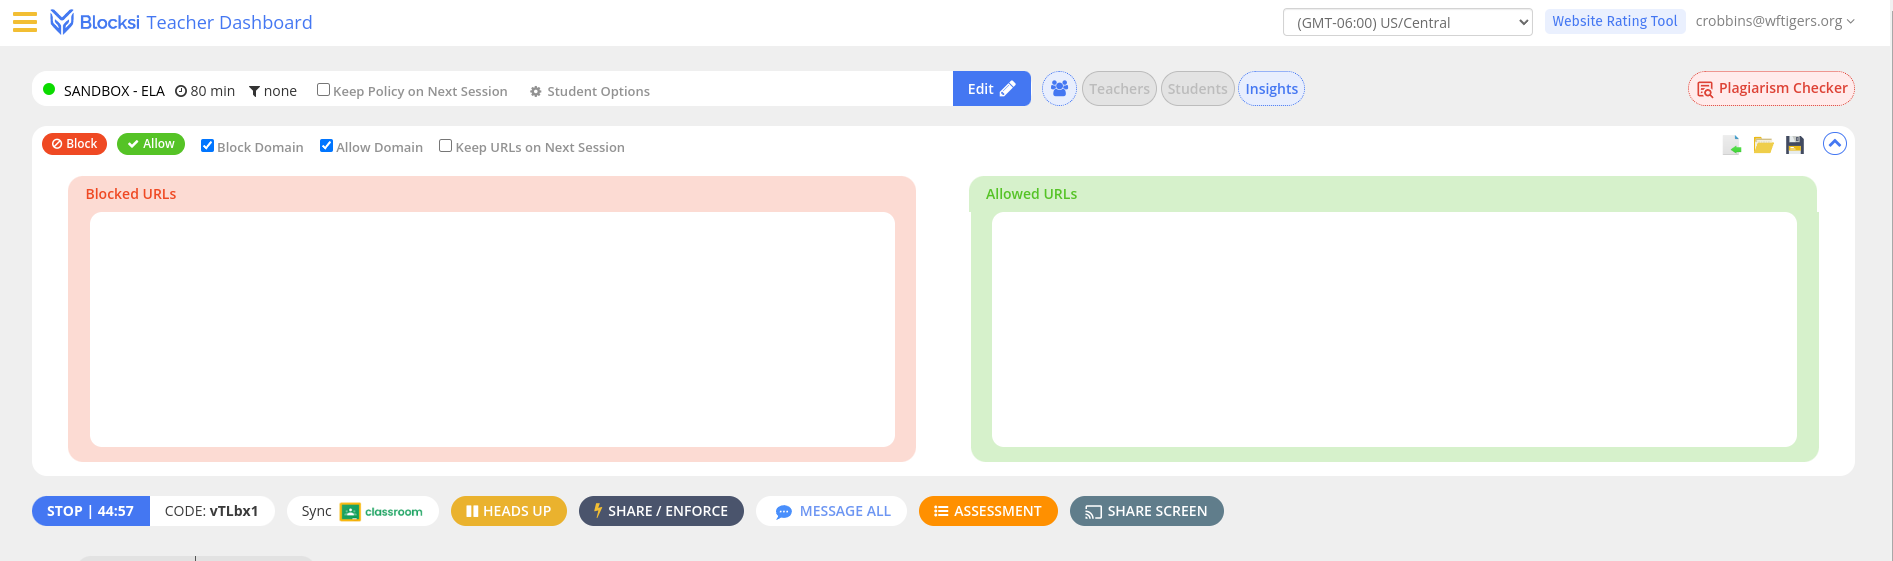
3. For a default class, the two boxes SHOULD be blank:
[](https://info.wftigers.org/uploads/images/gallery/2026-10/RRZBpYqXTVtSP50W-3c421974a3604e3d987fd6dd4b9eb17814bb9d76.png)
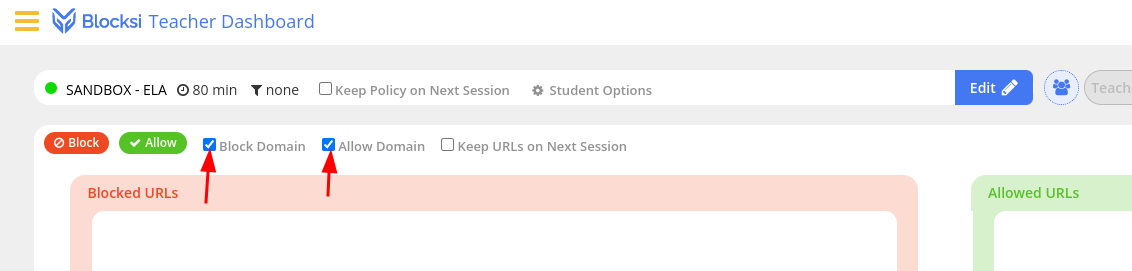
4. The settings to allow blocking specific addresses instead of full domains (allows specific pages instead of entire areas of the internet) are these two checkboxes. You want them to be **INACTIVE**.
[](https://info.wftigers.org/uploads/images/gallery/2026-10/T8E9tFvHZ7JQFDt1-4aef35ab46ffaa49bca4f5b7608ce7790b44502a.png)
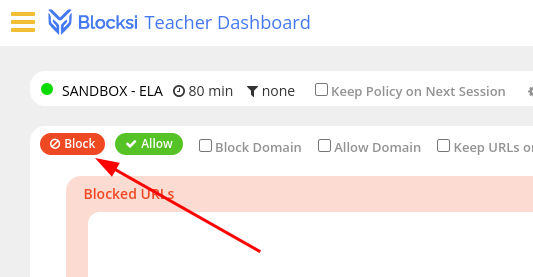
5. At this point, you should click on the “Block” button.
[](https://info.wftigers.org/uploads/images/gallery/2026-10/qa2Q3WrUE896R6nh-81438ac1c86378f6990d85f76d4b5a957b4b15ab.png)
6. Enter the full address of the page (like the one above) in the box, then click on the “Block Page” button.
[](https://info.wftigers.org/uploads/images/gallery/2026-10/g4wVoABWoVlCr1hF-5e248125f9fb12d49ce2d93f044c871b88c7892e.png)
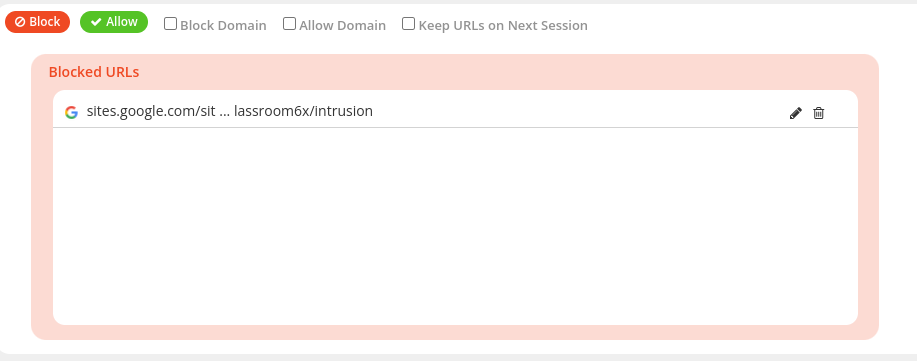
You should now see the full address (or perhaps a truncated version) listed in the “Blocked URLs” section.
[](https://info.wftigers.org/uploads/images/gallery/2026-10/ePdcLQmZo74IV9Ra-154ce77af329c1b3b09791c05ec9df60eb994ce5.png)
Originally posted by Cory Robbins on the West Fork Technology Hub (2023-12-05).