Directions
This book pertains to directions on how to do certain things or achieve certain outcomes with programs or technology.
- End of the School year - Tech FAQ
- View Students Information in TAC
- Using Generative AI
- Feedback Tool
- Google's AI Studio - Introduction
- NotebookLM - Introduction
- Creating Newsletters with Canva
- Windows 11 - Move start menu to the left
- Windows 11- Dark mode
- Installing Atlas Secure Test using Chocolately GUI
- Windows 11 - Pin Application to the Start or Taskbar
- Clipboard History, Emojis, Math and Language symbols
- Windows 11 - Calculator
- Scan From Copier to Email or Google Drive
- Windows Screen and Power Settings
- I love PDF tool
- Alternatives to Adobe Photoshop, InDesign and Illustrator
- Installing Respondus Lockdown Browser for VA Students
- Turning the trackpad on and off
- Employee Access Center - Setting Contact Number for Messaging
- Student Laptop Initial sign-in instructions
- Teacher/Aide Dell Laptop Intial Sign-In Instructions
- Grandstream phones tutorial video 1600 series
- Useful Keyboard Shortcuts
- Gmail Filters and Labels - Organize and Simplify your inbox.
- Google Authenticator - Bakcup Two-Step Verification
- Google Chat - Spaces
- Navigating the Knowledgebase
- Google Search Tools
- Downloading Google Docs as PDF or DOCX
- Converting Microsoft Word Documents into Google Docs
- Airtame - Share a single window
- Create Gmail Groups and Add Comments
- Connect to the West fork Schools Network - For Students and Staff
- Accessing the Bitwarden Extension
- Accessing eSchool, TAC, EAC, and eFinance from Off-Campus
End of the School year - Tech FAQ
Here are some of the frequently asked questions and answers regarding technology that we get at the end of the school year.
-
What should I do with my laptop over the summer?
A. Don’t leave your laptop or charger in your classroom. Either turn them into the tech department before you leave (survey option 1) or be prepared to turn them in late June/early July (survey option 2). We will notify you as soon as they are available. While they are in your possession, please find them a safe place in your home. Avoid leaving them in hot conditions (like a car) or an unsecured location. -
What should I do with my computer(s) if I’m not returning to West Fork next school year?
A. Please turn them into your building principal. -
What should I do if I’m changing rooms/buildings next year?
A. You will keep the same laptop. Leave your classroom phone (and other technology) in your current room. -
What should I do if I have technology in my room that is old or I’m not using?
A. Open a tech ticket (email support@wftigers.org) and we will remove them over the summer. -
If I am leaving the district what is the best way to leave lesson plans or other resources for my replacement?
A. Create a shared drive with a team member and/or your building principal. Copy the resources to the shared drive. -
If I am leaving the district how can I take my electronic resources and/or important emails with me?
A. Use Google Takeout to copy the resources to a personal email account. Follow this link for more details.
View Students Information in TAC
This article will show how to view student information in TAC, including demographics, parent contacts, schedule, report cards, transcripts, missing assignments, and current classwork. This works for students rostered in your class but can also be used for any student in your building. This is useful for club sponsors and coaches.
The pictures are rather limited due to personally identifiable information (PII) of students. A few minutes of clicking through the tabs will fill in the blanks not pictured.
Once logged in to TAC, if the student is in your class, click on the student name to pull up the student information viewer. If they are not in your class, click on the magnifying glass in the upper right-hand corner.

Type in the desired last name. Be sure to click “Show All Students” if they are not on your class roster.

After clicking on the student name, the Quick View tab is displayed.

The redacted section displays contact information. The full schedule and missing assignments are also displayed.
Click on the Contact button to see student, guardian, and emergency contact information.

The Registration tab is rather limited, so we will skip over that.
The RC/IPR/TRN tab shows report card, progress report, and transcript information.


The Tests tab is not used; however, the Classwork tab shows all the current published assignments as well as the student’s grade in each class.

Using Generative AI
In some previous articles, we have shown how to use AI to accomplish research and analysis-style tasks. This is a hugely helpful style of AI technology, but there is another, more immediately impressive (and somewhat terrifying) form of AI as well.
Where all of the other AI tools we have discussed are free for teachers, today’s topic will cover the use of Sora, a paid update to ChatGPT.
Generative AI is the term for Artificial intelligence that creates or generates content. This is so incredibly powerful… The purest form of use allows someone with creativity to realize their vision… Maybe you have someone who can’t draw a straight line, but they can write the most descriptive and captivating world-building text. Generative AI can take this text and (sometimes with a little pushing) turn it into something anyone can see. This isn’t unique to visual generation. AI has become more popular in music generation as well. Today, though, I’m going to focus on the visual elements of Gen AI.
I have two scenarios for you today. The first is how I actually used Sora in a project I’m working on, and the second is a more practical example.
My Actual Usage
The project: Create a sample player introduction video for athletics broadcasting as an example for coaches, administration, and AV students.
The process: Use Adobe After Effects to create templates for AV kids. Include player names, numbers, height, weight, grade, and position. Provide sample players with live motion overlayed on top of the template.
The problem: I don’t have access to any video content that would work in this situation. To be able to use a person in front of a background that doesn’t exist in the original video, you have to record the video in front of a green screen, or you have to use a process called rotoscoping (you literally trace the person in every frame of the video. At 30 frames per second, each player is 10 seconds, which means every player will have to be traced 300 times… way too much work for a demo). You also need video taken from a close vantage point or from a high-quality camera with very good zoom/lenses. This just wasn’t available to me. I COULD schedule time with a couple of students, set up all of the equipment, then do the demo shoot, and, a few years ago, that was the process, but I chose another way…
Enter AI: I pay for the upgraded version of ChatGPT. I use it A LOT for a large variety of projects that involve coding, and Gemini just isn’t as good at that. Anyway, as part of that upgrade, I get access to Sora, which creates video clips based on storyboards, text prompts, or even other media. I went the text route…
Remember… I said that these videos need to be taken in front of a green screen. So, as part of my prompt, I made sure to include that instruction. Here is what I provided Sora to get started:
A baseball player in front of a green screen
Please don’t be overwhelmed by the complexity of the prompt…
For my efforts, I received two, very reasonable videos. The GIF versions are below:

As you can probably tell, there are issues… The bat in that first one jumps from one hand to the other, and the other dude is just boring… I was, however, feeling emboldened by such a decent result with so little effort, so I tried a little harder with my next prompt:
A baseball player wearing a black jersey with old gold accent colors including the letters WF. He is standing in front of a green screen.
Ignore the fact that I said old gold… I forgot it was called Vegas gold until I finished the project…
For this exercise in clarity, Sora rewarded me with these two clips:


Ok… Now we are getting somewhere… Still, we have issues. First, these guys are clearly too old. Second, I can’t see faces, and that matters in a player highlight video. Third, The second guy put a double visor on his hat, which is super smooth, but weird…
We are good though… I’m feeling excited, so I further modify my prompt to this:
A baseball player wearing a black jersey with old gold accent colors including the letters WF. He is standing in front of a green screen. He has a baseball in his right hand, and he has a baseball glove on his left hand. He is a high school student. Focus on the face and his look of intense determination.
I hit the button to generate the video, and just knew… this is it… THIS is the prompt that will give me the PERFECT video. Then Sora gave me this:

I was ![]() underwhelmed. It seems to have gotten confused and thought I meant to CUT OFF HIS FACE!
underwhelmed. It seems to have gotten confused and thought I meant to CUT OFF HIS FACE!
But then I saw the second video:

And, dear reader, I was stoked. True, it wasn’t 100% what I asked for. It looks like he thinks he is holding a ball, but it isn’t there, and the green screen is JUST big enough to cover him, but I figured this was a great starting point to bring in the next tool…
Remix
Sora has a remix button. Basically you tell it to use a previous render as the jumping off point for any corrections. Now, instead of trying to craft a prompt, I just give it a set of tweaks. Here is my new set of instructions:
He should be wearing a baseball hat, and he should have a baseball in his right hand.
Sora responded with these:


Ok… Getting somewhere. I still can’t seem to get a ball in the kid’s hand, and the second dude is either left-handed, or his glove had fused upside down to his flesh… Either way, that isn’t great. I like the first one, and I’m willing to use for the demo, even without the ball.
Next, I need to highlight multiple players, so I need a remix that will result in a totally different person, and ideally a different action. I went with this:
Please keep the overall composition, but remove the ball and glove, and instead give the player a bat. Also give him a darker skin tone.
Critical advice - always say please to the robots.
Sora responded with:

And I was like “Yessss this isss… Whaaaat???” We were doing SO well until that second bat came out of nowhere.
But that’s ok, because Sora also gave me this one:

And while it also has some weird hand issues, it is perfectly serviceable for this task!
The template I had made needed three players, so when I had originally said “darker skin tone,” I wasn’t actually thinking a different race, I thought it did a great job, so I leaned into it for my third option:
Please change the nationality to be Asian.
And again, Sora toyed with me. The first clip is smoother, and I like the movement more, but bruh… what is the deal with the levitating bat? I did think the second option was good, and it was about this time I remembered that I have a limit of credits each month, so I took the second video.

Next Steps: Once I had the videos, I went through the process of isolating the players, and I put them into the highlight template. I’ll skip all of that because it has nothing to do with the AI part of this video, but feel free to ask questions!
Once I was finished, I got this video
https://youtu.be/AMtg4d1GsDY
Is this perfect? Nope. Not even close, but I think it is easy to argue that it is much more elar about what the goal is than me trying to communicate it verbally, or defaulting to one of those “picture unavailable” sort of things. AI allowed me to give a (nearly) finished-looking result, and, honestly, I think it did a pretty great job.
Now, there are obvious negative implications to this technology, but that is true with ALL technology, and pretty much ALL inventions/discoveries. I think we have to be willing to learn and use things for good, and this is just one example of how I’ve tried to do it.
An interesting use-case
For this one, I’ll keep it much shorter. I wanted to see what the cast of Harry Potter would look like if it were created/casted by AI. The annoying part of this is that you have to collect all of the character descriptions from the book, and because of how AI work, you have to remove names and specific identifiers so that existing content for that character isn’t the inspiration. Luckily, ChatGPT (and Gemini) can do that with a simple prompt:
I need the physical aspects as well as the character traits of Hermione Granger from the Harry Potter books. Please just provide the physical appearance and personality trait specific details, and remove all elements that would indicate that the character is Hermione, as if the intent was to make the reader guess who this character is… Similar to the first time we are introduced to her.
I was provided with this
read description
A young individual with thick, bushy brown hair that seems to have a mind of its own, often falling in wild waves around their face. Their eyes are a deep brown, filled with intensity and a sharp, observant nature. Their complexion is light, and their expression is frequently animated, especially when engaged in conversation or deep thought.
They are of average height, though they often carry themselves with a certain confidence that makes them seem taller. One of their most distinctive physical traits is their large front teeth, which add to their expressive appearance. Always seen with a book in hand, they seem prepared for any situation, radiating a sense of readiness and purpose.
This individual is exceptionally intelligent and studious, always seeking to expand their knowledge. They possess an unwavering work ethic, often preparing far ahead of time and double-checking their own work for perfection. Highly logical and practical, they tend to analyze situations methodically, yet their quick thinking allows them to adapt under pressure.
Despite their academic focus, they are also deeply loyal and incredibly brave, unafraid to stand up for what is right, even when it places them at odds with others. Their sense of justice is strong, and they are passionate about advocating for those who may be overlooked or mistreated. However, their strong opinions and confidence in their knowledge can sometimes come across as bossy or overbearing, especially when they insist on being correct.
Though not necessarily drawn to confrontation, they do not hesitate to correct misinformation or challenge authority when necessary. They have a tendency to overthink and worry, especially when the outcome of a situation is uncertain, but their resourcefulness and determination ensure they rarely falter for long. Beneath their structured and intellectual demeanor, there is a deep sense of compassion and warmth, especially for those they care about.
I did the same thing for Harry, Ron, Dumbledore, and Volde…
read descriptions
Please perform the same exercise for Harry Potter. It is ok to keep gender.
ChatGPT said:
Character Description
A slightly thin, wiry boy with a messy mop of jet-black hair that never seems to stay in place, no matter how often it is brushed. His eyes are a striking shade of green, often described as intense and piercing, though they hold a quiet depth beyond his years. A pair of round glasses sit on his nose, often slightly askew from being knocked around. His skin is fair, though he has a somewhat sallow, underfed look, as if he has gone without proper meals for long stretches of time.
One of his most defining physical features is a lightning-shaped scar on his forehead, a mark from a past that follows him wherever he goes. Though the scar is small, it carries an air of mystery, often tingling or burning at the most unexpected moments.
He is quietly observant, often processing everything around him before speaking. Though not the loudest voice in the room, there is a natural sense of leadership in the way he carries himself—unwillingly at times, yet undeniably present. He has an innate sense of courage, often acting on instinct rather than careful planning, throwing himself into danger if it means protecting those he cares about.
Despite his reputation, he is deeply humble and self-conscious, never fully comfortable with the attention he receives. He dislikes being placed on a pedestal and often feels like an outsider, struggling with the weight of expectations placed upon him. He is fiercely loyal and protective, willing to stand up for friends, even against overwhelming odds. His sense of justice is strong, and he cannot tolerate bullying or unfairness, even when it would be easier to stay quiet.
Though he has a strong moral compass, he is not without flaws. He can be impulsive, letting his emotions drive him into reckless decisions. His stubborn streak often leads him to take on burdens alone, unwilling to ask for help even when he needs it. Beneath his bravery and resilience, there is a deep longing for belonging and connection, making the bonds he forms all the more precious.
4o
You said:
The same for Ron Weasley, please.
ChatGPT said:
Character Description
A tall and lanky boy with a slightly gangly frame, often seeming as though he hasn’t quite grown into his own limbs. His hair is a vivid shade of red, somewhat untidy and falling across his forehead in a way that seems to match his relaxed, casual demeanor. His eyes are a light blue, frequently alight with humor or frustration, depending on the situation. His skin is fair and freckled, a trait shared by many in his large family.
Though he has a strong presence, he often carries himself with a certain slouch, as if trying not to take up too much space. His hands and feet are slightly oversized, a sign of a boy still growing into his full height. He has a distinct ear-to-ear grin when he’s amused, but just as easily wears an expression of frustration or exasperation when things don’t go his way.
A natural comedian, he has a sharp wit and a talent for sarcasm, often using humor to diffuse tension or hide his own insecurities. Though he exudes confidence in casual settings, he sometimes struggles with feelings of inferiority, particularly when compared to those closest to him. He has a deep yearning to prove himself, whether through skill, bravery, or recognition.
Despite these insecurities, he is fiercely loyal, standing by his friends through thick and thin—even when jealousy or frustration momentarily gets the better of him. He has a brave heart, though his courage is sometimes tested by fear or doubt, making his victories over them all the more meaningful. He is also quick-tempered, prone to reacting emotionally before thinking things through, but his heart is always in the right place.
A strategic thinker, he has a surprising knack for tactical games, displaying an instinctive ability to anticipate moves and patterns—a skill that serves him well in games and real-life situations alike. While he may not always recognize his own worth, his unwavering loyalty, humor, and courage make him an invaluable companion, even when he doubts it himself.
4o
You said:
The same for Albus Dumbledore, please.
ChatGPT said:
Character Description
A tall and slender man, with a long, flowing silver beard that cascades down to his chest. His hair, equally silver, is kept long, tucked neatly behind his ears, giving him the appearance of someone who has lived through many years of wisdom and experience. His eyes, a striking shade of blue, twinkle with amusement and deep intelligence, often conveying more than his words. They are sharp, constantly assessing and understanding far beyond what is spoken.
He wears half-moon spectacles perched delicately on the bridge of his nose, adding to his scholarly appearance. His face is lined with age, but rather than appearing tired or worn, it radiates kindness, patience, and an ever-present sense of curiosity. His posture is relaxed yet commanding, exuding a sense of quiet authority without the need for force.
Possessing a calm and collected demeanor, he often speaks in riddles and whimsical phrases, leaving those around him to puzzle out deeper meanings. He is profoundly intelligent and highly strategic, always several steps ahead in any situation. His wisdom is vast, not just in knowledge but in understanding people, their motivations, and the balance of power between good and evil.
He carries himself with gentleness and humor, often using lightheartedness to put others at ease. Despite his warm and grandfatherly presence, there is an undeniable depth and sadness beneath his kind exterior—an unspoken weight of past regrets and difficult choices. Though he preaches love and understanding, he is not without flaws, sometimes withholding vital information to protect others, believing that knowledge can be as dangerous as it is powerful.
A true believer in the power of love, kindness, and second chances, he has an unshakable faith in people’s ability to change for the better. However, he is also a master manipulator when necessary, steering events with a careful hand, often working in the shadows to ensure the best possible outcome. His compassion, intelligence, and quiet strength make him a guiding force, yet his past remains a reminder that even the greatest minds are not without their burdens.
4o
You said:
And for Lord Voldemort, please.
ChatGPT said:
Character Description
A tall and unnervingly thin man, with skin as pale as bone, almost translucent in certain lights. His features are gaunt and angular, giving him a serpentine appearance, further emphasized by the absence of a human nose—replaced instead by two thin slits, like a snake’s nostrils. His eyes are a piercing, blood-red shade, with narrow, slit-like pupils, making his gaze both hypnotic and terrifying.
His head is completely bald, devoid of any hair, adding to his unnatural and almost spectral presence. His fingers are long and spindly, his movements eerily smooth, almost gliding rather than walking. His lips are thin and colorless, often twisted into a cruel smile or a sneer of disdain. The very air around him seems colder in his presence, as though his mere existence drains warmth and life from his surroundings.
His voice is high and chillingly smooth, carrying a cold, commanding authority that demands immediate obedience. When he speaks, there is an unmistakable tone of superiority, as though every word is spoken from the mouth of someone who believes themselves to be far above those around them.
An embodiment of intelligence and ambition, he is ruthlessly cunning and dangerously strategic, always calculating his next move with cold precision. He possesses an unshakable belief in his own superiority, dismissing all who oppose him as weak, foolish, or beneath his notice. His hunger for power is insatiable, and he will go to any lengths—no matter how dark or twisted—to achieve absolute control over life and death.
Completely devoid of compassion, empathy, or remorse, he views emotions as weaknesses, particularly love, which he despises and fears in equal measure. His lack of humanity is not just psychological but also physical, as his relentless pursuit of immortality has warped his body into something barely recognizable as human.
Though he is highly intelligent, his arrogance often blinds him, leading him to underestimate those who do not fit his definition of power. His rage is cold and terrifying, rarely expressed in wild outbursts but instead in calculated, merciless acts of violence, often delivered with a quiet, almost casual cruelty.
Despite his outward control, fear is his greatest motivator—the fear of death, of insignificance, of losing control. It is this fear that drives his every action, compelling him to cling to life at any cost, no matter how monstrous he must become to do so.
Cool! So now that I have that, I can tell Sora what to do. All I did was paste the descriptions in, as they were given (except for Ron. I’ll show you the first one and the remix). I did have to change “individual” to “girl” in Hermionie’s description.
Here is the cast, as set by Sora
Hermione Grainger

Harry Potter (Featuring a SECOND scar)

Scary Ron Weasley (nightmare fuel)

Ron Weasley (remix: “This should be as phot-realistic as possible” Still scary…

)
Albus Dumbledore

Lord Voldemort (not as scary as Ron 1)

Feedback Tool
Curipod is a unique tool that allows teachers to combine the power of AI with the tool feature set of something like kahoot.
In this introduction, we will use curipod to generate a custom lesson on a novel. We will utilize the provided activities to get better engagement from students.
Let’s start by logging in/signing up. Visit curipod.com. At the top right of the page, there is a “Sign Up For Free” button. It is totally fine to use your Google account for this, and it makes the process a little more simple
Ok. Now that the boring part is out of the way, let’s build some education materials!
On the home page of our account, we have a couple of “Get Lesson” buttons. We will go ahead and click on one of these to get started.

That provides us with a list of options. All of these are super helpful, but the one we will be looking at in this part is “Generate a lesson.” Let’s click on that to continue.

Next, we will select our subject area. In this demo, I’ll be an ELA teacher.

Once I’ve selected my subject area, I get options for the specific topics I’m looking for. For the demo, I’ll select “Novel Study.”

I’ll then provide the title and author of the book, a chapter if I want the lesson to be limited to the single chapter rather than the entire book, and then a focus point from the pretty lengthy list of options.

Once I’ve made my selections, I’ll click on “Next.”

The next page will ask me to set a grade level, and will allow me to select a language and refine the “prompt” of the lesson.

The cool thing about this page is that I can also align to standards. I’m going to click on this button to get started.

You will get a spinning circle window with Arkansas and the provided grade already selected.

Give it a few seconds (it does take several), and the system will automatically suggest standard alignment options for you. Click the one you would like to use.


I can align to multiple standards by repeating my last action. I’m good for now, so I’ll click on “Get Lesson”

Next, you will get a screen that tells you what is happening in the background. Some of these take a little bit. It takes around a minute to fully complete the lesson build.

Once that finishes, we will be taken to our “Designer” window. This is very similar to Google Slides or Canva.

All of the text is editable. Just double-click anywhere to edit, and use the slide thumbnails at the bottom to progress through the presentation.
Ok… Now the cool part.I’m going to hit the preview button at the top right. This will allow me to see both the “big screen” or teacher screen AND a sample student screen to see how the activities will work.

Now I see two screens, the student on the left, and the projector or teacher screen on the right. There are a few things to pay attention to here:
1: This is the link students will access to see what is currently on the student screen.
2: This is the pin code that students must enter to join your class (spaces don’t have to be typed)
3: This is the button you will see when you hover over the teacher’s side. It let’s you mute the annoying music… You are welcome.
4: This is where students will enter the pin code.

I’ll go ahead and enter the pin code then hit join.

On the teacher screen, I will immediately see that a student has joined, and a nickname will be provided. This nickname protects student anonymity, but it also ties back to the student’s real name for detailed review.
As a student, I’ll provide my real name, and click submit. That shows the student a waiting page, and the teacher has a user and management page.

Kids like to click buttons… If they click on the “Slides” button on the left, before the lesson starts, they will only see the intro slide.

When students have all joined the activity, the teacher can click on the “start” button.

At this point, students are directed to look at the board, and the intro slide is shown on the main screen. Again, if the student clicks on slides, they only see the active slide. This is GREAT if you have kids who struggle reading from their seats.


Once you reach an activity slide, your buttons will change. in this example, I can set an activity timer. It defaults to a recommended value, but the +/- buttons allow me to modify it. When I’m ready, I’ll click on “Start Activity.”

Students will get a countdown, then the activity will start.


Students will complete the activity. Sometimes it is writing, sometimes it is multiple choice, sometimes they have to draw a picture…

Once a student submits, they will receive a waiting screen with the ability to edit their response.
Teachers will see how many responses have been issued so far, and they can add a minute to the activity or end it at any time.

Some activities allow voting after everything is submitted. I’ll click on “Start Voting.”

Students will be presented with all of the answers (unnamed), and they click their proposed option. I’m seeing a duplicate here because you have to have at least two options to vote on…

After voting ends, either because time runs out or all students vote, the rankings will be shown, and the winning students will get congratulatory screens.

To present this for real, I would click on the “Start Now” button instead of preview. Then, the process is identical. You will just see the “big screen” or teacher screen side of things.
Important Notes
- Every activity is editable.
- Several activities will provide AI feedback to the students for things such as clear answers, supporting details, and error checking.
- Every slide is fully editable. Don’t feel like you have to stick with the provided layout.
- You can add and remove slides and activities.
AI Generated Help
Podcast
FAQ
- What is Curipod and what makes it unique?
- Curipod is an educational tool that combines the power of AI with interactive features similar to platforms like Kahoot. It allows teachers to generate custom lessons and create engaging activities for students.
- How can I get started with Curipod?
- Visit curipod.com and click on the “Sign Up For Free” button in the top right corner. You can easily sign up using your Google account. Once logged in, click on one of the “Get Lesson” buttons on the home page to start building educational materials.
- How do I generate a lesson on a specific topic using Curipod?
- After clicking “Get Lesson,” choose “Generate a lesson.” Then, select your subject area (e.g., ELA) and the specific topic (e.g., Novel Study). Provide the title and author of the book (and a chapter if needed), and a focus point for the lesson. Finally, set the grade level, language, refine the prompt, and align to standards if desired.
- Can I align Curipod lessons with educational standards?
- Yes, Curipod allows you to align lessons with specific standards. On the lesson generation page, click the button to align to standards. The system will suggest standard alignment options for you to choose from.
- What is the “Designer” window and how do I use it?
- The “Designer” window is similar to Google Slides or Canva. It is where you can edit the lesson slides. All of the text is editable by double-clicking. Use the slide thumbnails at the bottom to navigate through the presentation.
- How do I preview the lesson and how do students join the activity?
- Click the “Preview” button in the top right corner to see both the teacher and student screens. Students access the lesson using a link and pin code displayed on the teacher screen. Students enter this pin code to join the class activity.
- How do interactive activities work in Curipod?
- Once students have joined, click “Start” to begin the lesson. Navigate through the slides until you reach an activity slide. Set a timer for the activity and click “Start Activity.” Students will then complete the activity (e.g., writing, multiple choice, drawing). Some activities will provide AI feedback to the students.
- Can I customize the generated lessons and activities in Curipod?
- Yes, every activity and slide is fully editable. You can add, remove, and modify slides and activities to suit your teaching needs. The layout of the slides can also be changed.
Google's AI Studio - Introduction
Ohhhh Boy! This one is fun! Today, we will be looking at AI Studio, a Google product, sort of a user interface, for the Gemini AI platform.
In this demo, I will be using my microphone to interact with Gemini in real-time. I’ll have it observe, analyze, and diagnose a set of scoring rubrics, it will guide me through using the maintenance website to submit a work request, and I will also have it analyze a very small amount of code.
Note: this is the first time I’ve ever used this tool. I wanted you to see the process, whether it was simple or a struggle. I’m basically playing around, and I REALLY hope this helps you see how approachable this technology is.
Quick Click-byClick to get started
- Go to https://aistudio.google.com
- Read and accept the license agreement
*Click on the “Stream Realtime” option in the menu
*Click on “Share your screen”
*Grant any microphone/webcam access you are prompted for
*Choose the screen you want to share
*Click on share and begin speaking


This tech tip is a video because it is difficult to present in any other way, but, out of respect for your time (and to use more AI tools), I’ve also used NotebookLM to provide some audio and text resources, starting with this video summary:
This video demonstrates Google AI Studio’s screen-sharing capabilities, showcasing its real-time interaction with Gemini. The presenter uses AI Studio to analyze student work, providing feedback on a complex rubric for a drumline audition. The AI identifies common student weaknesses and suggests improvement strategies, demonstrating its utility in grading and providing feedback. Furthermore, the presenter illustrates how AI Studio can assist in navigating unfamiliar websites and building Google Sheets, highlighting its versatility across various tasks and platforms. The technology’s ability to process large amounts of information quickly and provide actionable feedback is emphasized.
Podcast #1 (I told NotebookLM to target instruction to teachers):
Google AI Studio for Teachers.wav
Podcast #2 (This was the default output without any prompting):
Google AI Studio for Teachers part 2.wav
Briefing Document
Okay, here is a detailed briefing document summarizing the key themes and ideas from the provided text:
Briefing Document: Google AI Studio Screen Sharing Analysis
Introduction:
This document summarizes the key takeaways from a tech demonstration of Google’s AI Studio, specifically focusing on its screen-sharing capabilities. The demonstration explores how AI Studio, using the Gemini model, can analyze screen content in real-time and provide feedback, assistance, and insights. The user tested this tool across several scenarios, including analyzing student performance data, navigating new software, creating spreadsheets, reviewing lesson content and even debugging code.
Key Themes & Ideas:
- Real-Time Screen Analysis: AI Studio enables real-time analysis of screen content, going beyond just text input. This includes the ability to “see” and understand:
- Documents (e.g., Google Classroom Gradebooks, rubric spreadsheets, audition packets)
- Software interfaces (e.g., website navigation, code editor)
- Potentially any visual data displayed on the screen.
- The presenter highlights that “the ability to use basically any window and get instant feedback on how it works is pretty stellar.”
- Interactive AI Assistance: The tool facilitates two-way conversation between the user and Gemini, allowing for dynamic problem-solving and question answering based on the shared screen content. This interaction can include:
- Vocal commands: The user can speak to Gemini and receive verbal responses
- Screen Sharing: Gemini analyzes the screen’s visual content.
- Webcam integration: Allows the sharing of physical objects or documents.
- The user noted that he has “an audio file of everything that Jim and I said” in addition to the text transcript of each response, which allows for review.
- Versatile Applications in Education: The demonstration highlights a broad range of educational uses:
- **Analyzing student data:**Gemini can quickly identify patterns and areas of weakness in student scores across multiple assignments and a detailed rubric.
- The presenter notes that this method was “much much faster” than manually analyzing the scores, even though it “isn’t perfect.”
- Quote: “This is easier than going through and individually looking at each one of the scores.”
- Generating targeted feedback: Gemini can suggest areas where students need additional support based on their performance data and identify patterns across students.
- Finding resources: Gemini can recommend search terms and types of resources related to specific learning needs (e.g. video and written resources on internal pulse and technique for drumline students).
- Reviewing curriculum: Gemini can assess the appropriateness of learning materials (e.g., an audition packet) based on specific student needs.
- Beyond Educational Context: The tool’s application extends to general productivity and learning:
- Navigating unfamiliar software: Gemini can guide users through the steps of using a new website or application, even if it is a complicated application.
- Quote: “the capability to basically remove the limitation of knowing how to use anything that you can have on your screen within reason obviously…is pretty powerful.”
- Creating new documents/projects: Gemini can provide step-by-step instructions for creating documents, such as setting up a spreadsheet or an email draft.
- Code assistance: Gemini can provide analysis and debugging support for code.
- Quote: “I can help you understand the logic of the code, explain specific functions or algorithms and suggest potential causes of issues.”
- Limitations and Imperfections: The user acknowledges that AI Studio is not flawless:
- OCR limitations: AI sometimes misreads text from screen images, especially with fast scrolling (e.g., mispronouncing or misinterpreting a musical piece’s title).
- Initial errors: The user experienced an initial error when the AI misidentified a student.
- Information recall: The user was able to see that Gemini has difficulty maintaining a context of information shared from different documents.
- This resulted in the user having to “re-adjust” the questions that were being asked.
- Dependence on Context: The user discovered that some questions can be confusing and can cause the chatbot to have difficulty responding to prompts. This required him to clear the chat and start a new session.
- Iterative Process: The user emphasized the importance of adjusting the way information is presented to the tool and the way questions are phrased.
- The presenter noted that “the retry and kind of readjusting how I went about asking the questions or presenting the information seemed to make quite a bit of difference.”
Specific Examples of AI Functionality:
- Student Data Analysis: Gemini correctly identified that students were struggling with the “formal audition” and that students had weaknesses in internal pulse and technique.
- Software Navigation: Gemini was able to assist the user in finding the correct fields in a work order request, and identified a discrepancy that was not immediately obvious to the user (that a field was cut off).
- Spreadsheet Creation: Gemini walked the user through building the framework for a spreadsheet.
- Curriculum Assessment: Gemini analyzed an audition packet and gave a good assessment about the level of difficulty it contained for the students the user was working with.
- Code Assistance: Gemini suggested improvements to the structure and accessibility of HTML code.
Conclusion:
Google AI Studio’s screen sharing feature shows significant potential as a real-time assistant with a variety of applications. It is particularly useful for educators for analyzing student data and improving teaching, but it’s also valuable in general learning, software navigation, and code assistance. While not perfect, it offers a faster and more interactive way to process information and get help with digital tasks. The user concluded that it “has the capability to basically remove the limitation of knowing how to use anything that you can have on your screen within reason obviously…is pretty powerful.”
Frequently Asked Questions about AI Studio's Screen Sharing Feature
**What is AI Studio's screen sharing feature and how does it work?**
AI Studio’s screen sharing feature allows you to share the contents of your computer screen with the AI model, Gemini. Gemini can then “read” the content of the screen and provide feedback, answer questions, or assist you in various tasks related to what you’re showing it. You can use it for a variety of tasks, like getting feedback on a document, understanding how to navigate a website, or even getting help with coding. When you initiate screen sharing, you’ll be prompted to select the specific screen or window you wish to share, granting the AI access to visually perceive the content being displayed. This effectively creates a real-time, visual interaction with the AI.
**How can I use AI Studio's screen sharing feature in an educational context?**
The screen sharing feature has numerous applications for educators. It can be used to get feedback on student work, such as rubrics or assignment scores, allowing the AI to identify areas where students are struggling and suggest improvements. It can also help teachers learn how to navigate complex websites or software platforms, create new resources, and even assist with lesson planning. By sharing your screen, you can essentially have an AI tutor or assistant to guide you and provide support in a variety of tasks related to teaching and curriculum development.
**Can AI Studio analyze data displayed on my screen, like a spreadsheet of grades?**
Yes, AI Studio can analyze data displayed on your screen. For instance, it can process a spreadsheet of student grades and identify patterns in student performance, such as common areas of weakness. In the example in the text, it quickly reviewed student scores in a Google sheet and determined that internal pulse and technique were the main areas of deficiency. The AI can summarize trends, compare student data, and provide helpful insights you can use to adjust your teaching methods or provide targeted support.
**How does AI Stuido handle complex documents or long web pages when screen sharing?**
AI Studio can process complex documents and long web pages by reading the content as you scroll through it. In the example with the rubric, the user scrolled through the lengthy Google Sheet and the AI was able to read and analyze the data. This allows it to understand context, which is important when analyzing information across multiple fields. This enables you to have the AI evaluate various pieces of information in real-time without having to manually copy and paste anything or share direct files.
**Can AI Studio help with tasks beyond just data analysis, such as navigating websites or using software?**
Absolutely. AI Studio’s screen sharing isn’t just for analyzing data. It can also assist with navigating websites, software applications, and other programs. You can use it to get step-by-step guidance on how to use a platform, troubleshoot problems, or complete tasks, such as filling out forms, opening support tickets, or working through specific processes in a given program. This makes the tool not only useful for content-related tasks, but also for more general assistance with software.
**How can AI Studio assist me in creating new digital resources like Google Sheets?**
AI Studio can help users, especially those who are new to a certain tool, to create new digital resources. By screen sharing a blank sheet, the AI can walk you through the steps required for the project. It can provide guidance on column headings, formulas, and other necessary functions. This can be extremely helpful in making sure you know how to properly set up a sheet or other resource that might be essential to your productivity.
**Can AI Studio provide feedback on curriculum or teacher materials?**
Yes, AI Studio can analyze curriculum and teaching materials by visually processing them on your screen, including analyzing an audition packet and suggest elements that might be beneficial for students based on their weaknesses. The AI can identify complex or problematic areas in the curriculum and help to decide what is or is not working for a specific group of students. This functionality will help teachers refine lessons and make sure the learning material is targeted to areas of improvement.
**Is AI Studio helpful for debugging code or providing programming suggestions?**
Yes, AI Studio can help with coding, including debugging code and providing suggestions for improvements. It can understand the logic of your code, explain its functions, and point out areas for enhancement by identifying best practices. While it can’t directly modify your code, it can help you analyze it and give suggestions on what to do next, so it can be used as a programming resource. This can be especially useful for learning new languages or improving the quality of your code.
NotebookLM - Introduction

NotebookLM is a free, AI-powered tool from Google designed to help users interact with and learn from their documents. Described as a “personalized AI research assistant,” NotebookLM summarizes uploaded sources and generates insights into their content. It works by analyzing uploaded files, including Google Docs, PDFs, text files, web pages, and even copied text. It then uses Google’s Gemini AI model to allow users to ask questions, summarize information, and create new outputs based on those sources.
More About NotebookLM
There are several really powerful features in this tool, but the biggest advantage is the concept of “source-grounding.” This just means that, instead of trying to use the entirety of the internet as a source, NotebookLM limits its content knowledge to only the sources you have active in the open notebook. This is huge because the internet is FULL of incorrect information. The ability to specifically point NotebookLM to a set of sources and have it become an “instant expert” on all of that content is a huge deal.
Don’t misunderstand… this is not just a tool that will regurgitate the information you feed it. Instead, it “reads,” “watches,” and “listens” to the content you provide, makes connections, and interprets it… similar to if you studied and tried to compile a working knowledge of the sources on your own. Once given the resources, you can:
- Ask questions at ANY depth of knowledge that would be contained in the sources (ex: “Explain the concept of crop rotation to me. Assume that I have no knowledge of agriculture” or “Explain the concept of crop rotation to me. Assume that I have doctorate-level knowledge of the chemical makeup of various soils but don’t understand the nutrient requirements of common crop types.”)
- One click study guide to cover all of the source information
- One click briefing documents to provide an overview of the sources
- One click FAQ generation over the sources
- One click timeline generation for chronological aspects of the sources
- One click (or advanced) podcast style generation.
- Add your own notes based on conversations with the AI
Creating Your First Notebook
Show Instructions
Visit notebooklm.google.com
On your first visit, you will get a welcome message. You can choose to check the box if you want emails when new features are added to NotebookLM, or you can just click on the “okay” button to get started.

We don’t have any notebooks yet, so, again, just for the first time, we will get the “Create your first notebook” page. I’ll click on “Create” to make the notebook.

Great! When you create a new notebook, you will automatically get this “Add Sources” prompt. We can open this prompt manually to add more sources, but we will talk more about that later. For now, we have 4 primary source types that can be added.
- Uploaded sources: these can be things like PDF documents, word documents, audio files, text files, and that sort of thing. These are files that are currently on your computer, for example, you may have downloaded a PDF from Lexus Nexus. You can upload that PDF here. NotebookLM will read it and use it for all future interactions within this notebook.
- Google Drive sources: If you have a Google Doc or a slide, you can select it from your drive.
- Links: Provide either the link to a website or to a YouTube video. Super handy!
- Paste text: Sometimes you will be in a situation where the website blocks NotebookLM. No worries! Copy the text you want, and paste it in. Also, sites like Project Gutenberg have full text of novels. You can paste that text in (or upload the text with option one).

Start adding sources. You can have up to 50 sources for each notebook. That is quite a bit!

If you accidentally closed the add source window, or to add more sources, click the Add source button at the top left!

Your sources will now appear in the source list on the left. Each source has a checkbox to the right. If it is clicked, that means that the source will be active in any of the conversations or actions you have with NotebookLM. If it is unchecked, that source becomes dormant and ignored.
Example Use case: I could add a rubric as a source, then I could add each student’s essay in a separate Google doc or PDF. Then I can check only the rubric and a single student’s essay. Now when I ask NotebookLM to “analyze the student essay to see how well it adheres to the assigned rubric. Offer suggestions for improvement, areas that are particularly well executed, and suggestions for further research based on this student’s demonstrated knowledge.” NotebookLM should give me a pretty thorough response to that, and it should be pretty valuable insight for me to formulate a response to the student.

Once we have our sources uploaded and selected, we can use the center area to ask questions and guide the research. We can type whatever we would like, but NotebookLM does an initial reading, and it will offer some questions below the text input area. You can click one of these to get the conversation started. This is particularly helpful if the content area is something you know very little about.

The Studio/Notes panel is on the right. There is an Audio Overview section that allows you to generate a podcast-style conversation between two AI hosts, one male, and one female. I’ve included an example below. It is pretty slick. If you would like, you can click the “Generate” button, and the system will automatically take all of the content and present a podcast that covers the research sources in an overall sense. If you click on the “Customize” button, you can guide the conversation, meaning that you can require the conversation to delve more deeply in specific directions, set a language level, assume a content knowledge level, and many other potential guided parameters.
In addition to the audio overview, you have the main “Notes” features. Clicking on the “Add note” button will let you create a note of your own making. You can type whatever you want, and it will be collected at the bottom of the panel.
Clicking on any of the other buttons in this panel will automatically generate the element that is indicated on the button. Once clicked, NotebookLM will place these items in the Notes panel. You can click on a note at any time to open it in an expanded view. I’ve included the FAQ option below.


Deep Dive conversation (Podcast)
You can listen to the podcast here.
More About NotebookLM
There are several really powerful features in this tool, but the biggest advantage is the concept of “source-grounding.” This just means that, instead of trying to use the entirety of the internet as a source, NotebookLM limits its content knowledge to only the sources you have active in the open notebook. This is huge because the internet is FULL of incorrect information. The ability to specifically point NotebookLM to a set of sources and have it become an “instant expert” on all of that content is a huge deal.
Don’t misunderstand… this is not just a tool that will regurgitate the information you feed it. Instead, it “reads,” “watches,” and “listens” to the content you provide, makes connections, and interprets it… similar to if you studied and tried to compile a working knowledge of the sources on your own. Once given the resources, you can:
- Ask questions at ANY depth of knowledge that would be contained in the sources (ex: “Explain the concept of crop rotation to me. Assume that I have no knowledge of agriculture” or “Explain the concept of crop rotation to me. Assume that I have doctorate-level knowledge of the chemical makeup of various soils but don’t understand the nutrient requirements of common crop types.”)
- One click study guide to cover all of the source information
- One click briefing documents to provide an overview of the sources
- One click FAQ generation over the sources
- One click timeline generation for chronological aspects of the sources
- One click (or advanced) podcast style generation.
- Add your own notes based on conversations with the AI
Creating Your First Notebook
Show Instructions
Visit notebooklm.google.com
On your first visit, you will get a welcome message. You can choose to check the box if you want emails when new features are added to NotebookLM, or you can just click on the “okay” button to get started.
We don’t have any notebooks yet, so, again, just for the first time, we will get the “Create your first notebook” page. I’ll click on “Create” to make the notebook.
Great! When you create a new notebook, you will automatically get this “Add Sources” prompt. We can open this prompt manually to add more sources, but we will talk more about that later. For now, we have 4 primary source types that can be added.
- Uploaded sources: these can be things like PDF documents, word documents, audio files, text files, and that sort of thing. These are files that are currently on your computer, for example, you may have downloaded a PDF from Lexus Nexus. You can upload that PDF here. NotebookLM will read it and use it for all future interactions within this notebook.
- Google Drive sources: If you have a Google Doc or a slide, you can select it from your drive.
- Links: Provide either the link to a website or to a YouTube video. Super handy!
- Paste text: Sometimes you will be in a situation where the website blocks NotebookLM. No worries! Copy the text you want, and paste it in. Also, sites like Project Gutenberg have full text of novels. You can paste that text in (or upload the text with option one).
Start adding sources. You can have up to 50 sources for each notebook. That is quite a bit!
If you accidentally closed the add source window, or to add more sources, click the Add source button at the top left!
Your sources will now appear in the source list on the left. Each source has a checkbox to the right. If it is clicked, that means that the source will be active in any of the conversations or actions you have with NotebookLM. If it is unchecked, that source becomes dormant and ignored.
Example Use case: I could add a rubric as a source, then I could add each student’s essay in a separate Google doc or PDF. Then I can check only the rubric and a single student’s essay. Now when I ask NotebookLM to “analyze the student essay to see how well it adheres to the assigned rubric. Offer suggestions for improvement, areas that are particularly well executed, and suggestions for further research based on this student’s demonstrated knowledge.” NotebookLM should give me a pretty thorough response to that, and it should be pretty valuable insight for me to formulate a response to the student.
Once we have our sources uploaded and selected, we can use the center area to ask questions and guide the research. We can type whatever we would like, but NotebookLM does an initial reading, and it will offer some questions below the text input area. You can click one of these to get the conversation started. This is particularly helpful if the content area is something you know very little about.
The Studio/Notes panel is on the right. There is an Audio Overview section that allows you to generate a podcast-style conversation between two AI hosts, one male, and one female. I’ve included an example below. It is pretty slick. If you would like, you can click the “Generate” button, and the system will automatically take all of the content and present a podcast that covers the research sources in an overall sense. If you click on the “Customize” button, you can guide the conversation, meaning that you can require the conversation to delve more deeply in specific directions, set a language level, assume a content knowledge level, and many other potential guided parameters.
In addition to the audio overview, you have the main “Notes” features. Clicking on the “Add note” button will let you create a note of your own making. You can type whatever you want, and it will be collected at the bottom of the panel.
Clicking on any of the other buttons in this panel will automatically generate the element that is indicated on the button. Once clicked, NotebookLM will place these items in the Notes panel. You can click on a note at any time to open it in an expanded view. I’ve included the FAQ option below.
Sample Output
My Sources
Deep Dive conversation (Podcast)
NotebookLM FAQ
What is NotebookLM?
NotebookLM is a free, experimental AI tool developed by Google that acts as a personalized research assistant. It helps users organize, analyze, and synthesize information from various sources like documents, PDFs, websites, and even audio files. Users can create digital “notebooks” containing up to 50 different sources, each with a maximum of 200,000 words. NotebookLM uses Google’s Gemini AI model, which has a large token window allowing it to process and understand large amounts of text.
How Does NotebookLM Work?
NotebookLM utilizes a process called “source-grounding,” meaning it focuses specifically on the documents you upload rather than pulling information from the broader internet. This makes it an “expert” on your chosen material. Once you’ve added your sources, you can ask NotebookLM questions about the content in a chat-style interface. The AI then analyzes your sources and provides summaries, answers to your questions, and generates insights based on the information provided.
What can I do with NotebookLM?
NotebookLM offers a range of functionalities for various tasks:
- Summarization: Quickly grasp the main points of lengthy documents or multiple sources.
- Question Answering: Ask specific questions about your uploaded content and receive direct answers with citations.
- Insight Generation: Discover connections and themes within your sources that might not be immediately apparent.
- Content Creation: Generate different outputs like study guides, FAQs, timelines, briefing documents, and even podcast-style audio summaries.
- Data Extraction: Pull specific information like lists or data points from your sources.
How is NotebookLM different from other AI tools?
NotebookLM stands out from other AI tools in a few key ways:
- Source-Grounding: It focuses solely on the user-provided documents, leading to more accurate and relevant responses.
- Citation Feature: All answers are linked back to the specific source material, allowing for easy verification.
- Audio Summary Generation: It can create engaging, podcast-style audio overviews of your content, offering a new way to consume information.
Can students use NotebookLM?
Currently, NotebookLM’s terms of service restrict use to individuals aged 18 and older. However, educators can utilize the tool to create resources for their students, such as study guides, summaries, or audio overviews, and then share those outputs with students.
What are some of the examples of how educators can use NotebookLM?
- Lesson Planning: Generate summaries of complex texts, create study guides for specific chapters or units, or develop differentiated materials for various learning levels.
- Professional Development: Analyze research articles or policy documents to extract key insights or create briefing documents for collaborative discussions.
- Research: Analyze large amounts of data from student surveys, interviews, or focus groups to identify trends and patterns.
- Personal Learning: Deepen understanding of a subject by summarizing and analyzing multiple sources, generating questions, and creating personalized study guides.
What are the limitations of NotebookLM?
- Potential Inaccuracies: While NotebookLM strives for accuracy, it is still under development and can sometimes generate misleading or incorrect information. Always double-check its output.
- Bias: AI models can reflect biases present in their training data. Be aware of potential biases and critically evaluate the information presented.
- Over-Reliance: Avoid becoming overly dependent on the tool for critical thinking or decision-making. Use it as a support tool to enhance your own analysis and understanding.
How can I get started with NotebookLM?
You can access NotebookLM by visiting notebooklm.google. Create a free account and start experimenting by uploading your own documents or trying out the example notebooks provided.
What are some tips for using NotebookLM effectively?
- Start Small: Begin with a topic or document you’re already familiar with to test the tool’s capabilities.
- Experiment with Questions: Ask a variety of questions to explore different ways of interacting with your sources.
- Use Citations: Verify information by referring to the original sources through the provided citations.
- Share with Others: Collaborate with colleagues or students by sharing notebooks and resources.
- Stay Informed: Keep up with updates and new features as NotebookLM continues to evolve.
Creating Newsletters with Canva

Check out Mr. Unger’s Tiger Weekly and Ms. Webb’s High School Newsletter to see some of what Smore is capable of.
Smore DOES have a free plan, but it locks quite a bit of the functionality behind a payment plan.
Soooo where does that leave us? We can actually use Canva to do some really nice newsletters! This allows you to use a platform that works for more design tasks (meaning you don’t have to learn different tools), and you have free access to all of the premium tools when using your school account.
Let’s Do it!
First, it would make sense to look at a newsletter template. This DOES make sense, but these template are more similar to the old, paper type of newsletter. There are some great templates, and if you want your newsletter to be printable, then this is your best starting point.

The biggest issue with the newsletter template is the vertical size of it. If you have a lot going on, a single 8 1/2" isn’t going to be all that easy to use. Sure, you can use multiple pages, but that puts a page brake and consequently, a visual break in your news. If you just need a little more height to your page, check out the infographic templates!

Cool, so we have two options so far, but MAYBE we want to be just that little bit different… that little bit extra… Maybe we want our digital newsletter to feel more, you know, DIGITAL!
Because this is what I’m looking for in this demo, I’m going to use the “website” template. It is a bit annoying that there isn’t a blank version of this, so either find a template that you like as a starting point, or just pick a random one that you can delete all of the contents of.

For this demo, I’m using the template called:
“Digital Noticeboard Teacher Education Website in Yellow Purple Colorful Lined Style”

The cool thing about the website layout is that pages are basically equal to slides. Moving from page to page has animated transition effects instead of just scrolling. When I add a page by clicking on this button, I’ll get a new blank page after the currently visible page.

Templates usually provide pretty reasonable instructions on what to do, for example, I can double-click on this bubble, and add the information that I’m instructed to. Or, I can change it to whatever I think makes sense!

I don’t like this background on the first “page” or section. To change it, I’ll go to my uploads on the left, and I’ll click on a photo that I would like to use. If I don’t already have an image, I can also use the “elements” option to search for free image options.

Now I’ve got a picture, but it clearly isn’t a background image.

Let’s right click on the image, and then click on “Replace background.”

Cool! Now I have a fancy background on this first page! I’ve created another problem though. I can’t really read the title text.

I’m going to click on the title, then I’ll click on the font color option to bring up the left toolbar.

In the toolbar, I’ll click the font color, I’m going to try white.

Well… That’s easier, I guess, but it is still not great. Let’s add an effect to try and bring the text “forward” on the image.

On my top toolbar, I’ll click on “Effects” to get my left toolbar.

Conveniently, in the effects toolbar, there is an option called “Lift.” I’ll click that.

Great! Now the text is easier to read, and it kind of stands up on the page.

While I’m here, I’ll just rename the title.

Something else that you would expect from a digital newsletter is the ability to click on things and be taken to new locations on the web. Maybe you want to link to the school website, this week’s lunch menu, or maybe your Clever page. I’m going to link to the percussion “Band” app.

I’ll click on the button/bubble/asset that I want to turn into a link, and then I’ll click the three dots above it.

In this expanded menu, I’ll click on “Link.” I’ll also make a mental (or physical) note that I can also hold down my control key and press K to get to the same thing in the future).

That opened the link tool, so all I have to do is pate in the link the location I want my students to visit. Then I’ll hit done.

By default, this is going to underline the text, and that is totally fine, but I don’t like it here. I still have the “button” selected, so I’ll click on the underline font button to disable it.

Much better! Now it looks a lot more like a button you would find on a website.

At this point, I’ll continue going through the template, adding, removing, and editing the elements to make my newsletter look the way I want (except I totally didn’t do that for the sake of the demo).
That brings us to sharing! What good is a newsletter if nobody sees it!?!? I’ll click on the “Share” button to option the options.

Now, I’ll choice the “Public view link” option.

This gives me YET ANOTHER window, and I’ll click on “Create public view link.”

Now I can click on the convenient “Copy link” option, and my link is ready to paste into an email or Google Classroom, or wherever else I might think of.


Now, if I click where the visitor label is, I’ll get the analytics window.

This shows several stats on views. This might not be critical, but it is nice to see if you are talking to yourself or not!

If you get to a point where you no longer want the newsletter to be public, you can click on Share > Public view link, and then click the three little dots to remove your link. Easy!

Click here to view my demo newsletter!
Well, that’s pretty much it! You can use these same techniques in all of your other Canva design projects, so don’t think that this information HAS to be used just for newsletters. I used exactly the same techniques to make the title thumbnail for this post. PLUS, I used Canva’s stupid-good background removal tool. One click, and we are background free!
Windows 11 - Move start menu to the left
Windows 11 introduced a change, moving the start menu from the traditional bottom left of the screen to the center. This doesn’t bother some people😊, but others find it infuriating😡! If you are in the latter group, it only takes a few clicks to move the start menu back to the left.
-
Click on the Start Menu.

-
Type in “Settings” and press enter.
-
Click “Personalization” on the left side of the System dialog box.

-
Scroll down a bit and click on “Taskbar”
-
Click “Taskbar behaviors”
-
This will expand the Taskbar behaviors menu. There is a drop-down menu to the right of Taskbar alignment. Select “Left” in the drop-down menu.


Windows 11- Dark mode
Dark Mode is an optional setting in Windows 11 (and many other apps and operating systems) intended to reduce eye strain and conserve battery life. It also makes the screen less jarring in low-light environments.
To enable it for Windows 11:
- Click on the start menu.
- Type in “Settings” and press enter.
- Click “Personalization” on the left side of the System dialog box.
- Click “Colors”
- In the “Choose your mode” section select “Dark” from the drop-down menu.


You will notice an immediate change in the appearance of several on-screen items.

Installing Atlas Secure Test using Chocolately GUI

If a student is missing the Secure Test Browser for ATLAS testing, follow these instructions.
-
Press the Windows key on your keyboard

-
Type in
chocolatey
-
You should see “Chocolatey GUI” as an option. Click on it.

-
It takes a little time for this program to open. Be patient while it opens and looks for available applications.
-
Once loaded, you should see the Chocolatey app store. To look for a new program to install, click on “ChocolateyInternal” on the left.

-
In the search box, at the top, type in “securetest” and press enter.

-
This should bring up an icon that is named “SecureTest.” Right-click on it, and choose “Install.”

-
You will get a progress indicator letting you know that ar-secure-test is being installed. Wait until this goes away. It will take a few minutes.
-
When it is finished, the box will close, and your lockdown browser icon will have an “installed” badge.

-
To open the Secure Test browser, double-click the icon on the desktop.


Windows 11 - Pin Application to the Start or Taskbar
If an application is frequently used, consider adding a shortcut to the start menu or the taskbar to save searching for or navigating to it.
To get started, click the Windows icon and type in the application’s name. In this example, we will use the calculator app.

Right-clicking the application reveals the option to “Pin to Start” or “Pin to taskbar.”

Pin to Start places a shortcut on the start menu.
Pin to taskbar places a shortcut on the taskbar at the bottom of the screen.

Clipboard History, Emojis, Math and Language symbols
Pressing the Windows Key and V in Windows 11 opens a powerful tool that allows you to paste anything you have recently copied as well as emojis, gifs, math symbols, and language symbols from an expansive library.
–––––––––––––––––––––––––––––––––––––––––
Pressing the Windows Key and V opens the following window.
By default, the clipboard history is displayed. Clicking on the text/picture will paste the selection into the document, email, or other app being used.
Bonus tip: Click the Pin to keep the item in your clipboard history. A pinned item will stay in the history even after a reboot.
–––––––––––––––––––––––––––––––––––––––––
If you like to add emojis😊, gifs, or Kaomojis(❁´◡`❁) to emails or documents simply click the option in the menu, search/scroll, and click the item to paste.
–––––––––––––––––––––––––––––––––––––––––
Finally, the symbols area allows you to paste just about any symbol imaginable. Need an obscure math symbol or letters in another language? Chances are it will be here!
They are organized into the following groups:
- General Punctuation
- Currency
- Latin
- Geometric
- Math
- Supplemental
- Language
Windows 11 - Calculator
The Windows 11 Calculator has come a long way since its humble beginnings in Windows 3.1.
While the standard mode is not too different from the “good old days,” the current version has modes for scientific calculations, Graphing, Programming, Date Calculation, and many Converters.
Standard Mode
When the calculator app is opened it defaults to the standard mode. This works fine for basic arithmetic needs.

Click the hamburger menu to the left of Standard to explore the different modes.

Many of the other modes work best when viewed full screen.
Scientific Mode
Lots of advanced math features. Don’t miss the trig and function menus as well as the ability to switch between radians, gradians, and degrees.

Graphing Mode
Definitely want to go full-screen for this mode!
Enter a function(s) to see it placed on the graph.
Depending on the function entered the slider can adjust the variable. Don’t miss the Min, Step, and Max feature.

Programmer Mode
This mode is probably not very useful unless you are teaching programming. It is very handy if you need to convert between Hexadecimal, Decimal, Octal, and Binary!

Date Calculation
This mode calculates the number of years, months, weeks, and days between two dates. For example, it can tell you how long it has been since the invasion of Pearl Harbor.

Converter Modes
There are currently 13 different Converter Modes.

The process for each is pretty similar. Here is a quick example using the volume converter to see how many Liters are in one gallon. Select the desired units for each (Gallons and Liters) and enter the desired amount (1 Gallon)

Scan From Copier to Email or Google Drive
The color copiers offer two delivery options for scanned documents. Scanned documents can be sent by email or saved directly to Google Drive in PDF format.
To get started, use your badge to log on to the copier.
From the home screen, click the Scan button.

Choose either To Email or To Google Drive.

To Email

- The Subject of the email can be changed. Click to access the onscreen keyboard.
- The File name can also be changed in the same manner.
- Click the Setting button for 2-sided scanning and many other options.
- Place the document in the document feeder or on the scanner bed and click Start.

The document will be delivered to your email in pdf format. Note the sender is Tech.
To Google Drive

- The Filename can be changed. Click to access the onscreen keyboard.
- Click the Setting button for 2-sided scanning and many other options.
- Place the document in the document feeder or on the scanner bed and click Start.
The document will be saved to your Google Drive in a folder called Scans for PaperCut MF. Note: you will also receive an email from Scans for PaperCut with a link to the scanned document.

Windows Screen and Power Settings
If your computer goes to sleep more quickly than you like or prompts you to log in more frequently than you like this article is for you!
Press the Windows key on the keyboard and type sleep

Click on Power, sleep, and battery settings.
The Power and Battery window will open.

Click on Screen and sleep
The default times for turning the screen off and putting the device to sleep are shown while on battery and plugged in.

Increase these times as you see fit! There is no save button, the settings will be applied as you select them.
A couple of items to be aware of:
- Increasing the time of the “On battery power” options will decrease the time the computer can run while on battery power.
- Remember to press the Windows button and L to lock the computer if it is unattended.
I love PDF tool
Whether scanned from the copier, downloaded from the Internet, or received in an email, PDF files are by design easy to open but difficult to edit. This article demonstrates two of the many tools available to make changes to PDF files.

ilovepdf.com is a powerful collection of free PDF tools.
Logging in to the website is optional. If you choose to, you can log in with your Google credentials.
There are multiple tools in each of the following categories:
Organize PDF
Optimize PDF
Convert to PDF
Convert from PDF
Edit PDF
PDF Security
These tools are fairly intuitive to use. The rest of this document will be a demonstration of the tools we use on a regular basis in the tech office.
Tool#1 - Organize PDF
Click the Organize PDF button.
Select the PDF file you want to work with by: drag and drop, Clicking the Select PDF file button, or loading from Google Drive.

Select the file and click Open.

Once the file is open a thumbnail of each page will be displayed.
Drag and drop the pages to change the order.
Hover over the thumbnail to Add, Delete, or Rotate a page.
When done, click the Organize button.
The file can now be renamed and downloaded.
Tool #2 - Merge PDF
Click the Merge PDF button.
Select the PDF files you want to work with by: drag and drop, Clicking the Select PDF file button, or loading from Google Drive.

In this example, PDF#1 and PDF#2 are selected and opened.

A thumbnail of each file will be shown. You can drag and drop to reorder.
Click the Merge PDF button.
The merged file can now be renamed and downloaded.
Alternatives to Adobe Photoshop, InDesign and Illustrator

This is pretty huge news if you are someone that loves Canva (or hates it) but feels like sometimes it is a little too… limiting.
Recently Canva purchased the Affinity company. Affinity is company that produces the most comprehensive and direct competitor to the Adobe Creative Suite (PhotoShop, Illustrator, and InDesign). The Affinity versions, Photo, Designer, and Publisher respectively, are really great pieces of software, and, in a lot of ways, they are better than the Adobe versions. At full price, the Affinity suite (works on Mac, Windows, and iPad) will cost $164.99 one time. That’s SO much nicer than the subscript required for Adobe products.
Why am I telling you this? It’s because Canva has a policy that provides the best versions of their software to students and teachers for free, and when they purchased Affinity, they made the choice to include the new programs in that free offering! So now, you get everything Canva has to offer, but you also have access to these three professional-level design programs! I think that’s pretty awesome, personally!
We have put the suite in Chocolatey, so you and your students can now follow these instructions to install and activate on your school computers. Want to install it on your personal computers? Just follow the step 2 instructions in this link.
Installing Affinity On School Computers
-
click the Windows button, and type in “GUI” or “chocolatey” to bring up “Chocolatey GUI.” Click on it to open.
-
Click on “ChocolateyInternal” on the left side of the store.

-
Affinity Photo, Designer, and Publisher are probably near the top of the list, but feel free to search for “Affinity” to narrow your choices. Once you see your Affinity options choose which of the three apps you want to install first, right-click it, and click on “Install.”

-
Your install window will close, and you will then see a new desktop shortcut for your application of choice.

-
If you want to install more of the apps, feel free to do that now or later. The next steps just have to happen with the first app you open.
-
Pick one of your newly installed Affinity apps to open. You will see the screen below. Click on “Sign in with Canva.”
-
Then click on the “Sing in with Canva” button
-
This will open Chrome. On the page, select your team, then click on the “Allow” button.
-
You will get an “Open Affinity [application] 2?” prompt. Select always allow, and then click the “Open…” button.
-
You will get one final button to let you “Lanuch Affinity…” go ahead and click that to get started.


The Internet is full of tutorials on this software. Go forth, make beautiful and/or functional things.
Bonus tip…
The major thing Adobe offers that Affinity doesn’t address is video production. They may add this in the future, but that doesn’t help right now. To fix this, we have also added DaVinci Resolve to Chocolatey. I really like this software too. They use it on Hollywood blockbuster films, so I’m pretty sure it should work for our purposes!
Installing Respondus Lockdown Browser for VA Students

If you are a Virtual Arkansas student and need to install the Respondus Lockdown Browser, follow the steps below.
-
Press the Windows key on your keyboard

-
Type in
chocolatey -
You should see “Chocolatey GUI” as an option. Click on it.
-
It takes a little time for this program to open. Be patient while it opens and looks for available applications.
-
Once loaded, you should see the Chocolatey app store. To look for a new program to install, click on “ChocolateyInternal” on the left.
-
In the search box, at the top, type in
lockdown browser
-
This should bring up an icon that is named “Respondus LockDown Browser.” Right-click on it, and choose “Install.”
-
You will get a progress indicator letting you know that your lockdown browser is being installed. Wait until this goes away. It will take a few minutes.
-
When it is finished, the box will close, and your lockdown browser icon will have an “installed” badge.

-
To open your lockdown browser, you should be able to double-click on the desktop icon.


Turning the trackpad on and off
Certain models of the student Windows devices have a function key that turns on/off the trackpad. This can be helpful if they are accidentally hitting the trackpad while trying to type. More often, it gets pressed by mistake and they think their device is damaged beyond repair.
Below are the keys for the affected grades and models as well as the key to toggle the trackpad on/off.
-
5th and 9th (Acer Models) F10

-
7th and 8th (Lenovo Models) F6

Employee Access Center - Setting Contact Number for Messaging
We use a mass notification system to send important staff information. Examples include: winter weather closings, event notifications, and reminders of important happenings.
Your information is populated from your HR file, so it is critical that you verify that this information is correct.
-
Access the Employee Access Center
- Click on the “WF Bookmarks” option inside of Chrome
- Click on “Employee Access Center”
- For the “District” and the “Profile” dropdowns, make sure that “West Fork School District” is the selected option.
- Sign in using your school email address and the password your originally set for this site. If you do not know your password, you can use the “Forgot your Password?” link below the Sign In button. If you STILL can’t get in, contact Patty Burnett for a password reset.
-
Verify & Update Information
- Your information is listed on the page directly after you sign in. Use the key below to make sure you have the correct numbers in the correct areas.
- If you need to make a change, click on the “update” button at the top center of the page.
- Make any changes required, then click on the save button.
Important Values and Their Uses
You MUST verify that the following information is correct:
-
Personal Cell Phone: This will be the number where district/school text messages are sent. This number is critical.
-
Phone Number: This will be where voice calls are sent. It CAN be the same number you entered into the Personal Cell Phone number or it CAN be different. This number is critical.
-
Emergency Phone: Again, this is a backup call device. You can enter anyone else you would like to receive staff calls here
-
Emergency Cell Phone: This is a backup text-compatible phone. You don’t have to provide this, but if you want to enter a spouse’s/significant other’s cell number as a backup/additional message device, you should add it here
-
Work Phone: This will be the number that appears in the “Blackboard Directory” It can be a school number, home number, or a cell number, but it MUST be 10 digits (meaning no extensions and that you must have an area code). If you are someone who is given access to send calls, this will also be the number that shows on the caller ID.
If this information isn’t correct, you will not receive the information that you need.
Student Laptop Initial sign-in instructions
Student Laptop Initial Sign-in Instructions
Sign in to the Computer
- In the bottom left corner, click Other User
- Click the arrow next to “Sign in with work account”
- Sign-in
- Confirm two factor
- Read the Welcome screen and click “I Agree”
- Wait a minute (or two) while Windows does the initial user setup
Google Chrome Setup
- Once the desktop appears double click Google Chrome.
- Click Don’t Sign In and proceed. (You are already logged in to all things Google.)
- If you were just clicking through and logged in to Chrome it doesn’t hurt anything.
Sign in to Papercut
- Use your Gmail login and password
Teacher/Aide Dell Laptop Intial Sign-In Instructions
Teacher/Aide Dell Laptop Initial Sign-in Instructions
Sign in to the Computer
- In the bottom left corner, click Other User
- Click the arrow next to “Sign in with work account”
- Sign-in
- Confirm two factor
- Read the Welcome screen and click “I Agree”
- Wait a minute (or two) while Windows does the initial user setup
Google Chrome Setup
- Once the desktop appears double click Google Chrome.
- Click Don’t Sign In and proceed. (You are already logged in to all things Google.)
- If you were just clicking through and logged in to Chrome it doesn’t hurt anything.
Sign in to Papercut
- Use your Gmail login and password
Sign in to the Bitwarden Extension
Refer to this knowledgebase article. Expand “The Chrome App” section
https://link.wftigers.org/bitwarden
Grandstream phones tutorial video 1600 series
This link is a video that shows you how to use your new phone. I will be looking for more in-depth tutorials as well.
Useful Keyboard Shortcuts

Keyboard shortcuts are a faster and more ergonomic alternative for mouse-driven actions, allowing you to perform tasks with just a few keystrokes. Whether you're composing emails, crunching numbers in Google Sheets, or simply browsing the web in Chrome, there are keyboard shortcuts for almost every task.
Google Workspace Shortcuts:
Full Article: Use Google Workspace keyboard shortcuts - Google Workspace Learning Center
Gmail
Full Article: Keyboard shortcuts for Gmail - Computer - Gmail Help
To see a complete list, open Gmail and press Shift + ?
- Compose new email:
C - Send email:
Ctrl+Enter - Reply to email:
R - Forward email:
F - Archive email:
E - Mark as read/unread:
Shift+I
Drive
Full Article: Keyboard shortcuts for Google Drive on the web - Computer - Google Drive Help
To see a complete list, open Drive and press Shift + ?
- Create new document:
Shift+T - Create new spreadsheet:
Shift+S - Create new presentation:
Shift+P - Open selected file:
Enter - Rename selected file:
N
Calendar
Full Article: Use keyboard shortcuts in Google Calendar - Google Calendar Help
To see a complete list, open Calendar and press Shift + ?
- Create new event:
C - Edit event:
E - Move to next/previous period:
J/K - Jump to today:
T - Go to date:
G
Google Meet
Full Article: Use Google Workspace keyboard shortcuts - Google Workspace Learning Center
To see a complete list, in a meeting press Shift + ?
- Mute/unmute microphone:
Ctrl+D - Enable/disable camera:
Ctrl+E - Raise/lower hand:
Ctrl+Alt+H - Show/hide people:
Ctrl+P - Increase/decrease maximum tiles:
Ctrl+Alt+K/J
Docs
Full Article: Keyboard shortcuts for Google Docs - Computer - Google Docs Editors Help
To see a complete list, open a Google Doc and press Ctrl + /
-
Basic Text Editing:
- Bold:
Ctrl+B - Italicize:
Ctrl+I - Underline:
Ctrl+U - Undo:
Ctrl+Z - Redo:
Ctrl+Y - Select all:
Ctrl+A - Copy:
Ctrl+C - Cut:
Ctrl+X - Paste:
Ctrl+V - Paste without formatting:
Ctrl+Shift+V
- Bold:
-
Formatting:
- Increase/decrease font size:
Ctrl+./Ctrl+, - Align left/center/right:
Ctrl+Shift+L/Ctrl+Shift+E/Ctrl+Shift+R - Bulleted list:
Ctrl+Shift+8 - Numbered list:
Ctrl+Shift+7 - Insert hyperlink:
Ctrl+K
- Increase/decrease font size:
-
Navigation and Selection:
- Move to beginning/end of line:
Home/End - Move to beginning/end of document:
Ctrl+Home/Ctrl+End - Move to previous/next word:
Ctrl+Arrow keys ← → - Select text:
Shift+Arrow keys
- Move to beginning/end of line:
Sheets
Full Article: Keyboard shortcuts for Google Sheets - Computer - Google Docs Editors Help
To see a complete list, open a Google Sheet and press Ctrl + /
-
Navigation and Selection:
- Move to beginning/end of row/column:
Ctrl+Arrow keys - Select entire row/column:
Shift+Space/Ctrl+Space - Extend selection:
Shift+Arrow keys - Show all formulas:
Ctrl+ `
- Move to beginning/end of row/column:
-
Editing and Formatting:
- Insert row/column:
Ctrl+Shift++ - Delete row/column:
Ctrl+- - Fill down:
Ctrl+D - Fill right:
Ctrl+R - Format as currency:
Ctrl+Shift+4 - Format as percentage:
Ctrl+Shift+5 - Clear formatting:
Ctrl+\
- Insert row/column:
Slides
Full Article: Keyboard shortcuts for Google Slides - Computer - Google Docs Editors Help
To see a complete list, open a Google Slide and press Ctrl + /
-
Basic Slide Navigation:
- Move to previous/next slide:
Arrow keys ← → - Jump to slide:
Ctrl+Shift+S - Start presentation:
F5
- Move to previous/next slide:
-
Editing and Formatting:
- Duplicate slide:
Ctrl+D - Insert new slide:
Ctrl+M - Delete slide:
Ctrl+D - Change text alignment:
Ctrl+Shift+L/Ctrl+Shift+E/Ctrl+Shift+R
- Duplicate slide:
Other Shortcuts
There are many other shortcuts out there, if you use a program often you may check and see if there are shortcuts in it to make your life a bit easier.
PopOS - Pop!_OS Keyboard Shortcuts - System76 Support
Canva - https://www.canva.com/help/keyboard-shortcuts/
Gmail Filters and Labels - Organize and Simplify your inbox.

Gmail Filters and Labels
Let’s face it… Email is annoying. We all send messages to locations, and we expect for them to be read by the recipients, but we also receive messages through the same platform, and honestly, responding can be a pain! You have all of the junk email, spam, phishing attempts, random reply-alls that should only have ever been a reply, and list serves full of people that ask the same question in six different threads at the same time. What a mess!!!
While I can’t promise you that filters and labels will fix all of this, I can promise that setting the up allows for your important things, or similar messages, to be categorized and easy to distinguish from the rest of the cluster.
Let’s break down the process…
Finding a pattern
To begin, we have to find a way to distinguish our target emails from other messages. Think of this like a search term in Google. We want a way to get the emails we need to act on and ONLY those emails.
Sometimes this is super easy, let’s use a mailing list as an example… Let’s say that all of your “How To Be a Master Educator” messages come from list@awesome-educator.com. It is probably a pretty safe bet that you can use that email address sender as your pattern. It isn’t going to accidentally return messages you don’t want to include.
So, that’s cool, but sometimes it is a little more complicated. In this example, we will look at emails coming from DocFlow, the system we use for registration and various other campus forms. If you are someone who receives messages from DocFlow, you may get several, and these emails will usually indicate different tasks and different overall workflow purposes. All of these emails come from the sender docflow@wftigers.org, so if we create a filter using just that email, all of our workflows will be combined into a single label. That means that, depending on who you are, job applications, purchase order notices, facility requests, and other various things would all go to the same filter. That’s probably not what you want. In these sorts of situations, we need to look at the subject or the body of the message to find common patterns. In this example, we will look at the Kindergarten Roundup form. A message from this form will include the following:
Sender: docflow@wftigers.org
Subject: New Round-Up Submission - Student Name
Sometimes we might have to look at the body of the message, but, for our use case, the subject and sender will be enough. We can look for any email coming from that email address with a subject containing “New Round-Up Submission.” I’ll ignore the hyphen to avoid any weirdness with special characters that MIGHT happen. This should be totally sufficient to catch what we want, and nothing more.
Creating a filter
Now that we have a grasp on finding patterns, let’s create a filter using that pattern. I’ll keep using the DocFlow example of Round-Up.
-
In Gmail, click on the little advanced search button.
-
This will open the advanced search pane, and we will be able to use any combination of these items to create our filter. I’ll use the pattern options we defined above to fill out the form. I’ll ignore the date options for now.
-
At this point, I’ll click on “Create filter.”
-
This will open the filter pane, and it provides us with several options that we will go over in the next section…


Choosing Actions
We understand finding patterns, and we know how to turn those patterns into a filter. Now, let’s look at the actions available to us in the filter pane to get the most out of our understanding.

-
This is going to be used very often. What it means, when used by itself, is that you will not see your email within your inbox, ever, it will automatically act as if you hit the archive button within the message. Most of the time, though, you will use this will labels, meaning that the message will ONLY go to the label and will entirely “skip the inbox.”
-
This will automatically mark the message the same as if you had opened it. I don’t ever use this one, but I’m sure someone has a good use of it!
-
The star option is like a favorites function for your email. It is a sort of quick label, and all of the matching messages will go into this same area. Again, I don’t use this, but it might be good as a sort of “I’m currently working on” type of organization method.
-
This is the magic one, or at least, this is the one we will primarily focus on. A label can be thought of as a folder of sorts. They can be nested (one inside of another), and they can be named whatever you want. If you already have a label you want to use, you will be able to choose it by clicking on “Choose label.” If you need to create one, clicking on “Choose label” will allow you to create a new one as well.
-
This is something that I do use, but might not be helpful to everyone. This is good for when pesky vendors won’t send invoices to the accounting email instead of to me.
-
This is a full delete, not an archive. You should really only use this on rare occasions unless it is part of a bigger workflow that would be beyond the scope of this tip.
-
Do you ever get emails from somewhere you know is legit, but it keeps going to your spam? This is the option you would use for that circumstance!
-
Templates are cool, but they are also beyond the scope of this tip.
-
Selecting this action will make your email stand out by activating the little chevron dude next to the email.

-
This does the opposite of the one above.
-
This is like the automated version of labels, and I never use them. This will let you put an email into either “Social,” “Updates,” “Forums,” or “Promotions,” the default list of categories within Gmail.
-
This is why we ignored the date options in the prior step. Checking this box will apply the filter to all of the past conversations (message threads) in the past, as long as they meet the filter. It gives you a handy count of the conversations that will have the filter applied also!
Labels and Organization
Now that we understand our action options, let’s go ahead with building the Round-Up filter.
-
Select “Skip the inbox (Archive it).”
-
Select “Apply the label”
-
We don’t already have a Round-Up label, so we need to make one. click on “Choose label…”
-
Click on “New label…”
-
I’ll enter “Round-Up Forms” (or whatever) in the label name. If you want to nest the label under another one, you can check the box and choose some already existing labels.

-
Click on the “Create” button.
-
We are all set, so now click on “Create filter”


At this point, we should now see the label listed on the left.
That label shows as not having any unread messages. When you get a new message, the label will be brighter, and it will also have a number to the right.![]()
We can also go further by color coding our labels. To do that, hover to click on the three dots, choose “Label color,” then choose the color you want.
Wrapping Up
That’s it! Hopefully you can see how handy this feature is. And we really only scratched the surface. Do some experimenting, and maybe even look into the featured called “Multiple inbox sections.” you can use this to accomplish something like this screenshot, where each of the areas on the right (you pick the name and amount you want) automatically show the messages with the label of your choosing.

Google Authenticator - Bakcup Two-Step Verification
The district use two-step verification as a security measure on faculty accounts. Usually a yes/no prompt will appear on your phone to confirm you are logging in. Other times you may need to use an 8 digit backup code you’d either downloaded or requested from the tech office.
The Google Authenticator app is a handy alternative to these backup codes, providing a 6 digit code that is refreshed periodically. Setting it up is very quick but you’ll want to pull up the QR code on a second device such as a laptop. Instructions are as follows…
Install The App
On your phone, go to the App Store or Play Store and search for “Google Authenticator”, it will be from Google LLC.
As of writing, the logo looks like the one below.

While this downloads, continue to the next section to pull up the QR code on a second device.
Get QR Code
In the chrome browser, signed in to your school account, you can follow this link: https://myaccount.google.com/two-step-verification/authenticator
You will be prompted for your Google password. You will then have a page where you can add an authenticator app, clicking this will pull up a QR code to be scanned. We will follow the on-screen instructions.
App Setup
On your phone, open the Google Authenticator app and tap the + sign in the bottom right.
Choose “Scan a QR code”
Scan the QR code and follow the prompts on the screen, it should have you enter one of the codes to confirm the app.
After following the prompts, you should be all set. Now, when verifying a login, you can select “Try another way” and pick the option for authenticator app. Simply open the app and use the 6 digit code before it expires.
If you would rather follow the Google support article, it is as follows: Get verification codes with Google Authenticator - Android - Google Account Help
Google Chat - Spaces

If you haven’t discovered Google Chat, you are missing out. The tech department uses this all the time to communicate with each other and other people on campus. It is like texting, but it is easily accessible within your email. Plus, it works well on mobile.
Anyway, we are going to discuss a specific part of Google Chat in this tip. Spaces.
Spaces is designed for group collaboration. It allows you to organize conversations into threads, collect shared documents into a common space, collect and assign tasks, and install additional apps for things like polls.
Setting Up a Space
Create a new space
- Visit mail.google.com
- Click on the “Chat” button in the left menu

- Click “New chat.”

- Click on “Create a space”

- Enter a name, and choose to add an emoji if you want to.
- Make sure to choose “Collaboration.” Announcements has a purpose as well, but it isn’t what we are currently looking for.
- The access settings section should USUALLY be left as it is. Again, there are exceptions, but make sure you think about changing these carefully.
- Click create.


Accessing a Space
- Visit mail.google.com
- Click on the “Chat” button in the left menu
- On the left, click the name of the space you are looking to participate in.

Add People to a Space
- Inside a space, click the name of the space.
- Click on “Manage members”
- Click on the “+Add” button
- Type in the names of the people or groups you want to add to the space.
- When you have everyone added, click on the “Add” button


Add an App to the Space (using polls)
a
- Inside a space, click the name of the space.
- Click “Apps & Integrations.”
- Click on “Add apps.”
- Select the app of your choice from the list. I’m going to select “Absolute Poll” to allow voting on questions in the Space.
- Click the “Add” button.
- Once added, you will often get a message from the app that provides instructions on how to use it. For example, since I added the poll app, I can type:
/polland then hit enter, I’ll get a form. I can provide the requested information (I don’t have to put 4 options, and scrolling provides more settings), and when I “Submit,” I’ll get a poll for the users.


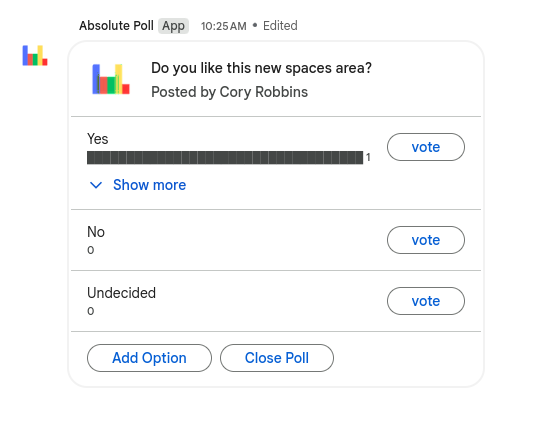
Using a Space
Threaded communication
When a message is posted in a space, replies become “threads.” This concept is just organizing a conversation. Think about threads as topics of discussion.
To start a thread, it is as easy as sending a message. The magic happens on the replies.

- To reply, I’ll hover my mouse over the message I want to reply to.
- I’ll then click on the little word bubble icon
- You will now see a split screen with the main space on the left, and the thread on the right.
- I’ll then type my reply in the RIGHT side reply box.
- when I’m finished typing, I’ll hit enter, or I’ll click the airplane icon.
- This does two things. First, it adds a reply indicator to the original message. Clicking on that will open up the thread. Second, it adds the response under the original message to the right side of the screen.


Viewing All Space Threads
To view all of the treads that are in a space, click on “Threads” in the top right corner of the space.

This will open your screen in a split view, and you will be able to see all of the threads for the space on the right side of the split.
Quoting Conversations
Sometimes it is helpful to quote a message.
Please note that this will NOT create a thread.
- To quote, I’ll hover my mouse over the message I want to interact with.
- You will see the quoted message and a reply box.
- Press enter or hit the airplane button.
This will result in a message with the quoted text above what you sent.


Knowing When There is a Message
There are two primary indicators to let you know you have a new message in a space.
First, like your email, the chat icon will show the number of unread messages you have waiting for you.
Second, in the bottom left corner of your email inbox, there will be a stack with the icons of the spaces you have unread messages in.
Adding Drive Files to a Space
Of course, you can share a file like normal, but it is often helpful to have files in a collective area along with communication.
- Inside the space, click the circled plus button next to the message box.
- Click the “Google Drive” option.

- If the file already exists in your drive, click on “Attach a Drive file.” If you want to create a new file and automatically share it with the members of the space, choose one of the other options.


You will then be prompted to pick the file you want to share or to add a name for the new file you are about to create.
If you created a new document, that will open in a split view, but whether the document is new or attached, you will get an icon, and in the lower right corner of the icon, it will allow you to open it in split view.

There is plenty more you can do inside of Spaces. Hopefully, this is enough to get your collaboration efforts started though!
Navigating the Knowledgebase
If you are reading this, you’ve made it to the Knowledgebase where we mainly post support guides for digital tools used across the district. Most of these are already the subject of a Tech Tip Tuesday, yet there is a better way to search for these articles when you need them. In this article we will cover searching for articles using keywords and tags.
Basic Search

To begin a search, we can click on the magnifying-glass icon toward the top right of the site. From this search bar we have a few options for searching…
-
Keywords: If I simply search “chrome” and hit [Enter] then it will return with every article that has the word “chrome” in it, not just in the title.
-
Tags: Similarly, searching “chrome,” instead of pressing [Enter] I can select an option with a tag icon (second and third result in the figure above) to search any article tagged as being chrome-related. This will return topics that are specifically about the chrome browser.
-
Users: You can also search by the name of an author (one of the tech staff) to pull up all the posts they’ve made. I suggest typing @username as this will pull up their posts instead of their whole profile page. For example, if you want to view all of my posts (because you can’t get enough of them) simply search @Hale_Stephen and hit enter.
Within Posts
Another option is to click on tags and such within posts, this will return posts with the tag similarly to using the search icon.

From Sidebar
Finally, you can also use the sidebar on the website to navigate to content you are looking for. To view all tags to search from, click on the “All tags” button.

Google Search Tools
Google is the most used search engine in the world. It has many useful but hidden-away capabilities. This article explores some well-known and some lesser-known tools that are accessible from the Google search bar. Many of these are super handy in the classroom.
Click the arrow next to each topic for more details.
Timer
Type the word “timer” in the Google Search bar.
A 5-minute timer will load automatically.
-
Adjust the number of minutes by clicking on the time.
-
Click Stopwatch to switch modes
-
Clicking Full Screen is handy if displaying on a projector.
-

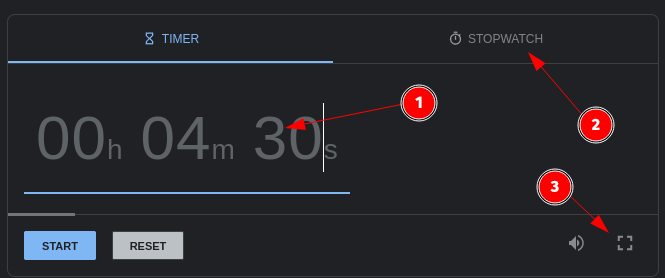
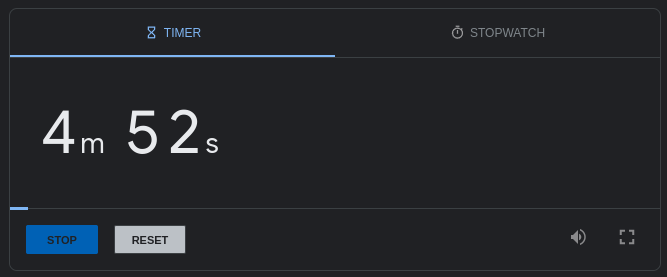
Calculator
Type the word “calculator” in the Google Search bar.
A basic scientific calculator is displayed.
Alternatively, type a math problem directly in the search box. The calculator will load with the answer.
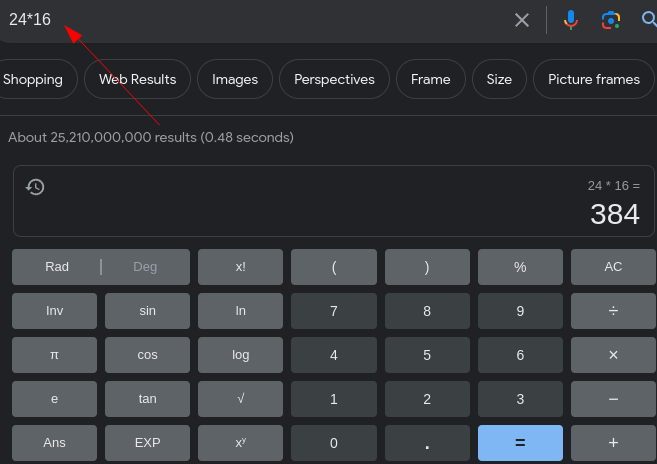
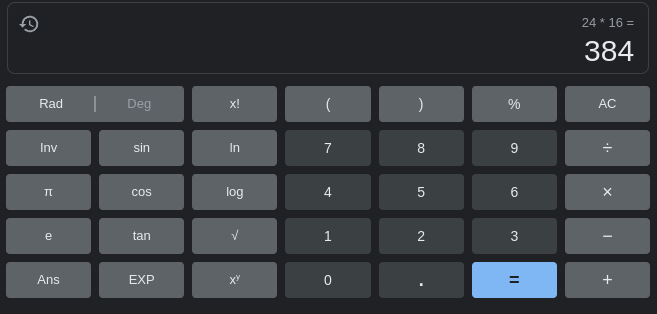
Unit Conversion
Type a number and then two different units in the Google Search bar.
Examples: 5 km in miles or 2 cups to ml
- Use the drop-down to change the type of conversion. Length, volume, time, temp, etc.
- and 3. Use these drop-downs to change the units.
-

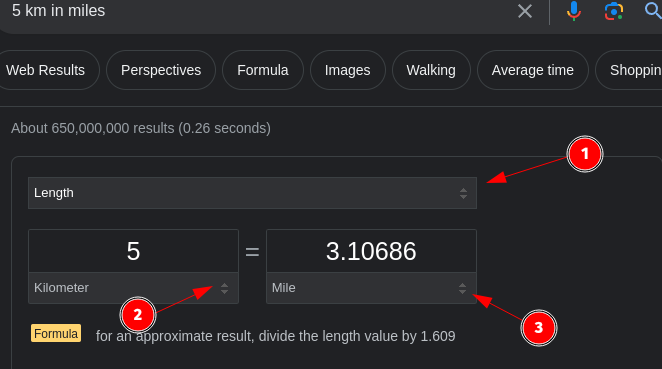
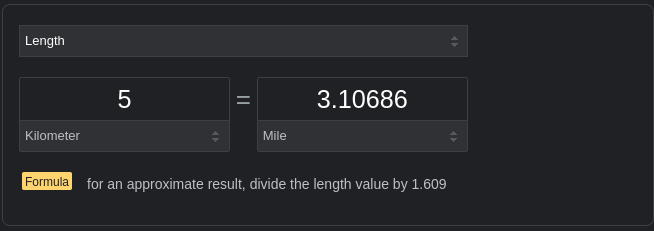
Dictionary/Pronunciation
Type define and a word in the Google Search bar.
Click on the audio icon to hear the word pronounced

Google translate
This is a simplified version of Google Translate.
-
Select the input language or begin typing and let Google detect.
-
Select the output language.
-
Click the microphone for audio input.
-
Click the speaker to hear the translation.


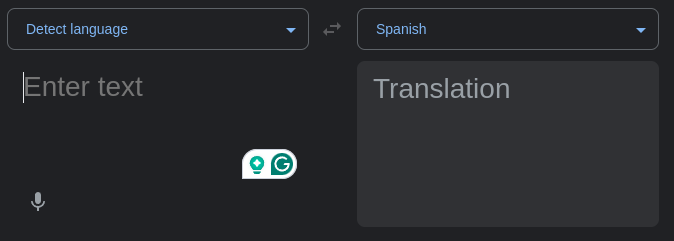
Sunrise/Sunset
Type “Sunrise” or “Sunset” in the Google Search bar. This will display the sunrise or sunset time for your current location.
For more fun enter an alternate location and add a date.
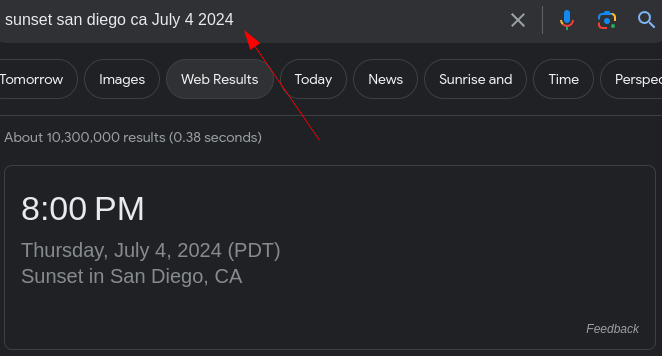
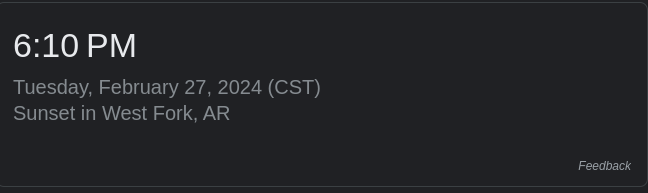
Time in any location
Type “Time In” followed by a location in the Google Search bar to see the current time.
Type just “Time In” to see the time in your current location.
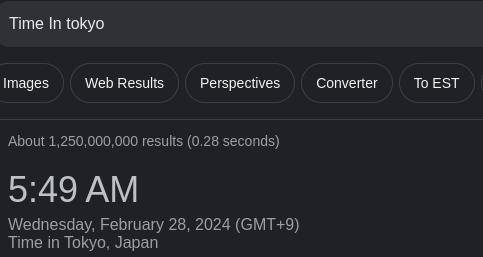

Coin Flip
Type “Coin Flip” in the Google Search bar.
This can be a fun and unbiased way to decide between two options.
Also handy when teaching probability.
Click Flip Again to repeat.

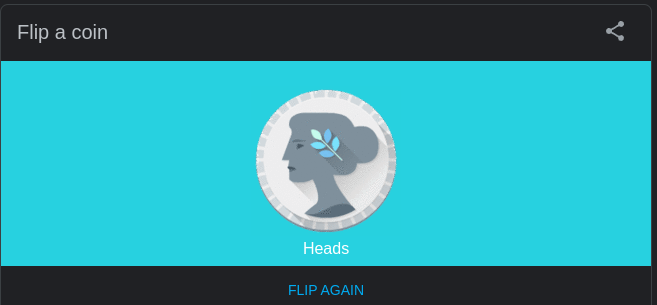
Spinner Wheel
Type “Google Spinner” in the Google Search bar.
This could be a creative way to call on students (or many other uses).
-
Click in the upper left corner to change the wheel size.
-
Click in the upper left to change the wheel to a fidget spinner.
-
Click Spin to spin again.


Roll Dice
Type “Roll Dice” in the Google Search bar.
This is handy for playing games or probability lessons.
-
Click on a die to remove it from the board.
-
Click a die type to add it to the board.
-
The total is displayed automatically. Use the plus/minus button to add/subtract from the total.
-
Click Roll to roll again.

Google Metronome
Type “Google Metronome” in the Google Search bar.
-
Click + or - to change the Beats Per Minute.
-
Click play to start the metronome.


Google Tuner
Type “Google Tuner” in the Google Search bar.
Click the microphone icon to begin.
It will display the musical note and if it is in tune.
Downloading Google Docs as PDF or DOCX
There are occasions when it is necessary to download a Google Doc in another format such as PDF or DOCX. This process is super simple. The same process works with Sheets (PDF or Excel) and Slides (PDF or PowerPoint). This is useful when sending an email attachment as a specific file type or when uploading a document to a web portal. For example, EES artifacts are easier to upload as a PDF.
With the Google Doc open:
-
Click On File
-
Click Download
-
Select the type of file to be downloaded. Typically either DOCX or PDF

-
Navigate to the download location of your choosing
-
Rename the document is you desire. Be sure to leave the file extension. (DOCX, PDF, etc.)
-
Click Save

Converting Microsoft Word Documents into Google Docs
Even though we are primarily a Google Docs school there are occasions when we receive Microsoft Word Documents (docx files). Thankfully it is quite simple to convert docx files to Google Docs files for editing, sharing, or printing.
There are two main scenarios for receiving docx files:
Scenario 1 - Email Attachment in docx format
Click for details
- In Gmail, click on the preview of the docx file. (Note: The W and docx indicate this is a Microsoft Word File.)

- When the preview opens, click on Open with and choose Google Docs

- The file will open in Google Docs and can be edited but is technically still in docx format. It is best to click File and Save as Google Docs.

Scenario 2 - Downloaded File in docx format
Click for more details
Double-clicking the downloaded file will typically either open the document in Libre Office or try to download the file again. To open the document in Google Docs:
- Open a blank Google Docs document. (as a shortcut open a new tab in Chrome and type docs.new)
- From the File Menu select Open

- Click the Upload tab and then click Browse
- Navigate to where the file was saved and double-click the file.

Google Docs will scan the file for viruses and then open it as a Google Doc.

The same processes work for Spreadsheets (Excel to Sheets) and Presentations (PowerPoint to Slides)
Airtame - Share a single window
Sometimes it is useful to present content using Airtame while using your computer screen for other tasks (entering grades, viewing notes, etc).
I’ll quote Airtame on this feature to sum it up…
“This feature allows you to share a selected window or application while simultaneously working/viewing presentation notes and other content on your computer.”
Up until now most of the teacher laptops had an outdated version of Airtame that only allowed sharing of the entire screen. You should be able to notice an additional button now for [Share window],

If you see this option, simply select the [Share window] button and select what you would like to have on the projector. If you aren’t sure how to open a separate window then you can visit this support article for instructions. To repeat the same instructions here, you will press [Ctrl] + [N] or click and drag a tab off of the current Google Chrome window.
Create Gmail Groups and Add Comments
If there is a group of people you contact regularly it makes sense to create a contact group in Gmail to save a few minutes.
To begin, log in to your school Gmail account.
Click on the waffle icon to the right of the screen and select Contacts.

Scroll down a bit to the Labels section and click the plus sign.
Create a name for the Group
There are several ways to add contacts to a group. Here is the method I prefer:
- Type in a name in the search bar and select the contact you want to add.
- Click the + Label Button
- Click the name of the group.
- Click Apply

Repeat this process until all members have been added to the group.
Return to Gmail. Compose a message and begin typing the name of the group. It will auto-populate and tell you how many recipients will be included.
Complete the message as desired and send normally.
Connect to the West fork Schools Network - For Students and Staff

West Fork Schools offers two options for connecting to Wi-Fi.
- For students and staff, this is the West Fork Schools Wi-Fi network.
- For guests to the district, it is the WFPS Guests network.
PLEASE NOTE: If you have already connected to the West Fork Schools network, you do NOT need to follow the steps below unless you wish to connect another device.
Guests
To get it out of the way quickly, the WFPS Guests network does not require a password, but it DOES require a one-time-use voucher code that guests must pick up from one of the offices. It is not for students or staff, and the access is HEAVILY restricted.
Students and Staff
Again, there are two options here.
- School-Owned Devices - Devices assigned to you by the district
- BYOD (Bring Your Own Device) for Personal Devices like phones, tablets, and laptops
School-Owned Devices
Click for more details
This is a ONE TIME setup. After you have connected your device, you will be good to go in the future.
Connecting School-Owned Macs and Windows Machines
If you have a school-owned Mac or Windows machine that connects with Wi-Fi, please follow the instructions for the BYOD devices. If you run into problems with permissions, please open a ticket.
Connecting School-Owned Chromebooks
School chromebooks should automatically connect ONCE THEY HAVE GAINED A WI-FI CONNECTION for long enough to download the new profile. For now, we recommend temporarily connecting to “Student.”
Connecting School-Owned Linux Devices
To start, make sure you are on some sort of wi-fi on campus. If you CAN NOT connect to any Wi-Fi, there is a backup option listed at the bottom of this page. You will know that you HAVE to use the backup method if you don’t have the ability to complete step 2 below.
Please Note: If you are NOT on campus, this will not work. Please wait until you can be on campus.
- Press your Windows key.

2.Type “wifi” in the search box. Click on “WF Wi-Fi Connect.” If you don’t see this option, then you will need to follow the backup plan at the bottom.

-
You will receive a popup box. Make sure you read it, then click “OK.”

-
In the next box, type in your SCHOOL EMAIL username and password. The program should be smart enough to remove the @wftigers.org part, but it is best if you just type the part of your username that comes before that.


-
IF YOU ARE A STAFF MEMBER, you will get the next box. Because of how your computers work, you have to also provide your computer password. Click “OK,” then enter your computer password in the next box. STUDENTS WILL NOT SEE THIS BOX!


-
In the top right corner of your screen, you will see three little dots under the Wi-Fi symbol. This means that the connection is attempting to happen.

-
If everything was typed correctly, you will then get a box letting you know that the connection was successful, and asks for you to click on “OK.” You should be able to verify with a solid Wi-Fi symbol, and by seeing “West Fork Schools” as the connected network.


-
If something went wrong, you will get a message prompting you to try again. Make sure you are providing your SCHOOL email and password when prompted and your COMPUTER password when prompted. If you STILL can’t get a successful result, try the backup option below.
Backup Option
The method presented below is just a fancy wrapper for doing it the manual way, but you have to have been on Wi-Fi to download it. Luckily, it isn’t terrible to do it manually.
Click for Backup Plan Instructions
-
Click the battery/sound indicator at the top right of your screen.

-
Click where it says “Wi-Fi Not Connected”

-
Click “Select Network”

-
Click “West Fork Schools”
-
You should now see a settings page pop up. There is a lot in here, so let’s make sure everything is set up correctly.
-
Make your settings match the ones in the screenshot below. Just make sure you use your username (the part before @wftigers.org) and your email password in the two bottom boxes.
-
Once you verify everything, you can click on “Connect.”
-
In the top right corner of your screen, you will see three little dots under the Wi-Fi symbol. This means that the connection is attempting to happen.
-
If everything was typed correctly, you will be able to verify with a solid Wi-Fi symbol, and by seeing “West Fork Schools” as the connected network.


BYOD Devices
There are several different options here. Device manufacturers make this complicated. Click on your device type, and follow those instructions.
iPhone/iPad
-
Scan this QR Code These codes will also be posted on your office doors, the tech office door, and at various locations around the building. You HAVE to use this code (or the direct link) for iOS and Mac devices because of the type of security being used on the network.
-
When you scan the code, you will see the page below. Press “Allow.”
-
Press on “Close,” then return to your homescreen.
-
Open the Settings app.
-
Very near the top of the Settings app, you will see “Profile Downloaded.” Press that.
-
Press on “Install.” This certificate is what the phone uses to verify he connection. We are using an unsigned certificate because they don’t have to be renewed, meaning that you don’t have to do this setup process all the time.
-
You will be prompted for your phone’s passcode. FaceID will not work here.
-
Press on “Install.”
-
You will be asked for your username. Enter the part of your email that comes BEFORE @wftigers.org.
-
Enter your school email password.
-
Press “Done.”
-
Press “General” at the top left to move back to your General Settings page.
-
Press “Settings” at the top left to move back to your settings page.
-
Press “Wi-Fi.”
-
Press “West Fork Schools.”
-
The spinning connection icon should show up beside “West Fork Schools.”
-
You should get the check letting you know your connection is successful.


Android
There are a LOT of different versions of Android. If you are an Android user, you are going to have to use the steps a little more loosely than an iPhone user would, but these steps should get you there.

- We need to start by installing the school certificate within Android. Open your internet browser. Optionally, you can skip this step and the next one if you scan the QR code for the Android certificates.


-
Visit https://tech.wftigers.org/wfschools.crt
-
Close the prompt to only install trusted certificates (if you get one)
-
Open your settings app.
-
Go to your Security settings.
-
Go to the Encryption & credentials section.
-
Tap either WLAN or Wi-Fi certificate.
-
Tap the wfschools.crt file
-
When asked to enter a name, enter WF Schools, then press ok.
-
Go to your network settings
-
Press “West Fork Schools”
-
For the Wi-Fi Settings, you need to set the following things…


-
EAP method or Authentication Type, or Phase 1 Authentication needs to be “TTLS or Tunneled TLS”
-
CA Certificate needs to be WF Schools (this is the certificate you just installed)
-
If you are asked for a phase 2 authentication type, use PAP.
*Online Certificate Status needs to be either Do not verify or request status. Require will not work.
- For Domain, type in the following line, exactly as it appears:
WF Schools
-
Enter the first part of your email for the identity or username (the part before @wftigers.org),
-
Enger your school email password in the password field.
- At this point, you should be able to connect. If you need help, stop by the tech office so that we can see your device.
Windows 11 Home or Pro
This is very similar to the Windows 10 instructions. There is just one extra piece of information you must provide.
-
Press the Windows key on your keyboard, or click on the Start button.

-
Type in “wifi,” then click the “Wi-Fi Settings” option that pops up.
-
Click on “Manage known networks.”
-
Click on “Add network.”
-
Start by typing “WestFork Schools” as the network name, and checking the "Connect automatically box.
-
Click on the “Open” security type, and change it to “WPA2-Enterprise AES,” then make your settings match the screenshot below. Make sure to use your own google username (without the @wftigers.org portion). Then click on “Save.”
-
You should get a notice at the bottom of your screen stating that action is required to continue connecting.

-
Click on the notifications area to get to your options.

-
Click the arrow to the right of the wi-fi symbol.

-
Click on “West Fork Schools” with the “Action needed” label.

-
Make sure the “Connect automatically” and click on “Connect.”

-
On the “Sign in” prompt, type in your username (the part BEFORE @wftigers.org) and you school google password. Then click on “OK.”

-
Click on the “Connect” button to confirm.

-
That’s it. You should get a message stating that you are connected and secured.


Windows 11 Enterprise or Education Laptops
While it pains me to admit it, this one is the easiest of them all. Windows 11 simply does not care about the type of security you have, so it is as simple as clicking on the network to join it.
When you are asked to authenticate, use the first part of your email (the part before @wftigers.org) for the username, and your email password for the password.
That’s it!
Windows 10 laptops
-
Press the Windows key, and type in “wifi.”
-
Click on the link that says “Manage known networks.”
-
Click on the “+ Add a new network” button.
-
This is the important part! Make your screen look EXACTLY like the image below.
-
In the username box, type in the first part of your email (the part before @wftigers.org), and type in your email password in the password box. Press “OK.”

-
You should now be prompted to “Continue connecting.” Click on “Connect.”


MacBook
For MacOS, you have to install a profile, similar to how you do on an iPhone. I’m going to use Safari, because it is installed by default.

-
In Safari, type https://tech.wftigers.org/wf-wifi.mobileconfig (or click this link) and hit enter.
-
This should open a page that has a bunch of random-looking text.
6 -
Click on the File menu, and choose “Save As…”
-
Leave the name alone, but choose where you want to save the file. I chose Downloads.

-
Go to where you saved the file.
-
Rename the file. You need to remove the “.xml” at the end, so it ends in “.mobileconfig”.
-
Click the “Use .mobileconfig” button

-
Double click the file.
-
You will get a notice in the top right letting you know that the profile is ready to install.

-
Open the system preferences (Click the Apple, then click on “System Preferences”). Then type “profiles” in the search box, then click on “Profiles” when it shows up. Note if you are using an older version of MacOS, there isn’t a search box, bot there is a button on the screen that says “Profiles.”
-
Click on the “West Fork Schools Wi-Fi” option.

-
Click on the “Install” button.

-
When asked if you are sure you want to install, click on the “Continue” button.

-
Enter your username (the first part of your email, before the @wftigers.org)

-
You will be asked to enter the password for your administrator user (this will probably be the same password you use to log in to your Mac).

-
You should now see that the profile is showing as “2 settings.”

-
Open your Wi-Fi connection menu.

-
Click on the “West Fork Schools” option to connect.


Chromebook
Sorry about the photos in this part. I can’t take screenshots before I log in. ![]()
-
From your login screen (you CAN do it while logged in, but it is MUCH better to do it on the login screen, so that you have access to the internet outside of your account) click on the time in the lower right corner.
-
Click on the network name of the account you are currently connected to. If you are disconnected, just click on the Wi-Fi symbol.
-
Choose “West Fork Schools.”
-
Make you settings match the 3 photos below, with the obvious replacement of my username and password with your own. Be sure that you don’t type the @wftigers portion of your email address, or it will not work. Then click on the “Connect” button.
-
“West Fork Schools” should now say “Connecting…”
-
You should now be connected, but you may verify that this is true by clicking on the clock. You should see the West Fork Schools Network as connected.


Accessing the Bitwarden Extension
Your school device has the Bitwarden extension installed within Edge, but wait!!! Before you type in your email, there is a setting you need to change. Click where it says "Accessing: bitwardent.com" as shown in the screenshot.
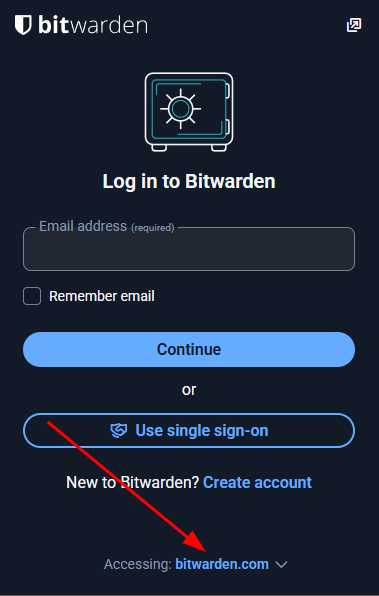
You need to change this to Self-hosted. That will bring up a window, and in the top box, labeled "Server URL," type in: https://bw.wftigers.org
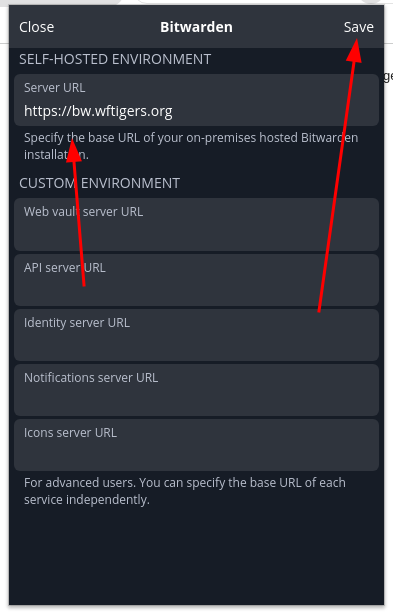
Then click on Save at the top.
You should then get a green confirmation notice at the bottom, and it should say Self-hosted under the email address box.

Now go ahead and type in your email address! I also click the "Remember email" checkbox.
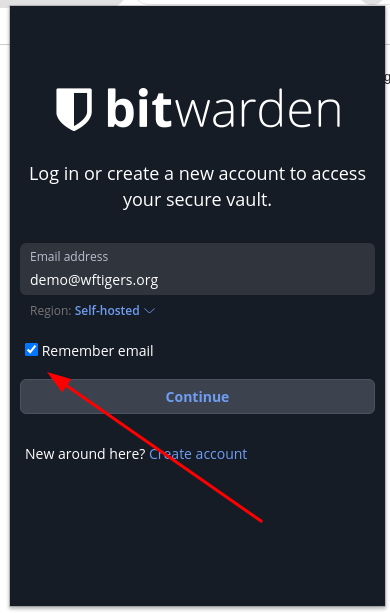
Then click on Continue.
On the next page, you need to click on the "Enterprise single sign-on" button. That will take you to a Google page (unless you are already logged in). Complete the Google authentication and any two-factor that is required.
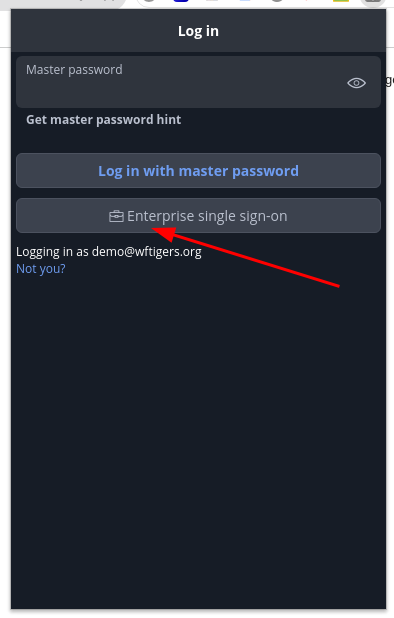
You will then get this screen:
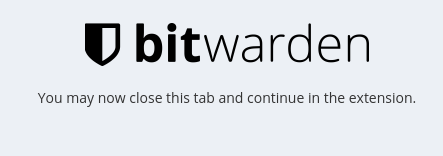
This just means you may now open the extension, and then type in your master password, and click on "Unlock"
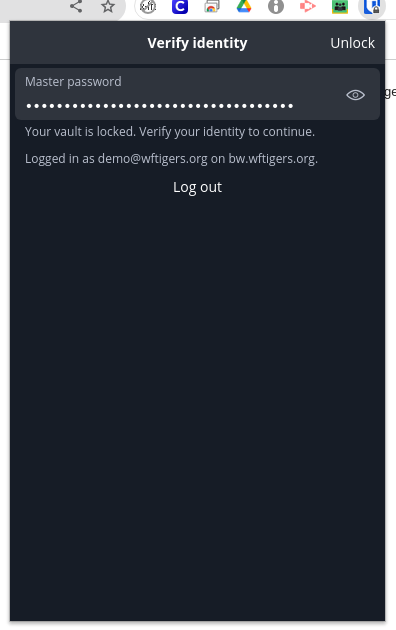
You will now be presented with your Bitwarden vault and other options.

Accessing eSchool, TAC, EAC, and eFinance from Off-Campus
~Updated 2026~
Accessing state resources from off-campus has changed to work with your school Microsoft account, the same account used to log into your school-provided laptop, your email, and other campus services. Because of this change, there is a workflow adjustment that must be made.
The old pop-up login does not work with Microsoft accounts, so you will have to perform a pre-authentication when you are working off-campus.
To access the login page, either visit https://proxy-login.wftigers.org or click on the "Off-Campus Access" button found in your new-tab page.
Once you go to this page, you will need to click on the "Sign in with Microsoft" button.
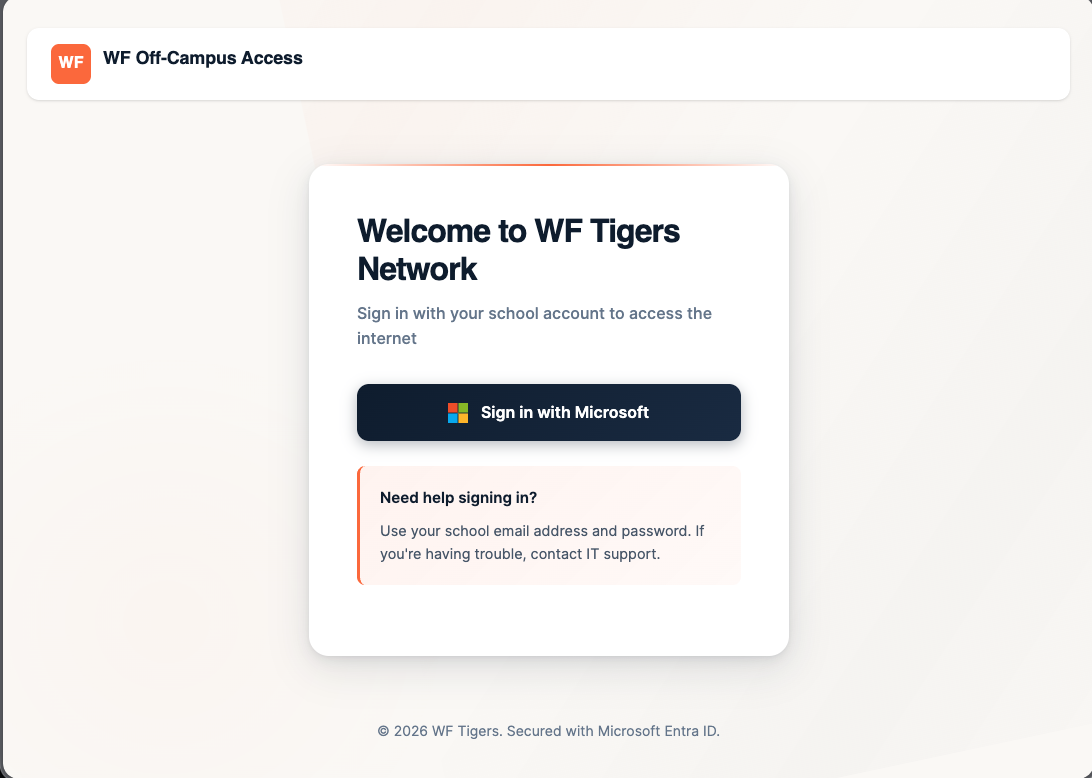
You will potentially have to verify your account permissions, but you should then see something similar to this success page:
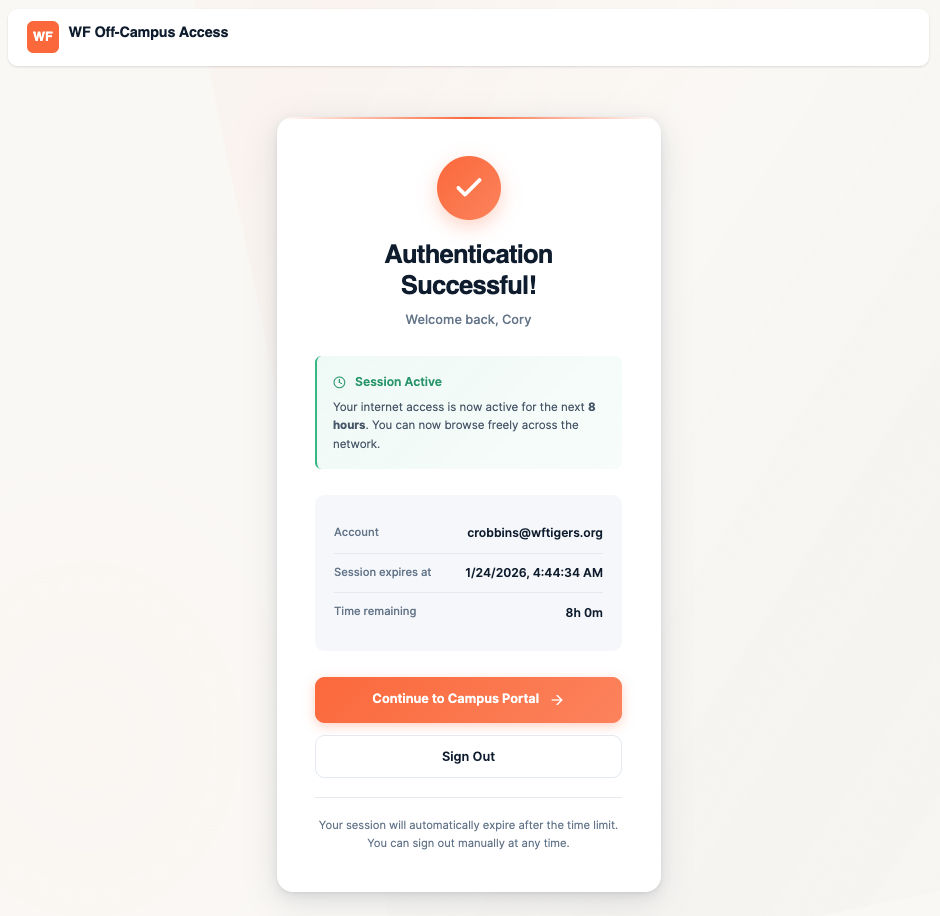
You will see that this shows an 8-hour session. To proceed, click on the "Continue to Campus Portal" button.
On the next page, you should see shortcuts for eSchool, eFinance, TAC, and Employee Access Center. From this point, you can click on any of the link cards, or you can use your normal bookmarks.
It isn't required that you sign out.
Please note: You will be able to use this method in any Chrome browser that you have synced your profile with. You can also use it on any school device within Edge.